PICKUP/DELIVERY Reserve
Reserve Order To-Go

Carne Seca (Brazilian Beef Jerky)

Shredded carne seca in a white bowl on tea towel

From the parma hams of Spain to the salted cod of Scandinavia, meat preservation has existed in cultures around the globe since ancient times. Prior to refrigeration, it was a crucial means of making food last longer by preventing spoilage from bacteria and other contaminants. In Brazil, a ration of dried beef was a staple for the gauchos, who required fast and shelf-stable ingredients while driving cattle across the country. Known simply as carne seca (“dried beef”), this Brazilian version of beef jerky remains popular both as a snack and an ingredient. Let’s take a closer look at the history of carne seca in Brazilian cuisine, how it is made, and how it differs from North American beef jerky. 

Carne Seca in Brazil

The first iterations of carne seca in South America were known as charqui, a Quechua term that referred to various types of meat, mostly llama, that were cut in thin strips and dried in the sun. “Charqui” is, in fact, where the word “jerky” comes from. 

There are variations of carne seca according to region. Beef has replaced llama as the most common type of carne seca, although other meats can be used. All Brazilian beef jerky recipes typically involve salt to draw out the moisture and speed the drying process. More or less salt is used depending on local tastes, and other seasonings may be added, such as pepper, and ground herbs. 

What Type of Beef is Used for Carne Seca?

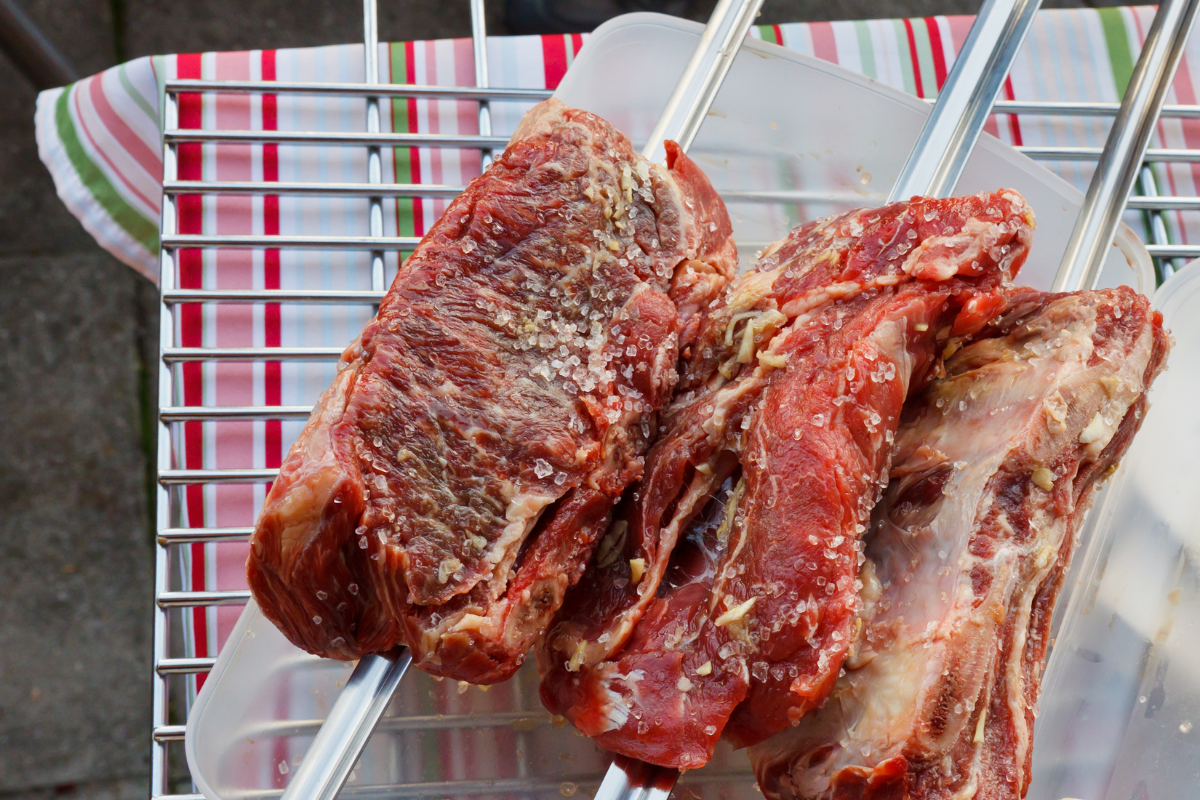
You can use any kind of beef you like to make homemade carne seca. However, it is best to use a leaner cut, such as a top round, bottom round, or flank steak. Picanha will also work beautifully, since the majority of its fat exists in a thick cap on top of very lean muscle. 

North American vs Brazilian Beef Jerky

While carne seca is, indeed, a kind of beef jerky, it has some key differences with its American counterpart. In the US, we think of beef jerky as bite-sized, fairly thick pieces of salted, dried beef that you eat with your hands on the go. The meat often has a smoky or peppery flavor, and is rarely used in cooking.

In Brazil, by contrast, carne seca is utilized predominantly as an ingredient in main courses, such as feijoada and arroz carreteiro. It is usually air dried, as opposed to American jerky, which can be smoked. Prior to using in a recipe, carne seca is typically rinsed to remove excess salt then rehydrated.

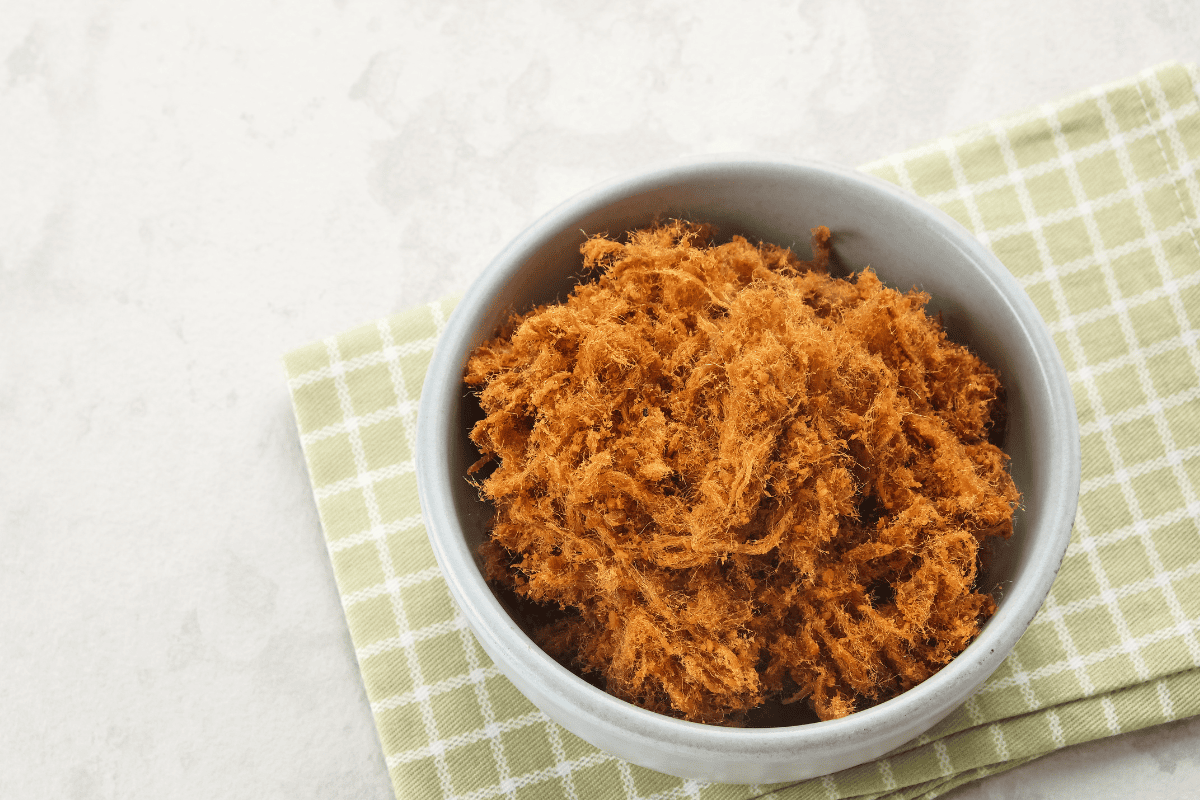
The appearance of Brazilian beef jerky is also different. It is often shredded finely, especially when accompanying a side of Brazilian rice and beans. This gives it a more satisfying texture that is much less chewy than larger pieces would be. 

Can You Make Carne Seca at Home?

Absolutely! To make carne seca at home, you basically need three ingredients: beef, salt, and sun. It is also best done in a fairly dry climate, since humidity will attract more pests (even with all that salt). Otherwise, you can use a dehydrator or a Biltong box (see below). 

Homemade Carne Seca Basic Recipe

1. Prepare the Beef

Trim excess fat away from your cut of beef. Then, place it on a baking sheet in the freezer for around 15 minutes until it is partially frozen. This will make it easier to slice into strips.

2. Cut the Beef

Cut the beef in very thin strips (3-4 mm) against the grain. If you have a friend at your local butcher’s, you could ask them to do this for you with the deli slicer and save you a lot of time.

3. Salt the Beef

For every 8 oz of beef you have, add 1 tablespoon of salt. Mix with your hands to be sure all the strips are evenly coated.

4. Cure the Beef

Cover your salted beef strips and refrigerate them for four hours. 

5. Dry the Beef

Now, for the drying. You have a couple options for this. You can be a real gaucho and attempt to sun-dry your beef by hanging it up somehow. A clothesline can come in handy for this method. Simply drape the thin strips over the meat and let the sun do the work. This will take several days and can most certainly invite pests, like birds and insects. Unless you are able to maintain fairly constant vigilance, we recommend either a dehydrator or a Biltong box. 

If using a dehydrator, you can go high and fast or low and slow. We prefer the low and slow method, which sets the dehydrator at 105 degrees Fahrenheit and slowly dries the meat over 20 hours or so. 

The Biltong box is closer to the traditional method, since it involves air drying; but it is protected from pests inside a box. The Biltong box is actually named after a kind of preserved meat eaten in South Africa. Buying one online can set you back a pretty penny, but if you are handy, you can make your own using stuff you probably already have around the house. 

The length of time for drying carne seca in a Biltong box will vary from a few days to a couple of weeks, depending on how thick you’ve cut it. With the thickness we recommended, however, it shouldn’t take longer than 72 hours. 

6. Shred the Beef

Brazilian beef jerky has a signature, shredded texture. This can be easily achieved by pulsing your carne seca in a food processor. Pulse in short bursts until your jerky achieves a fluffy, shredded appearance (kind of like the hairs on a coconut husk). 

Where to Buy Carne Seca?

If you want to save yourself the trouble and simply buy carne seca, it is easily done in the US. It is quite popular in northern Mexican cuisine; as such, many mercado’s will carry pre-packaged shredded beef jerky. You can also buy it online, if you are so inclined. 

If you are looking for a non-shredded version of carne seca that seamlessly blends American and Brazilian tastes, try Texas de Brazil’s all new line of beef jerky. Choose from smoky original or spicy, and indulge your taste buds in a truly delicious and dangerously snackable jerky. Visit our online market to order yours today. 

Chicken Milanesa (Crispy Breaded Chicken Cutlets)

Chicken milanesa with a lemon wedge and fried potatoes

When something is prepared “a milanesa” in Brazil, it generally means some kind of meat has been pounded thin, breaded, and fried crisp. Americans have similar recipes that use this technique, such as chicken fried steak and the borrowed German dish, schnitzel. Brazilians tend to favor poultry and beef over pork, so today we will be making chicken milanesa. Served simply with a squeeze of lemon or on top of a toasted brioche bun, chicken milanesa is an easy comfort food dish that is perfect for a busy weeknight meal. 

Why is it Called Chicken Milanesa?

In English, Chicken a Milanesa is known as “Milanese Chicken” or “Milan Chicken.” This is because the particular dredging and frying style has origins in Milan, Italy. Traditionally, veal was the meat of choice, but beef, pork, and chicken are also popular options. 

The Milanese method of preparing fried meat is a series of steps: 

  1. The meat is pounded thin to tenderize and allow it to cook quickly and evenly.
  2. The pounded cutlet is dredged in flour.
  3. The meat is dipped in a beaten egg mixture.
  4. The meat is dipped into seasoned breadcrumbs.
  5. The meat is pan-fried in oil until crisp and golden.

Vegetarian Milanese Chicken

Again, Milanese-style refers more to the dredging method and less to the actual protein used. This means you can easily substitute vegetarian options and fry them the same way you would chicken, beef, etc. 

Eggplant works well as a substitute, since it has a firm texture. You could also use firm tofu or tempeh; however, when using vegetables, soybean products, or other vegetarian options, skip the step where you pound it flat. You’ll just wind up with a crumbly or slimy mess that does not lend itself to dredging and frying. 

Sauce for Chicken Milanesa

Chicken Milanese is traditionally served with a lemon wedge. It is a refreshing way to cut through what might otherwise be a somewhat greasy dish. You can elevate that twist of citrus by incorporating lemon juice and a little zest in a creamy, tangy butter sauce:

Chicken Milanesa Lemon Garlic Cream Sauce

3 oz unsalted butter, cut into 1-inch pats
2 cloves garlic, minced
6 oz dry white wine
8 oz chicken stock
8 oz heavy cream
Juice of two lemons
1 tsp lemon zest
½ tsp salt (more to taste)
Freshly ground black pepper

Simply melt one pat of butter in a saucepan over medium heat. Saute the garlic until fragrant, then add in the wine, stock, heavy cream, salt, and a few twists of freshly ground black pepper. Bring to a boil and then lower to a high simmer. When the mixture has thickened, add in the remaining butter, lemon juice, and lemon zest. Stir until the butter is melted. 

Milanese Chicken Sandwich

If you want to use your breaded chicken a milanesa for a sandwich, do so by all means! Lightly toast a brioche or potato bun and spread a little mayo or aioli on it. Top the chicken with some fresh lettuce and a thick slice of tomato, and you’ve got a chicken sandwich to rival your favorite fast food place. 

Panko vs Italian Breadcrumbs for Milanese Chicken

As an Italian recipe, traditional chicken milanesa calls for Italian-style breadcrumbs. However, we like to incorporate a little panko as well for added crunch. Panko breadcrumbs are much larger than their finer, Italian counterparts; adding them thickens the crust a bit and makes it all the crispier.

Recipe for Chicken Milanesa

Ingredients:

Serves 4

4 chicken breast cutlets (around 6 oz each)
½  cup seasoned Italian breadcrumbs
½ cup panko
½ cup all purpose flour
1 oz freshly grated parmesan or pecorino cheese
2 large eggs
1 tsp lemon zest
Salt
Freshly ground black pepper
Vegetable oil

Directions:

  1. Pound the chicken cutlets to a thickness of about ¼”. An easy way to do this is to place one on a cutting board, cover it with cling film, and pound with a meat tenderizer. Season each cutlet with salt and pepper.
  2. Set up your chicken milanesa dredging station: put the breadcrumbs, lemon zest, and parmesan cheese in one shallow bowl and mix to combine; put the eggs in another bowl and whisk thoroughly; finally, put the flour into another shallow dish and season lightly with salt and pepper. Mix to combine.
  3. Put around one cup of vegetable oil in a heavy skillet and heat over medium high heat. To see if it is ready, toss a few breadcrumbs in. If they sizzle right away, the oil is hot enough. The oil should be shimmering, not smoking. If this is the case, remove it from the heat and let it cool down a little.
  4. Take one of your chicken cutlets and coat it with the flour mixture. Shake it to remove any excess, then dip it into the egg mixture. Let any extra egg drip off before finally coating the chicken in the breadcrumb and cheese mixture. Repeat this process with each of your cutlets.
  5. Fry the cutlets in the oil until they are crisp and golden brown (about 3 minutes per side). Transfer them to a baking sheet lined with paper towels to drain any excess oil. 
  6. Serve your beautiful chicken milanesa with a fresh lemon wedge or with your lemon garlic cream sauce (see above). Enjoy!

More Great Brazilian Recipes to Try:


Smoked Mac n Cheese (Maccaronada com Requeijao)

smoked Brazilian mac n cheese with penne noodles

Smoked Pasta with Brazilian Cream Cheese

When it comes to comfort food, few dishes rival good, old-fashioned mac n cheese. Creamy, gooey, and flavorful, it is a perfect meal on its own, and a glorious accompaniment to churrasco. If you thought you couldn’t elevate  this staple dish, any further, prepare to be amazed:mac n cheese can be smoked right along with your favorite proteins. The smoke adds a whole new element to an already flavor-packed and decadent pasta dish. What’s more, it’s easy! Read on for a fabulous recipe for smoked mac n cheese. We have a feeling you won’t be going back to baked any time soon. 

Mac n Cheese in Brazil

Brazilians love cheese, so it’s no surprise that mac n cheese is nearly as popular there as it is here in the US. Of course, there are a few distinctly Brazilian ingredients that set the dish apart from its American cousin. The cheeses are a couple of national favorites you’ll find in nearly every dish that calls for dairy: mozzarella and requeijao. These milder cheeses are ideal when making a smoked mac n cheese, since the flavors won’t overpower that smoky element. 

Brazilian mac n cheese is also typically made with penne, not elbow macaroni. The grooves in penne allow the creamy sauce to fully coat each noodle, and the bigger size keeps the noodles a little more separated than in traditional mac n cheese. This is definitely more of a pasta than a casserole, although Brazilians don’t shy away from baked dishes either. 

Finally, our smoked Brazilian mac n cheese incorporates a little tomato goodness. Topped with parmesan cheese, the final product has an italian flare not dissimilar to baked ziti, but far creamier. 

Can You Freeze Smoked Mac n Cheese

Sure. Frozen smoked mac n cheese will keep for up to six weeks in your freezer. For best results, defrost or fully thaw the mixture before re-heating. This allows the sauce to melt evenly. You may need to add a little fresh cream to smooth out lumps that may have formed while freezing. 

Cheese Substitutes for Mac n Cheese

Requeijao is not commonly found in stores in the US. Luckily, you can easily make homemade Brazilian cream cheese. If this is a little more effort than you’d like, you can substitute American cream cheese. 

We are sticking with mozzarella cheese for our smoked mac n cheese. However, there are a few different cheeses that would be very well suited to a little smoke flavor: gouda, provolone, havarti, or, of course, cheddar. 

What Wood Chips for Smoked Mac n Cheese?

Mild wood chips are best for a good, but not overwhelming, smoke flavor. Try cherry, pecan, or applewood chips. 

Recipe for Smoked Mac n Cheese (Maccaroneda com Requeijao)

Ingredients: 

1 lb dried penne (16 oz)
1 onion, finely chopped
2 cloves of garlic, minced
Extra virgin olive oil
1 cup tomato sauce
1 cup heavy cream or whole milk
1 cup requeijão (Brazilian cream cheese)
1 cup shredded mozzarella cheese
1 oz shredded or grated parmesan cheese
Salt and pepper to taste
Fresh parsley, chopped (for garnish)

Directions:

  1. Preheat your smoker to 225 degrees Fahrenheit.
  2. Bring a large pot of salted water to a rolling boil. Add in the penne and cook until al-dente. Strain and toss with a little olive oil. Reserve ¼ cup or so of the pasta water. 
  3. While the pasta cooks, heat a large, heat-safe skillet over medium heat (cast iron works well).
  4. Add in a drizzle of extra virgin olive oil. Saute the onion until translucent. Then add in the garlic and cook for a further 30 seconds, just until fragrant. 
  5. Add in tomato sauce and a splash of the reserved pasta water. Add a few twists of freshly ground black pepper and kosher salt (we used 1.5 tsp). Bring the mixture to a high simmer, then reduce to medium, cover and cook until it has thickened (around 5 minutes).
  6. Now, stir in the heavy cream. Heat the mixture to a boil, then remove from the heat.
  7. Add in your mozzarella cheese and cream cheese, stirring constantly off the heat until all the cheese is melted. 
  8. When the sauce has come together, pour in the penne noodles and stir until evenly coated. 
  9. Top the smoked mac n cheese with the shredded parmesan cheese.
  10. Transfer the pan to the smoker and “bake” for 45 minutes to one hour. Keep an eye on the mixture so it doesn’t dry out. 
  11. Top finished smoked mac n cheese with fresh parsley. Enjoy!

More Great Brazilian Recipes to Try:


Pastel de Queijo (Brazilian Cheese Pastry)

pastel de queijo on a serving platter with dipping sauce

Pastels are a favorite street food in Brazil. They are essentially a hand pie, and can be stuffed with all sorts of delicious fillings, both savory and sweet. Today, we are opting for simplicity and making pastel de queijo. Mild and gooey cheese is encased in a crisp, fried crust for a truly decadent and satisfying treat. 

Where Does Pastel de Queijo Come From?

The exact origin of pastels in Brazil is not known. However, many attribute the first recipes to Chinese immigrants. This is due to the similarity between the pastel’s crust and a fried spring roll wrapper. It is thought that Chinese Brazilians adapted their spring roll recipes to suit different tastes, substituting traditional fillings with local ingredients. 

Another theory suggests that Japanese immigrants were the first to popularize pastels. During WWII, prejudice against Japanese immigrants grew immensely due to the country’s alliance with Germany. In order to escape persecution, many Japanese Brazilians posed as Chinese, adopting clothing and traditions to disguise their true heritage. Making food with typically Chinese ingredients may have been another way to maintain this facade. 

Whatever the history, pastels have become an integral part of Brazilian fast food cuisine. The fillings reflect regional tastes: shrimp and cod are popular in Bahia, while São Paulans favor ground meats. Other common fillings include heart of palm, shredded chicken, requeijao, and, of course, cheese. 

What Kind of Cheese is Best for Pastels?

Traditional pastel de queijo uses a mild cheese, like mozzarella or Minas cheese; but you can use any kind of cheese you like, so long as it is suitably melty. Whatever you might use for a fondue, you can use for a pastel de queijo: 

  • Gruyere 
  • Emmental
  • Cheddar
  • Gouda
  • Havarti
  • Provolone

Feel free to use a blend of your favorites as well. We are sticking with mozzarella and a little aged white cheddar today, but the sky’s the limit for your cheesy filling. 

Tips for the Perfect Pastel de Queijo Crust

The crust is very important for pastels: you want a crisp, crunchy texture that is thick enough to hold in all that cheesy goodness, but not so thick it’s hard to eat. Your crust should also have bubbles (remember the spring roll wrapper relationship?). 

The bubbles in your pastel de queijo crust are achieved via two key ingredients: alcohol and vinegar. Traditional Brazilian pastels use cachaca for the alcohol, but you can substitute any grain alcohol (rum, vodka, etc.). The alcohol does not impart much taste, as it cooks off during frying. It is simply a means of attaining that light, bubbly crust. 

Another important step in ensuring the best crust for your pastel de queijo is letting the dough rest. As with other pastry dough, this allows the gluten in the flour to relax. If you attempt to roll out and cut the dough without resting it, your crust will be tough.

Pastel Dipping Sauce

Pastel de queijo is sometimes served with hot sauce. You can certainly do this with yours, especially if you like heat. We like to pair ours with a little hot honey. In a microwave-safe container, mix half a cup of liquid honey with a tablespoon of red chili flakes (more, if you want spicier). Add in a tablespoon of apple cider vinegar and stir to combine. Heat the mixture in the microwave for two fifteen-second bursts. Let the mixture sit for a few minutes to allow the chili flakes to infuse, then strain them out. Voila!

Freezing Pastel de Queijo

You can easily prepare pastels ahead of time and freeze them until ready to use. Assemble them as you would right before frying, then place them on a baking tray and put them in the freezer. When they have hardened, transfer the pasteis to an airtight container (you may want to wrap them individually in parchment to prevent sticking). The frozen pastel de queijo will keep for up to 4 months. When you are ready to use them, fry them as you would below, keeping in mind you may need a little extra frying time. 

Recipe for Pastel de Queijo (Brazilian Cheese Pastries)

Ingredients:

For the Crust

3.5 cups flour (all purpose)
1 egg
¾ tbsp salt
1 cup cold water
1 oz canola or vegetable oil
1 tsp apple cider vinegar
1 oz grain alcohol (cachaca, rum, vodka, etc.)
Oil for frying

For the Filling

4 oz mozzarella cheese, cubed
4 oz aged white cheddar cheese, cubed

Directions:

  1. In a large bowl, combine the all purpose flour and salt. Add in the egg, water, vinegar, alcohol, and vegetable oil and mix until the dough starts to come together.
  2. Once you have a soft and pliable dough, knead it on a clean surface for about five minutes until it becomes smooth and elastic. Return the dough to the bowl and cover it with a damp cloth. Let the dough rest for 15-30 minutes.
  3. After the resting period, divide the dough into smaller portions (about the size of a large marble) and roll each portion into a thin, circular disk. You want around 3-4 inches in diameter. Repeat this process for the remaining dough. 
  4. Place 1 cube of each type of cheese in the center of each disc. Fold the dough over the cheese to form a half moon shape. Press the edges firmly to seal the pastel, using a fork to crimp the edges.
  5. In a large frying pan, add enough oil to cover the pasteis de queijo. Heat the oil to 350 degrees Fahrenheit (175 degrees Celsius). To check if the oil is ready, drop a small piece of dough into the oil. If it sizzles and quickly rises to the top, the oil is ready.
  6. Carefully slide the pastel de queijo into the oil and fry until golden brown on both sides, flipping once during the process. Fry in batches and avoid overcrowding the pan. It usually takes about 3-4 minutes per side, but keep an eye on them to prevent burning.
  7. Once done, remove the pastels from the oil using a slotted spoon and transfer them to a paper towel-lined plate to drain excess oil.
  8. Let the pasteis cool for a few minutes then serve with your hot honey dipping sauce or with a squeeze of lime juice. Enjoy!

More Great Brazilian Recipes to Try:


Brazilian Coconut Cocktail (Batida de Coco)

Brazilian coconut cocktail with straw, mini umbrella, and lime wedges

Coconut features heavily in much of traditional Brazilian cuisine. This is especially true in the north and northeastern regions of the country, which account for more than 80 percent of the country’s entire crop. You can find coconut milk enriching soups and stews, added to desserts, and of course, blended into drinks. Today’s recipe is a refreshing coconut cocktail called a batida de coco. Creamy, frothy, and incredibly simple to make, we’re certain you’ll be adding this to your list of poolside cocktails. 

Shaken Drinks in Brazil

For many of us, fruity adult beverages mean blended beverages: pina coladas, blended margaritas, daiquiris, and even frozen wine cocktails are a favorite in America. But Brazilians tend to favor shaken and muddled drinks over blended ones. The word batida itself means “shaken” in Portuguese. 

While today’s coconut cocktail recipe does involve a blender, it is merely to incorporate the liquid ingredients and produce a frothy texture and appearance. The ice will remain separate. If you wish, however, you can blend the ice with the other ingredients to make a blended version. 

Cachaça Substitutes for Batida de Coco

Your Brazilian coconut cocktail wouldn’t truly be Brazilian without a key ingredient: cachaca. Cachaca is the national liquor of Brazil. It is strictly regulated and, like rum, can be produced in light or dark varieties. Unlike rum, however, cachaca is made from fresh sugarcane juice that has been fermented. Rum is also derived from sugar, but it is made from the by-products of boiling it (namely, molasses). 

Cachaca has become more popular outside of Brazil in the last few years, so you shouldn’t have any trouble finding it at a larger liquor store. If you simply cannot find it, though, you can substitute a spiced rum or vodka. It may not be authentic, but you will still be getting a taste of Brazil with the coconut and condensed milk flavors. 

How to Choose Cachaca?

Again, cachaca is gaining in popularity, so you may be able to find several varieties at your local bottle shop. Cachaca may be consumed young or aged, light or dark. So what makes a good cachaca? In general, you want to look for small batch cachaca that has been pot distilled. Column distilled cachaca is mass produced and will lack depth of flavor. 

In terms of age, this will be your preference. Younger cachaca will retain some of the grassy, bright flavors of the sugarcane, while older varieties will incorporate the flavor of the wooden barrels in which they were aged. This can lend a smoky layer that you may or may not like. 

When it comes to a coconut cocktail, we tend to find that a semi-aged, small batch cachaca adds both a level of brightness and sophistication to an otherwise heavy drink. But again, you can customize this ingredient to suit your own palette.

Related: How to Make a Caipirinha

Coconut Cocktail Recipe from Brazil (Batada de Coco)

Makes eight 8 oz cocktails

Ingredients:

8 oz cachaca, rum, or vodka
2 cups coconut milk
2 cups coconut water
20 oz of sweetened condensed milk (more or less to taste)
Ice cubes

Directions:

  1. Fill a large pitcher with ice and pre-chill serving glasses in the freezer.
  2. Put all ingredients except for the ice in the belly of a blender. Blend or pulse until the mixture is frothy and uniform.
  3. Pour the mixture over the ice in the pitcher. If any of the ice has melted during blending, replace it with fresh ice.
  4. Fill the chilled glasses to the brim and garnish with fresh grated coconut and lime rounds. Enjoy responsibly! 

More Great Brazilian Drinks  to Try:

Cookout Food Brazilian Style

Family around grill for cookout

With warmer temperatures approaching, many of us are itching to get cookout season going. In the US, this typically means brats, burgers, hot dogs, and cold salads. But in Brazil, it’s a whole different ball game. If you’re looking for something new to try at your next barbecue, take a look at this list of unique and delicious cookout ideas. We’ve rounded up some of our very favorite recipes to elevate your cookout food to a new level. 

Unique Cookout Food Ideas from Brazil

Grilled Cheese Skewers

If you’re looking for a truly delicious and unique cookout food, consider grilled cheese.There is nothing simpler yet more decadent than a smokey, charred piece of gooey cheese on a stick. That’s exactly what these espetinhos de queijo are: thick pieces of paneer cheese, brushed with olive oil, seasoned with salt, and grilled on medium high heat for a few minutes on each side. Each slice is skewered with a pre-soaked bamboo stick for the perfect grab and go treat: crisp and smokey on the outside, and melty goodness on the inside. Get the full recipe for Brazilian grilled cheese skewers

Brazilian Potato Salad

Potato salad is a cookout food staple. Brazilian potato salad is similar to the American version, but somewhat lighter. It omits the boiled eggs, pickles, onions, and other ingredients in favor of a simple mixture of potatoes, mayonnaise, and sweet shredded carrots. Garnished with fresh parsley, it is a perfect accompaniment to any grilled meat. Get the full Brazilian potato salad recipe. 

Grilled Pineapple Slices

Another fun cookout food idea that couldn’t be simpler: grilled pineapple slices. Brushed with melted butter, brown sugar, and cinnamon, these slices are lightly charged over the grill until they form a delectable, caramelized crust. They taste amazing on their own, but we are sure no one would complain if they were served alongside a scoop of vanilla ice cream or as a garnish on a refreshing espanhola

Grilled Tomahawk Steak

If you’re looking to truly impress your guests, the ribeye is the king of cookout food. As one of the more expensive cuts of meat, it is essential that it is cooked correctly to get your money’s worth. Luckily, all it takes is a little simple seasoning and monitoring to achieve superb results. The most important steps include: bringing your tomahawks to room temperature, searing on high then moving to indirect heat, allowing the meat to rest for at least fifteen minutes, and slicing against the grain. Voila! Perfect, grilled tomahawk steak at home

Gourmet Brazilian Pasta Salad

Nothing says “cookout” like pasta salad. Brazilians call cold noodle salad “macarronese,” since it is traditionally made with macaroni. Our preferred recipe subs in fusilli for the macaroni to allow the flavorful bacon and dijon dressing to coat every nook and cranny. Add in fresh and surprising ingredients, like shredded carrots, fresh tomatoes, and sweet peas, and you have a gourmet Brazilian pasta salad

Feijoada with Farofa

Instead of the standard baked beans, try this Brazilian take: black beans slowly simmered in a flavorful broth with short ribs, bacon, and sausage. Topped with crispy farofa, feijoada is easily enjoyed as a main course or alongside your favorite cooked meat. 

Brazilian Lemonade

Actually a limeade, limonada suiça is sweet, tart, and refreshing. It is delicious chilled or blended with ice, and is also a fantastic mixer for something a little stronger (rum or cachaca, anyone?). 

Your Next Cookout: Delivered

The best cookout food starts with the best quality ingredients. Skip the supermarket and visit Texas de Brazil’s online Butcher Shop to get premium cuts of beef, lamb, pork, chicken, and more delivered right to your door. Purchase a la carte or a specially curated box and get ready to enjoy the ultimate at-home barbecue experience. 

Feijão Tropeiro

Brazilian Black Bean Stew with Collards and Sausage

Brazilian feijao tropeiro in white casserole dish

Feijao tropeiro is one of Brazil’s most popular dishes. A hearty stew of black beans, spicy sausage, and collard greens, it is something of a mixture between feijoada and caldo verde. Like American hash, feijao tropeiro has traditionally been a way to use up leftovers, making it a simple and economical dish. Of course, you don’t have to use leftovers. This stew is plenty delicious to warrant fresh ingredients as well!

Where Does Feijao Tropeiro Come From?

Feijao tropeiro is known in English as “cattleman’s stew.” This is because it originated among the tropeiro: cattle drivers of 17th century Brazil. Long months of travel necessitated foodstuffs that would not spoil: dried beans, cured meats, and cassava flour. The cattleman combined all three into a simple but satisfying dish that became known as feijao tropeiro (“feijao” means “beans”).

Today, feijao tropeiro incorporates fresh ingredients, like collards, and adds sausage and other meats. Contemporary Brazilians also like to put crispy pork rinds (“torresmos”) on top for added crunch and comfort.  

You can customize your feijao tropeiro with anything you like; but to remain authentic, you must start with the three traditional requirements: meat, beans, and cassava flour. 

Brazilian Sausage Substitute

Our feijao tropeiro recipe today calls for calabresa linguica sausage, a distinctly Brazilian cured meat that is both zesty and sweet. It can easily be purchased online through Texas de Brazil’s Butcher Shop; however, you can also use smoky kielbasa or chorizo. 

Where to Find Manioc Flour

Manioc flour is also known as cassava flour. It can be found in most specialty grocery stores, and even in some mainstream ones. If you cannot find cassava flour, you can substitute tapioca starch. Both are made from the yuca root, but manioc contains more fiber than tapioca starch. Keep this in mind, since it will contribute to the final texture of the feijao tropero. 

Dried vs Canned Beans for Cattleman’s Stew

Traditional Brazilian feijao tropeiro calls for dried pinto beans. Presumably, they have already been soaked and used in another dish, since the stew is usually made with leftovers. That being said, you can just as easily use canned pintos for convenience. Any foodie will tell you that the flavors will never be as good as with dried beans, but this is hash for cowboys-no time to get snobby. 

Feijão Tropeiro Recipe

Ingredients:

1 lb pinto beans, soaked and cooked (or 1 can pinto beans)
1 lb Braziliain sausage, cut into ½” slices
½ lb bacon, diced
1 medium yellow onion, chopped
4 cloves of garlic, minced
8 oz cassava flour
1 large bunch of collard greens, cut chiffonade style
4 large eggs
1 tsp salt (more to taste)
Freshly ground black pepper
Extra virgin olive oil
One 4 oz packet of pork rinds/chicharrones 

Directions:

  1. Heat a skillet over medium and fry the bacon until crispy. Remove it from the pan and strain it on a paper towel. 
  2. Discard the bacon fat and put a drizzle of olive oil in the same pan you used to cook the bacon. Brown the sausage for a minute or two and set it aside with the bacon.
  3. Add another drizzle of oil to the pan and saute the onions until they are fragrant and translucent (about 2 minutes). Add in your salt and pepper.
  4. Add in your garlic and pinto beans and cook for a few minutes more. 
  5. Stir in the sausage, bacon, and strips of collard greens. 
  6. Add the cassava flour a little bit at a time, until it is toasty and well-incorporated. 
  7. Reduce the heat to low and heat another skillet over medium heat.
  8. Add a drizzle of olive oil, and crack your eggs into the skillet. Fry them sunny side up, then put them on top of the feijao tropeiro mixture. 
  9. Serve immediately garnished with the crispy pork rinds and some fresh parsley or cilantro. A little hot sauce wouldn’t go amiss, either. 

More Great Brazilian Recipes to Try:

Rabanada

Brazilian rabanada dessert stacked in a pyramid with Christmas ornaments

Brazilian French Toast

Rabanada is a deep fried version of French toast that is traditionally served at Christmas in Brazil. That being said, there is certainly nothing wrong with enjoying it year round! Crusty baguette is soaked in a sweet custard, deep fried in oil, then rolled in cinnamon sugar. Trust us, no syrup is necessary for this delectable treat. Rabanada can also be eaten any time of day. In Brazil, it is not necessarily a breakfast item, but more often acts as a dessert treat on special occasions. 

Rabanada from Portugal

Rabanada has its origins in medieval Portugal. The recipe was both a way to abstain from meat during lent and also to make use of stale bread. Portuguese colonists brought the recipe with them to Brazil, where it became a staple item on the Christmas table. Rabanada is traditionally eaten as a dessert, often paired with a small glass of port wine. 

The earliest versions of rabanada were likely made with fresh milk in place of sweetened, condensed milk. There are versions of rabanada from all over the world, with the oldest known reference dating back to 1 BCE. A Roman recipe for aliter dulcia (“another sweet dish”) instructs the cook to soak bread in milk and beaten eggs, fry in oil, and drizzle with honey.

The most famous version is, of course, French toast, which is known as pain perdu in France. This translates to “lost bread,” which is a nod to the usefulness of the recipe in preserving bread that would have otherwise been “lost” due to staleness. 

In many Balkan countries, prženice is a version of rabanada that can be sweet or savory. You can find the dish served with various meats and cheeses, as well as fruit preserves and ajvar, a condiment made from peppers and eggplant. 

Rabanada vs American French Toast

Rabanada has a few significant differences when compared to American French toast. The first is the type of bread used. American French toast favors thick sliced, soft white bread, such as challa, sourdough, or brioche. Most recipes agree it is best to use bread that is at least one day old. Rabanada uses crusty French bread or baguette that has also been out for no more than 24 hours. Using a baguette is preferable since the slices are smaller, making them more manageable for the fryer. 

The custard of rabanada is also different. American French toast uses a mixture of eggs, sugar/honey, cream or milk, and perhaps some cinnamon or nutmeg. Rabanada adds sweetened condensed milk to the custard for an even more decadent taste and creamier inner texture. The mixture is warmed over medium heat, and the eggs are kept separate, used only to briefly coat the bread before deep frying. 

American French toast is usually pan fried in butter or oil, then served with maple syrup or preserves. By contrast, rabanada is deep fried in oil, then rolled in cinnamon and sugar. You can drizzle honey on it if you desire, but it is plenty sweet on its own. 

Rabanada Recipe

Ingredients:

1 loaf of day-old baguette (white, wheat, or sourdough), cut into one-inch slices
3 cups of milk or cream
3 large eggs
2 tablespoons vanilla extract or port wine
½ tsp salt
2 cinnamon sticks
½ cup sweetened condensed milk
Vegetable oil for frying

For the Rabanada Coating:

1 cup of granulated sugar
1.5 tablespoons ground cinnamon

Directions:

  1. In a small saucepan, whisk together the milk or cream, salt, condensed milk, and cinnamon sticks.
  2. Heat the mixture over medium low heat until you reach a simmer. Then remove it from the heat and allow it to cool. When it is cool, remove the cinnamon sticks and add the port or vanilla extract.
  3. In a bowl, whisk the eggs together.
  4. Heat the oil in a deep fryer or large pot to a temperature of 365 degrees fahrenheit.
  5. Prepare a plate or bowl with your mixture of cinnamon and sugar.
  6. Soak the slices of bread in the milk mixture for a few seconds on each side. Then coat each slice in the egg mixture.
  7. Fry the sliced rabanada bread in the hot oil until golden brown. Roll each piece in the cinnamon sugar, then transfer to a wire wrack or a tray lined with parchment. Serve immediately with hot coffee or a glass of port. 

More Great Brazilian Recipes to Try:


Cornstarch Cookies

Chocolate Coconut Cornstarch Cookies (Sequilhos)

Sequilhos are a popular cookie in Brazil made with cornstarch in lieu of wheat flour. Like many Brazilian desserts, they also incorporate condensed milk. The traditional recipe uses just four simple ingredients. We are going to have a little fun and add some shredded coconut and melted chocolate for flavors similar to a Belgian macaroon. These cornstarch cookies are the perfect accompaniment to an afternoon cup of tea or coffee; and, thanks to their omission of flour, they happen to be naturally gluten free!

What Does Cornstarch Do in a Cookie Recipe?

Wheat flour has gluten, which can become tough and chewy if over mixed. By contrast, the use of cornstarch results in a tender, melt-in-your-mouth texture. It is crumbly, not chewy or snappy. The addition of condensed milk and butter adds to the silky mouthfeel. 

Can I Use Tapioca in Place of Cornstarch in a Recipe?

These days, many individuals are concerned about the use of genetically modified versions of popular foods like corn. If this is a concern of yours, you can look for cornstarch that is certified non-GMO, or substitute another vegan flour, such as tapioca. As a thickener, tapioca flour is more efficient than cornstarch. In other words, if you were using it in a sauce or soup, you would need to add about half as much as you would cornstarch. 

In the case of our sequilhos, however, you can substitute an equal amount of tapioca flour. We are merely using it as an absorbing agent to create a dough, so it is not necessary to calculate different amounts. 

Do Cornstarch Cookies Need to Be Flattened?

Yes. Traditional Sequilhos cornstarch cookies are pressed down once with the back of a fork. Since the dough is dense, this helps the cookies cook evenly and in a uniform, disc shape. If you want, you can press the dough down twice with the fork to mimic the look of American peanut butter cookies. 

Can I Use Sugar in Place of Condensed Milk?

Yes, but you may need to experiment with the amount of cornstarch you add. This will also affect the number of cookies you can make. Because you will be reducing the amount of liquid overall, you will likely need to either use less cornstarch or add a little more liquid in the form of water, milk, or cream. The ultimate consistency should be thick enough to roll with your bare hands. Experiment with various amounts to achieve the right texture. 

Recipe Cornstarch Cookies With Coconut and Chocolate (Sequilhos)

Ingredients:

2.5 cups cornstarch
6 oz unsalted butter, softened to room temperature
½ cup sweetened condensed milk
1 cup of sweetened, shredded coconut
1 cup semisweet chocolate chips

Directions:

  1. Preheat the oven to 350 degrees Fahrenheit. 
  2. Mix together the softened butter and condensed milk.
  3. Add in the cornstarch a half a cup at a time, thoroughly combining each time. Keep in mind that you might not need to add all of the cornstarch. If the dough is thick but not crumbly, you have the right texture. If it is too sticky, add more corn starch. 
  4. Add in 2 tablespoons of the shredded coconut and mix.
  5. Chill the dough for 30 minutes.
  6. Remove the dough from the fridge, and roll it into 1 inch balls. Roll each ball in the shredded coconut, then place on a lined baking sheet a couple inches apart.
  7. Flatten each of the balls by pressing down with the back of a fork. They should be about ½ inch in height. 
  8. Bake for 15-20 minutes until the edges just start to brown. 
  9. Cool cookies on a wire rack for at least ten minutes before you make your chocolate drizzle.
  10. In a microwave safe bowl, add the semisweet chocolate chips. Microwave on high for thirty second bursts, stirring after each round. Repeat until the chocolate is completely melted.
  11. Dip each of your cookies on one side into the melted chocolate. Return them to the wire rack to cool. Alternately, use a spoon to drizzle chocolate over the top of the cornstarch cookies.  

More Delicious Brazilian Recipes to Try:

When Can I Start Grilling?

The Start of Grilling Season and How You Should Prep

churrasco style grilling

Many of us associate grilling with the hot summer months. Labor Day, for example, seems to be the unofficial marker of grilling season. But if you ask us, the time to grill is whenever you want! Firing up the grill in the cooler Spring temperatures or even in the snow can be a much more pleasant experience than laboring over coals in the summer heat. Read our tips for when to start grilling, how to prep, and what you should be cooking. 

Can I Start Grilling in Winter?

Of course you can grill in winter! If you live in a temperate climate, simply grill as you normally would in the summer months. In colder temperatures, you will need to take a few things into consideration:

  • Your grill will take longer to heat up, so start the preheating process earlier than you normally would.
  • Your grill will also require more fuel, since it will take longer to reach the desired temperature
  • The temperature of your grill may fluctuate more in the cold, which means food can take longer to finish cooking
  • Propane stays in a liquid state at -44 degrees fahrenheit. But we doubt you’ll be doing any grilling anywhere close to that temperature!

You will also need to take a few steps to ensure you are safe and comfortable outside in the cold. Dress warmly, but avoid baggy clothing or other items that may pose a fire risk, like long scarves. Make sure you have a clear path to and from the grill, and that it is free of ice or other fall risks. 

Start Grilling in Springtime

Spring is a perfect time to begin grilling. The pleasantly cooler temperatures are ideal for low and slow cooking, which might otherwise be too oppressive in the summer heat. The best meats for this kind of grill are generally tougher and from the muscular portions of the animal, such as shoulders and briskets. 

Grilling is also a great option for easy weeknight meals during the school year. You can grill meat and vegetables in a matter of minutes, and there are no pots and pans to clean up after. 

Prep Before You Start Grilling

Cleaning Your Grill 

The first step to prepping your grill is cleaning it. This should be done regularly (i.e. after each use) but also at the beginning of each grilling season. If you haven’t used your grill in a while, chances are it could use a good scrubbing. To clean your grill, remove all parts and brush off any stuck-on particles with a stiff wire brush. Then wash each part with mild soap and water and dry thoroughly before putting everything back together again. 

Once you’ve completed your start-of-the-season deep clean, you will want to maintain your grill after each use. Scrape it down thoroughly with a clean wire brush. For charcoal grills, remove accumulated ash and smoke residue; for gas grills, clean the drip pan after each use. 

After each cleaning, run a paper towel soaked with canola oil over the grates. This helps season them and prevent rust build up. Also be sure to regularly clean your wire brush with boiling water or soak it in warm soapy water, then rinse. 

Inspecting Your Grill Parts 

Once your grill is clean, inspect all parts for damage or wear and tear such as loose screws, cracked plastic pieces, broken handles, etc.. If anything looks suspect, replace it right away so it doesn’t cause any problems later on down the road. Also check the propane tank (if applicable). Make sure the hose isn’t worn or frayed and that all connections are tight and secure before using it again this summer season. You will also want to inspect for insects or other animals that may have decided to overwinter inside the hoses. 

Grill Packages Delivered to Your Door

Grilling is all about the meat, and you don’t want to compromise on quality. If you are looking for a convenient way to get the best cuts of meat delivered right to your door, try one of Texas de Brazil’s grill packages. Grade A lamb, pork chops, sausages, steaks, and our famous picanha will ensure your next barbecue is unforgettable. 

Unique Grilling Recipes to Try

You´re headed off-site..

Would you like to checkout now?

You're switching shops with items in your cart. Our Gift Card products are sold from a seperate shop than our Butcher Shop & Merchandise products and require seperate checkouts.

If you wish to return to your Gift Card cart, simply navigate back to a Gift Card product page and click the cart icon - if you don't see your products please toggle between our different shopping carts.