PICKUP/DELIVERY Reserve
Reserve Order To-Go

Fish Balls (Bolinho de Bacalhau)

fried fish balls served with wedges of lime in a silver tray.

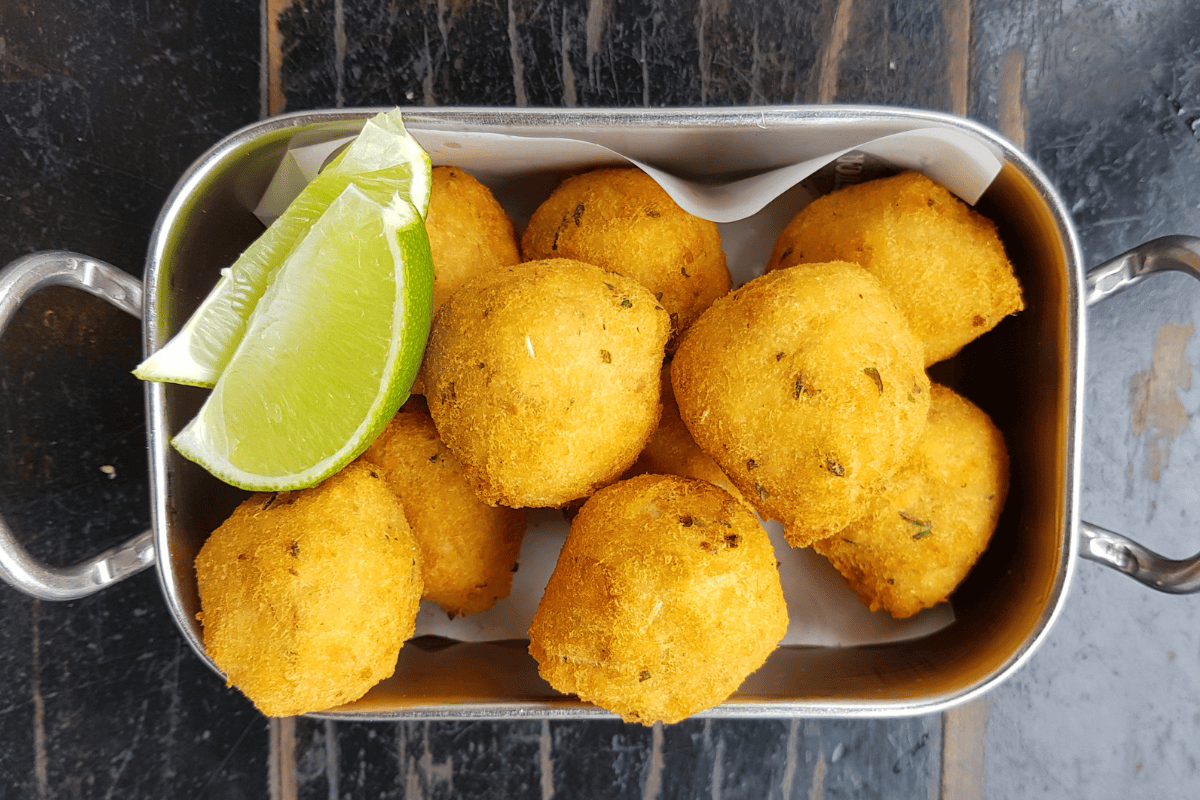
These fried fish balls are a favorite in Brazil, especially on the Christmas dinner table. They are bite-sized, delicious, and very simple to make-three things we love in a recipe. They are, essentially, a kind of fritter, similar to coxinha or acaraje. The filling is much simpler, however, consisting only of salt cod, potato, onion, garlic, egg, and a few herbs and spices. 

Salt Cod for Brazilian Fish Balls

The traditional recipe for bolinho de bacalhau uses salt cod. We have used this ingredient before in our bacalhau com natas, or salt cod in cream. Like many salted meats, salt cod originated as a means of preserving the fish year round before refrigeration.

Cod was once especially plentiful in the Atlantic ocean, so many countries sharing a coast with these waters have a long-standing culinary partnership with this type of fish. Portuguese colonists likely brought their recipes for salt cod to Brazil, where it remains a favorite ingredient in a variety of recipes. 

While you can use fresh cod for our Brazilian fish balls, we recommend the salt version. It is easy enough to find in most online super markets and specialty stores. Salt cod has a milder flavor and chewier texture that really lends itself to a croquette. Plus, you don’t need to worry about overcooking or undercooking it.  

Preparing Salt Cod for Bolinho de Bacalhau

The salt cod we are using for our fish balls is, technically, already cooked. It does need to be soaked for at least a day, however, to rehydrate the meat somewhat and rinse away most of the salt. Ideally, you should change the water at least three times over this period, since it will become saturated with the salt and unable to draw anymore out. 

Making the Filling for Fish Balls

The filling for our bolinho de bacalhau consists of shredded salt cod pureed with potatoes, onion, garlic, salt, pepper, egg, and heaps of fresh parsley. We like to saute the onion and garlic beforehand to keep the flavor mild, but you can use them raw if you like a little bite. If you don’t have a food processor or blender, you can just as well mash the ingredients together using a traditional potato masher or whip them using your stand mixer. 

Brazilian Fish Balls Recipe (Bolinho de Bacalhau)

Ingredients:

1 lb of salt cod
2 medium russet potatoes, peeled and chopped into small chunks
½ small onion, diced
1 clove of garlic, minced
3 eggs
1.5 tsp salt (more to taste)
Freshly ground black pepper
1.5 oz chopped fresh parsley (about 3 tablespoons)
1 cup panko bread crumbs
½ cup flour
Vegetable oil for frying

Directions:

  1. Remove the salt cod from the water in which it has been soaking. Transfer it to a stock pot or large saucepan and cover with fresh water. Bring to a boil and then reduce to a rolling simmer. Cook for fifteen minutes, then remove the fish to a plate (keep the boiling liquid).
  2. Put the chopped potatoes into the same water used to boil the salt cod. Boil them until they are fork tender (around 20 minutes). 
  3. While the potatoes are boiling, heat a small skillet over medium. Add in a drizzle of olive oil, then put in your diced onions. When they have softened (1-2 minutes), add in the minced garlic and cook for a further 30 seconds.
  4. When the salt cod has cooled enough for you to handle, shred it finely with two forks or your fingers.
  5. In the belly of a food processor, add in the cooked potatoes, shredded fish, garlic, onion, salt, pepper, and parsley and pulse to combine. Then add in one egg and pulse again until you have a uniform-looking mixture. It should be fairly cohesive. If it is too crumbly, add in a little water. 
  6. Fill a large pot with enough oil to submerge your fish balls (about four cups). Heat over medium-high until it reaches 350 degrees fahrenheit. 
  7. While the oil heats, make a dredging and breading station: put ½ cup all purpose flour in one dish; beat two eggs together in a second dish; add the panko bread crumbs to a third dish.
  8. Scoop a small amount of your fish ball filling into your hands (oil them beforehand) and roll into a ball. Coat each ball with flour then dip it into the egg mixture (shake off excess). Finally, roll the ball into the breadcrumbs. Repeat until you have used all of your filling.
  9. When all your fish balls are breaded and the oil is ready, fry them in batches until they are golden brown. Transfer them to a baking sheet lined with paper towels. Serve piping hot with your favorite dipping sauce. (We recommend this creamy garlic sauce.)

More Delicious Brazilian Recipes to Try:


Pastel de Queijo (Brazilian Cheese Pastry)

pastel de queijo on a serving platter with dipping sauce

Pastels are a favorite street food in Brazil. They are essentially a hand pie, and can be stuffed with all sorts of delicious fillings, both savory and sweet. Today, we are opting for simplicity and making pastel de queijo. Mild and gooey cheese is encased in a crisp, fried crust for a truly decadent and satisfying treat. 

Where Does Pastel de Queijo Come From?

The exact origin of pastels in Brazil is not known. However, many attribute the first recipes to Chinese immigrants. This is due to the similarity between the pastel’s crust and a fried spring roll wrapper. It is thought that Chinese Brazilians adapted their spring roll recipes to suit different tastes, substituting traditional fillings with local ingredients. 

Another theory suggests that Japanese immigrants were the first to popularize pastels. During WWII, prejudice against Japanese immigrants grew immensely due to the country’s alliance with Germany. In order to escape persecution, many Japanese Brazilians posed as Chinese, adopting clothing and traditions to disguise their true heritage. Making food with typically Chinese ingredients may have been another way to maintain this facade. 

Whatever the history, pastels have become an integral part of Brazilian fast food cuisine. The fillings reflect regional tastes: shrimp and cod are popular in Bahia, while São Paulans favor ground meats. Other common fillings include heart of palm, shredded chicken, requeijao, and, of course, cheese. 

What Kind of Cheese is Best for Pastels?

Traditional pastel de queijo uses a mild cheese, like mozzarella or Minas cheese; but you can use any kind of cheese you like, so long as it is suitably melty. Whatever you might use for a fondue, you can use for a pastel de queijo: 

  • Gruyere 
  • Emmental
  • Cheddar
  • Gouda
  • Havarti
  • Provolone

Feel free to use a blend of your favorites as well. We are sticking with mozzarella and a little aged white cheddar today, but the sky’s the limit for your cheesy filling. 

Tips for the Perfect Pastel de Queijo Crust

The crust is very important for pastels: you want a crisp, crunchy texture that is thick enough to hold in all that cheesy goodness, but not so thick it’s hard to eat. Your crust should also have bubbles (remember the spring roll wrapper relationship?). 

The bubbles in your pastel de queijo crust are achieved via two key ingredients: alcohol and vinegar. Traditional Brazilian pastels use cachaca for the alcohol, but you can substitute any grain alcohol (rum, vodka, etc.). The alcohol does not impart much taste, as it cooks off during frying. It is simply a means of attaining that light, bubbly crust. 

Another important step in ensuring the best crust for your pastel de queijo is letting the dough rest. As with other pastry dough, this allows the gluten in the flour to relax. If you attempt to roll out and cut the dough without resting it, your crust will be tough.

Pastel Dipping Sauce

Pastel de queijo is sometimes served with hot sauce. You can certainly do this with yours, especially if you like heat. We like to pair ours with a little hot honey. In a microwave-safe container, mix half a cup of liquid honey with a tablespoon of red chili flakes (more, if you want spicier). Add in a tablespoon of apple cider vinegar and stir to combine. Heat the mixture in the microwave for two fifteen-second bursts. Let the mixture sit for a few minutes to allow the chili flakes to infuse, then strain them out. Voila!

Freezing Pastel de Queijo

You can easily prepare pastels ahead of time and freeze them until ready to use. Assemble them as you would right before frying, then place them on a baking tray and put them in the freezer. When they have hardened, transfer the pasteis to an airtight container (you may want to wrap them individually in parchment to prevent sticking). The frozen pastel de queijo will keep for up to 4 months. When you are ready to use them, fry them as you would below, keeping in mind you may need a little extra frying time. 

Recipe for Pastel de Queijo (Brazilian Cheese Pastries)

Ingredients:

For the Crust

3.5 cups flour (all purpose)
1 egg
¾ tbsp salt
1 cup cold water
1 oz canola or vegetable oil
1 tsp apple cider vinegar
1 oz grain alcohol (cachaca, rum, vodka, etc.)
Oil for frying

For the Filling

4 oz mozzarella cheese, cubed
4 oz aged white cheddar cheese, cubed

Directions:

  1. In a large bowl, combine the all purpose flour and salt. Add in the egg, water, vinegar, alcohol, and vegetable oil and mix until the dough starts to come together.
  2. Once you have a soft and pliable dough, knead it on a clean surface for about five minutes until it becomes smooth and elastic. Return the dough to the bowl and cover it with a damp cloth. Let the dough rest for 15-30 minutes.
  3. After the resting period, divide the dough into smaller portions (about the size of a large marble) and roll each portion into a thin, circular disk. You want around 3-4 inches in diameter. Repeat this process for the remaining dough. 
  4. Place 1 cube of each type of cheese in the center of each disc. Fold the dough over the cheese to form a half moon shape. Press the edges firmly to seal the pastel, using a fork to crimp the edges.
  5. In a large frying pan, add enough oil to cover the pasteis de queijo. Heat the oil to 350 degrees Fahrenheit (175 degrees Celsius). To check if the oil is ready, drop a small piece of dough into the oil. If it sizzles and quickly rises to the top, the oil is ready.
  6. Carefully slide the pastel de queijo into the oil and fry until golden brown on both sides, flipping once during the process. Fry in batches and avoid overcrowding the pan. It usually takes about 3-4 minutes per side, but keep an eye on them to prevent burning.
  7. Once done, remove the pastels from the oil using a slotted spoon and transfer them to a paper towel-lined plate to drain excess oil.
  8. Let the pasteis cool for a few minutes then serve with your hot honey dipping sauce or with a squeeze of lime juice. Enjoy!

More Great Brazilian Recipes to Try:


Caramelized Leeks With Balsamic Reduction

Caramelized leeks in a skillet

In the US, we rarely think of leeks as a stand-alone dish. We use them to enhance other dishes, like soups and sauces. In Brazil, however, these sweet vegetables are served in a variety of ways alongside churrasco-style meats. Today’s recipe slowly cooks thin strips of leek in garlic-infused butter, olive oil, and a little sugar to produce a melt-in-your-mouth side dish that pairs well with any main course. Caramelized leeks also make a fantastic alternative to bruschetta when eaten on crusty french bread or toast points. 

However you enjoy them, we are sure of one thing: once you have tasted these caramelized leeks, you will wonder why you’ve never used this unassuming ingredient on its own more often! 

How Do You Caramelize Leeks?

Like onions, leeks are naturally high in sugar. This means they lend very well to slow-browning to bring out that sweetness. The method by which we will caramelize our leeks is quite similar to how you prepare yellow onions for French Onion Soup. The leeks are rinsed and the layers separated. We also recommend cutting the leeks into thinner strips for even cooking (and so they can be easily twirled up onto a fork). 

The leeks are then added to a pan of melted butter and oil, sprinkled with a little sugar, and left to cook slowly for about 20 minutes. You will stir them occasionally to allow for even cooking. The end result is a sweet and savory dish that can be slurped up like vegan pasta. 

How to Make a Balsamic Reduction for Caramelized Leeks

Our caramelized leeks are served with red pepper flakes and a drizzle of balsamic reduction. As the name implies, this sauce is made simply by reducing Balsamic vinegar until it has thickened to syrupy consistency. It is incredibly simple to do. 

Add one cup of good Balsamic vinegar to a small saucepan and bring it to a boil. Then reduce the heat to medium low. Let the liquid simmer until it is reduced by half, stirring frequently. Use it right away or refrigerate it for up to one week. If it thickens too much in the refrigerator, add a little plain Balsamic and mix. 

If you find you use balsamic glaze frequently, you can also buy ready-made bottles of it. 

Caramelized Leeks Recipe

Ingredients:

5 large leeks, rinsed and trimmed
3 cloves of garlic, smashed
1 tablespoon unsalted butter
2.5 oz extra virgin olive oil
2 tsp granulated sugar
½ tsp kosher salt
Red pepper flakes

Directions:

  1. Separate the layers of your rinsed and trimmed leeks. On a cutting board, slice them length-ways into long, thin strips (about one quarter inch wide). 
  2. Heat a large skillet over medium low heat. Add in the butter and oil. When the butter has melted, add in the smashed garlic and simmer until fragrant and softened (1-2 minutes).
  3. Remove the smashed garlic and discard. Put your leeks into the infused butter and oil mixture and sprinkle them with the two tsp of sugar and ½ tsp of salt.
  4. Stir the leek mixture together and cook over medium low heat. If they are browning too quickly, reduce the heat to low. 
  5. Continue cooking and stirring the mixture for about 20 minutes, until the leeks are soft, buttery, and brown. If necessary, add more butter. 
  6. Serve hot with a drizzle of balsamic reduction and a pinch of red pepper flakes. Enjoy!

What to Eat With Your Caramelized Leeks:

Texas de Brazil Online Butcher Shop

Did you know: you can have high quality meats to serve alongside your caramelized leeks delivered right to your door? Hand curated butcher boxes or a la carte options are available to suit every taste. From our world-famous picanha and Brazilian sausages, to premium cuts of lamb and pork, your next barbecue is about to get a massive upgrade. Visit our online Butcher Shop today to get started. 

Lebanese Brazilian Food: Fried Kibbeh

plate of fried kibbeh from brazil

Immigration from the Levantine Region to Brazil began in the late 19th century. The Ottoman Empire had collapsed, resulting in uncertain political and economic futures for the citizens of Lebanon and Syria. Between 1885 and 1933, over 130,000 Lebanese immigrants arrived in Brazil through the Port of Santos. 

Today, over 7 million Brazilians claim Lebanese descent. This number is greater than the population of Lebanon itself, so it is no surprise that Lebanese culture is quite prevalent in many parts of Brazil. This is particularly true of Lebanese cuisine, which can be found readily in almost every city. Favorite Brazilian Lebanese dishes include hummus, tabbouleh, sfiha, and sweet halwas drizzled with honey. 

Another favorite Lebanese dish in Brazil is kibbeh. Traditional kibbeh are a kind of croquette made by pounding a mixture of lamb, spices, fresh mint, and onions. The mixture is rolled together into a football shape and stuffed into a shell made from a blend of bulgur wheat and more minced lamb and spices. 

Kibbeh in Brazil

Brazilian kibbeh are similar to the traditional Lebanese croquettes, but the meat of choice is typically beef instead of lamb. There is also a raw version known as kibbeh cru. This is often compared to a French steak tartare, but the presence of those Levantine spices make it quite unique. 

Brazilian kibbeh may also be stuffed with various fillings, including requeijao (Brazilian cream cheese). 

What is Bulgur?

The bulgur used to form the shell of the kibbeh is made from cracked whole kernels of wheat (usually durum wheat) that are then par boiled. This precooking method means that bulgur can be prepared much faster than other versions. 

Bulgur is a very popular whole grain in the Middle East, where it has been used in various recipes for thousands of years. Tabbouleh salad, for example, incorporates bulgur wheat, tomatoes, onions, fresh mint, and a tangy lemon dressing.

What Is a Good Bulgur Substitute?

If you do not have or do not want to use bulgur, many recipes use wheat couscous instead. Plain white rice, farro, or barley can also be used. 

Gluten free bulgur substitutes include quinoa, buckwheat, amaranth, and millet.   

For kibbeh, the grain most similar in flavor is barley. However, barley will take much longer to cook, since it has not been parboiled. For a gluten-free substitute for kibbeh, we recommend millet. Again, you may need to adjust the cooking time to ensure it is tender. 

Do I Have to Use Mince Meat in Brazilian Kibbeh?

No, you can use a vegan alternative, like chickpeas, to form your shell and filling. You may need to experiment with the quantities to form a good binding, or you can just try this delicious recipe with chickpeas, dates, walnuts, and red onions.

What is Kibbeh Spice Made Out Of?

Kibbehs are spiced with a special blend known as kamouneh. This is a mixture unique to the Levantine region of the Middle East and lends an earthy flavor to any recipe. It centers around cumin (kamouneh), which is enhanced with various dried herbs and berries. 

If you cannot find pre-made kamouneh or kibbeh spice, try the following recipe:

Homemade Kamouneh for Brazilian Kibbeh

2 tbsp ground cumin
1 tsp ground black pepper
½ tsp ground marjoram
1 tsp dried mint
1 tsp dried basil
1 tsp salt
½ tsp paprika
½ tsp ground coriander
1 tbsp allspice
2 tsp turmeric
1/2 tsp cinnamon
½ tsp cayenne (or more for additional heat)

Brazilian Kibbeh Recipe

Ingredients:

For the shell

2.5 cups bulgur wheat (fine ground)
1 pound lean ground beef
1 large yellow onion, roughly chopped
1 tablespoon kamouneh spice
Pinch of salt

For the Filling

1 pound lean ground beef
½ yellow onion, diced
1 clove garlic, minced
1 tablespoon kamouneh spice
¼ cup toasted pine nuts
Extra virgin olive oil
Vegetable oil for frying

Directions:

  1. Soak your bulgur in cold water for fifteen minutes, then strain.
  2. Add the bulgur, 1 pound of lean ground beef, the roughly chopped onion, and one tablespoon kamouneh to a food processor*. Pulse until a thick, smooth paste forms.
  3. Place the paste in the refrigerator.
  4. Cook the filling. Heat a skillet on medium heat and add in a drizzle of olive oil. Add in your diced onions and cook until softened and translucent (2-3 minutes). 
  5. Now add in your beef and one tablespoon of kibbeh spice.  Cook until evenly browned.
  6. Just before the meat is done, add in the garlic and cook until it is fragrant and the meat has finished browning. Be careful not to burn the garlic!
  7. Allow your filling to cool for ten minutes or so.
  8. Retrieve your kibbeh dough from the fridge.
  9. Next to the kibbeh bowl, have your filling and a small bowl of water nearby. You will need to continually wet your hands to avoid the dough becoming too sticky.
  10. Wet your hands in the water and scoop about two tablespoons of the shell dough out. Roll the dough into an oval shape. 
  11. Press a hollow in the middle of your dough ball with your hands or the back of a spoon.
  12. Put a small amount of filling in the hollow you have made. Seal the dough back around the meat filling and roll again to make it smooth.
  13. Continue this process until you have used up all your dough and filling.
  14. Freeze the raw kibbeh for thirty minutes.
  15. Meanwhile, heat a skillet over medium high with enough oil to submerge the kibbeh (a deep fry). If you have a heat thermometer, heat the oil to 350 degrees fahrenheit.
  16. Retrieve your frozen kibbeh and fry them in batches until they are golden brown. Let them strain on paper towels and serve immediately with tzatziki, a drizzle of tahini, or greek yogurt thinned with a little lemon juice and olive oil. 

*If you do not have a food processor, you can achieve a similar effect with a blender. Or, if you want to go the traditional route, you can use a large mortar and pestle to beat the bulgur and meat together until they make a fine paste. In Lebanon, this mortar and pestle is known as a jeren. Jeren are made from solid rock and can weigh over 100 pounds!

More Recipes Like This:


You´re headed off-site..

Would you like to checkout now?

You're switching shops with items in your cart. Our Gift Card products are sold from a seperate shop than our Butcher Shop & Merchandise products and require seperate checkouts.

If you wish to return to your Gift Card cart, simply navigate back to a Gift Card product page and click the cart icon - if you don't see your products please toggle between our different shopping carts.