PICKUP/DELIVERY Reserve
Reserve Order To-Go

Pernil de Cerdo

Pernil de cerdo on a cutting board with roast garlic

We can’t help it, we are in a cozy mood. It’s Fall, and that’s an excuse to start cooking stick-to-your-ribs meals, like creamy soups, hearty stews, and of course, roasts. There’s something so comforting about having a roast on: the smells permeating the house with the promise of something only time can achieve. Today’s recipe is for a twist on pernil de cerdo, a classic Puerto Rican pork shoulder roast that Braziliians have adopted, especially at Christmas time. 

What is Pernil de Cerdo?

Pernil de cerdo translates to “roast of pork” from Spanish. However, most Puerto Ricans simply call it “pernil” since it almost always entails pork. It is most often a pork shoulder, but some recipes use pork butt or even pork leg. 

The origins of pernil de cerdo are debatable, but it most likely became popular as a cheaper and more manageable version of lechon asado. This is a whole roast suckling pig cooked over an open fire-still a popular dish in Puerto Rico, but less accessible to home cooks working with an oven. 

What Cut of Pork to Use for Pernil?

We prefer the shoulder for pernil de cerdo since it holds its shape better after a long cook. Pork butt will fall apart if you attempt to slice it after four hours. This is not necessarily a bad thing, but it is more suited to something like pulled pork or a cuban sandwich as opposed to a centerpiece-style roast. Likewise, you won’t want to use a pork loin, since it is too tender for low and slow cooking. 

For traditional pernil, you need a pork shoulder with the bone in and skin on. The bone keeps the meat extra tender, and the skin is crisped up at the end for a crunchy, almost crackling like garnish. 

What to Serve with Brazilian Pernil de Cerdo?

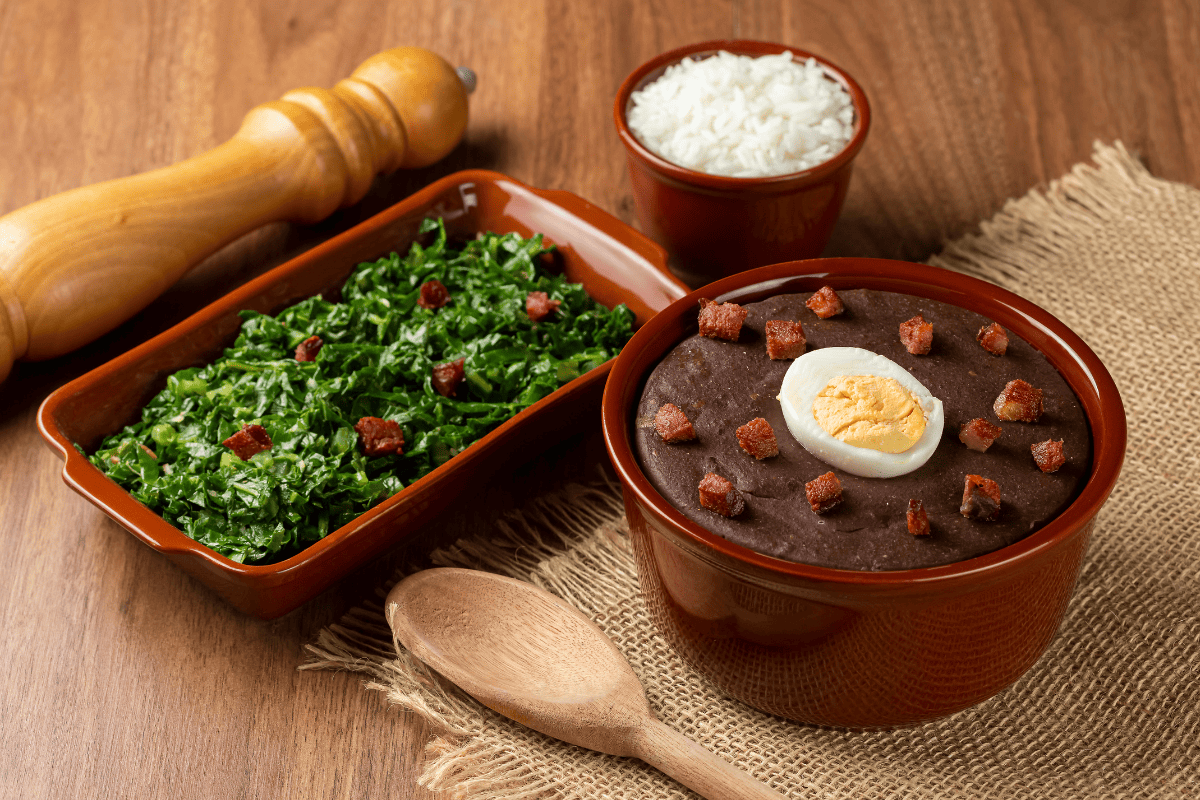
Puerto Ricans often serve their pernil with fried plantains and arroz con gandules, a rice dish made with pigeon peas. Brazilians prefer to eat it with rice and other classic sides, like feijoada with farofa. 

You can serve your pernil with whatever you’d like. Roast potatoes, carrots, or turnips wouldn’t go amiss. Of course, pork almost always pairs well with apples. Try sauteeing some roughly chopped green apples with thinly sliced onions, salt, pepper, and a teaspoon of sugar for a sweet and savory companion to any pork dish. For another sweet companion, try grilled pineapple slices

What Temperature to Cook Pernil?

Pork technically only needs to be cooked to an internal temperature of 145 degrees fahrenheit to be safe to eat. However, pernil de cerdo is cooked to much higher temperatures to achieve that buttery, tender texture. Your roast will be ready when it has reached around 200 degrees Fahrenheit. 

Marinade Options for Roast Pork Shoulder

Traditional pernil de cerdo is marinated the day before roasting. Most marinades incorporate sofrito, which is simply a blend of aromatics like onions, garlic, carrots, and peppers sauteed slowly in olive oil. Brazilian sofrito is called “refogado,” and typically uses only onions and garlic.  

Puerto Rican recipes also incorporate adobo, oregano, and some kind of citrus. Our recipe omits the adobo but does benefit from a good squeeze of lime and fresh thyme and rosemary in place of the oregano. 

Pernil de Cerdo Recipe (Brazilian Style Puerto Rican Pork Shoulder)

Ingredients:

One 6 lb pork shoulder, bone in and skin on
2 tbsp refogado
1/4 cup of lime juice
½ cup extra virgin olive oil
1 oz fresh thyme, chopped
1 oz fresh rosemary, chopped
2 tsp kosher salt
Freshly ground black pepper

Directions:

  1. Score the pork, cutting through the skin and slightly into the meat.
  2. Rub the refogado into the scored pork, making sure to get under the skin.
  3. Whisk together the olive oil and lime juice in a bowl. Add in the salt, ground pepper, and fresh herbs.
  4. Pour the marinade over your pork roast in a shallow dish or in a gallon freezer bag. Place in the refrigerator and marinate overnight.
  5. Preheat the oven to 350 degrees Fahrenheit.
  6. Transfer your pork to a roasting pan, skin side down, along with any remaining marinade.
  7. Roast for 3.5 hours, or until the roast has achieved an internal temperature of 195 degrees Fahrenheit (usually about 30-35 minutes per pound). 
  8. When the pork has come to the appropriate temperature, remove it from the oven and flip it so it is skin-side up.
  9. Preheat the broiler to 500 degrees fahrenheit, and return the pork to the oven. Broil until the skin is very crisp.
  10. When the skin is crisp, remove the roast and let it rest for a few minutes. Slice your pernil de cerdo tableside for a dramatic flair. 

More Great Brazilian Recipes to Try:


Stuffed Pumpkin Recipe (Camarao na Moranga)

Brazilian stuffed pumpkin with shrimp stew

Camarao na moranga is another favorite recipe at Christmas time in Brazil, where pumpkins are available year round. In the US, however, pumpkins mean one thing: Fall. This is a perfect meal to eat on a chilly Autumn evening. Not only that, its presentation is beyond compare: creamy shrimp soup in a real, roast pumpkin shell. Trust us, you won’t want to miss trying this stuffed pumpkin recipe this Fall. 

What Pumpkins are Used for Stuffed Pumpkin Soup?

Brazilians use a species of pumpkin called a moranga for this stuffed pumpkin recipe. The American equivalent would be a Cinderella pumpkin-the whimsical, somewhat squat pumpkins with a deep orange color. They are great for roasting and have a sweet, caramelized flavor when roasted. 

Interestingly, the origins of this stuffed pumpkin recipe in Brazil are as fairytale-esque as Cinderella herself. It is said that the first morangas were planted by Japanese political prisoners at the Presídio da Ilha Anchieta penitentiary.

Apparently, the conditions were quite unsanitary, leading many of the prisoners to contract worms. They refused Western medicine in favor of traditional remedies, which included pumpkin seeds. Local Brazilians became intrigued by the supposed remedy, and began buying the extra pumpkins planted at the prison. 

A trader carrying the pumpkins into a nearby town hit a rough patch of roadway, causing one of the pumpkins to roll off and into the sea. Miraculously, the pumpkin washed up on shore. Very coincidentally, the pumpkin was picked up by a seaside chef. When she opened it, it was supposedly full of shrimp. She was inspired to cook the shrimp inside and serve it in the hollowed out gourd. Thus, the first stuffed pumpkin recipe was born. 

This wild story is fun to tell and imagine. The only thing verifiable about it, however, is the general timeline and location when the stuffed pumpkin recipe known as camaro na moranga first appeared: in the 1940s in Sao Paulo. 

Squash Alternatives for Stuffed Pumpkin

While Cinderella pumpkins are typically used in the traditional Brazilian stuffed pumpkin recipe, other varieties of squash will do. Acorn squash, buttercup squash, and sugar pumpkins work well, especially if you want to make individual portions. If you want a slightly larger pumpkin “bowl,” you can also use Kobocha squash

What Type of Shrimp for Camarao na Moranga?

For your shrimp stuffed pumpkin recipe, you’ll want to use medium or large shrimp. This ensures everyone gets a generous helping of shellfish in every portion. White or pink shrimp is fine. Be sure to use either very fresh shrimp or opt for frozen, if you doubt the quality of the fresh shrimp. 

Brazilian Stuffed Pumpkin Recipe (Camarao na Moranga)

Ingredients:

One large Cinderella, kabocha, or other round roasting squash (8 lbs is good)
1 large onion, diced
3 cloves garlic, minced
Extra virgin olive oil
Kosher salt
1 fresh lime
Freshly ground black pepper
1 can stewed tomatoes
2 tbsp all purpose flour
1 cup fish stock
1/2 cup unsweetened coconut milk
2 lbs medium or large shrimp (raw/thawed, deveined, heads and tails discarded)
Fresh parsley
3 oz grated parmesan cheese
8 oz Brazilian cream cheese (you can substitute American)

Directions:

  1. Roast the pumpkin: Preheat the oven to 350 degrees Fahrenheit. Scoop out all the seeds and pulp. Season the inside of the pumpkin with a drizzle of olive oil, salt and black pepper. 
  2. Replace the top of the pumpkin and wrap the whole gourd in foil. You might need a separate piece to cover the stem. Roast for 45 minutes.
  3. While the pumpkin cooks, heat a large saucepan over medium-high. 
  4. Meanwhile, season the shrimp with salt, pepper, and a squeeze of fresh lime juice.
  5. Add a drizzle of oil to the hot saucepan. Sear the seasoned shrimp for a couple of minutes on each side, then remove. Be sure to reserve any juices produced by the cooked shrimp.
  6. Reduce the temperature to medium and add another drizzle of olive oil. Add in the chopped onions and cook for 2-3 minutes. Then add in the minced garlic and cook for a further 30 seconds or so.
  7. Add in your two tablespoons of flour and mix with the oil to form a rue. Cook for 30 seconds to eliminate the flour taste. 
  8. Slowly pour in your fish stock, whisking constantly. Bring the mixture to a boil to allow it to thicken fully, then reduce heat to medium. As it simmers, stir in the tomatoes and coconut milk. 
  9. Now, stir in the cooked shrimp. Let it warm through for a minute. 
  10. If you haven’t removed the pumpkin, do so now. Leave the oven on 350 degrees Fahrenheit.
  11. Carefully mop up any pumpkin juice with a paper towel. When the pumpkin is dry and cool enough to touch, spread the cream cheese all over the inside. 
  12. Now, ladle in your shrimp stew until the pumpkin is filled to the top. Sprinkle it with the parmesan cheese, and put it back in the oven (uncovered).
  13. Bake for 15-20 minutes, until the top has formed a golden crust.
  14. Garnish with fresh parsley. 
  15. Serve this stuffed pumpkin recipe over Brazilian rice. Be sure to scoop out a little pumpkin flesh with each spoonful. The combination of shrimp stew and fresh roasted pumpkin is a match made in Heaven. 

More Great Brazilian Recipes to Try:

Greek Rice Pilaf (Arroz a Grega)

Greek rice pilaf with carrots and spring onions

Arroz a Grega, or “Greek rice pilaf,” is a popular side dish in Brazil, especially at Christmas time. Despite the name, it is not, necessarily, Greek. There are disputes as to the origin of the dish and its name. Regardless, the general recipe incorporates traditional methods for cooking pilaf-style rice, while incorporating a few quintessentially Brazilian ingredients. 

What is Rice Pilaf?

Pilaf, in general, refers to a style of cooking long-grain rice. It usually involves toasting the rice in oil with aromatics, like onions and garlic, then simmering the rice in a flavorful broth with various proteins (lamb, chicken, fish, etc.) The result is a hearty dish with rice granules that are individual, not sticky like jasmine rice or creamy like risotto. 

Where Does Rice Pilaf Come From?

Although rice had already been in cultivation for thousands of years, the earliest recipes for rice pilaf were written in the 10th century.  The famed Persian philosopher and physician, Ibn Sina, included various recipes in his medical texts, describing the benefits of different ingredients. In Iran, he is still referred to as the “Father of Pilaf.”

This does not mean that pilaf did not exist in some iteration prior to this date. There are accounts, for example, of soldiers in Alexander the Great’s army (4th century BC3) eating “pilav,” and bringing the recipes home from Central Asia to Macedonia. 

The name itself has two derivatives. “Pilaf” is used predominantly in North America. It is derived from the Turkish pilav, which comes from the earlier Persian pilāv. British and Commonwealth nations refer to the dish as pilau, also Persian in origin and possibly Urdu, where the word pulāv indicates a dish of rice and meat cooked together. 

While the exact roots of the dish remain a mystery, it seems we can assume (based on the name and documentation) that the first pilafs came from the Middle East and surrounding regions. As trade routes expanded and cultural exchange flourished, rice pilaf made its way to various corners of the world, where it adapted to local ingredients and cooking techniques. 

Global Variations of Rice Pilaf

Caribbean Pelau: Eastern Caribbean recipes call for various local ingredients, like peas, pumpkin, and corn, along with pieces of chicken or cured pig’s tail. Other parts of the Caribbean add coconut milk and seafood, like crab meat.

South Asian Biryani: this dish originated with the Muslims of South Asia. It combines basmati rice with marinated meat (usually chicken, lamb, or shrimp) and a blend of aromatic spices, creating a rich and savory dish. Vegetarian versions with vegetables or paneer are also popular. In India, a dish called “pulao” also exists, but it is made with lentils and vegetables. Bengali pulao is more traditional, with saffron and long-grain rice. 

Central Asian Plov: In countries like Uzbekistan and Tajikistan, plov (or pilaf) is a staple dish made with long-grain rice, lamb or beef, garlic, and onion. It is usually seasoned simply with salt, pepper, and cumin, although other herbs and spices may be added regionally. 

Lithuanian Plovas: in addition to rice and vegetables (usually carrots, tomatoes, and/or mushrooms), plovas may contain chicken or pieces of pork derived from around the neck or stomach of the animal.

Arroz Grega in Brazil

In Brazil, rice pilaf is a staple item on the Christmas dinner table. The Brazilian version of rice pilaf, known as “arroz à grega,” showcases the country’s diverse culinary influences.

“Arroz à grega” translates to “Greek-style rice,” but it reflects a fusion of international flavors. This dish typically features white rice cooked with a medley of colorful vegetables like bell peppers, peas, and carrots. It’s often seasoned with olive oil and sometimes enhanced with raisins and cashew nuts for a touch of sweetness and crunch.

The vibrant colors and flavors of “arroz à grega” make it a festive addition to the Brazilian Christmas feast, providing a harmonious balance to the ubiquitous Chester hen and hearty stews that often take center stage during the holiday season. 

Why is It Called Greek Rice in Brazil?

No one really knows. While the Greeks do have their own version of pilaf rice, it is not, technically, a Greek dish. Furthermore, the Greek rice pilaf in Brazil incorporates ingredients not commonly found in Greek and other Baltic versions-namely, carrots and bell peppers. Either way, the name “arroz a Grega” has stuck, and indicates a specific Brazilian side dish simmered in broth with vegetables and raisins. 

Best Rice for Brazilian Greek Pilaf

Like traditional Brazilian rice, arroz a grega uses long-grain rice. This is important: long-grain rice has less starch, which keeps the granules from sticking to each other. You can use short-grain rice if that is what you have, but it will be harder to achieve the desired pilaf texture. 

Arroz Grega Recipe (Brazilian Rice Pilaf)

Ingredients:

2 cups long grain rice, such as Basmati
1 tbsp extra virgin olive oil
1 oz unsalted butter
1 yellow onion, finely diced
1 red bell pepper, diced
1 yellow bell pepper, diced
1 cup sweet green peas (fresh or frozen)
2 cloves garlic, minced
1 carrot, peeled chopped
¼ cup golden raisins
1 tsp red chili flakes
1 tsp ground cumin
3 cups chicken stock
2 tsp salt (more to taste)
Freshly ground black pepper
Diced spring onions for garnish (optional)

Directions:

  1. Rinse the rice until the water runs clear, then set aside.
  2. Heat a large skillet or pot over medium. Add in a drizzle of olive oil and the butter, then sautee the bell peppers, onion, peas, and carrots for 3 minutes or so. 
  3. Add in the minced garlic and cook for a further 30 seconds.
  4. Stir in the rinsed rice, and toast it in the oil and aromatics for 2-3 minutes. 
  5. Season with salt, pepper, cumin and chili flakes.
  6. Add in the chicken stock and bring the rice mixture to a boil, then reduce the heat to a simmer.
  7. Cover, and cook for fifteen minutes, or until the liquid has been absorbed. 
  8. Stir in the golden raisins and let them warm through. Taste for salt, and add more, if needed.

Serve piping hot alongside your favorite main course, like a delicious roast picanha or churrasco steak. Garnish with fresh spring onion slices. 

Visit Texas de Brazil for Authentic Brazilian Food

Texas de Brazil is a dining experience like no other. From our mouthwatering, all you can eat churrasco meats, to our enormous salad bar, there is something for everyone to love at our restaurants. Now, you can experience the taste of Texas de Brazil at home with one of our premium butcher boxes: the highest quality cuts of beef, lamb, pork, and sausage delivered right to your door. Go online to order a la carte or a hand-curated box for your next cookout. 


Brazilian Collards with Bacon (Couve Mineira)

Brazilian collards alongside feijoada black bean stew and rice

Collard greens, known as “couve” in Portuguese, play a significant role in Brazilian cuisine. They are a staple side dish often served alongside traditional Brazilian dishes like Feijoada (a black bean stew with pork) and grilled meats. Collard greens are not only delicious but also nutritious, providing essential vitamins and minerals that complement the richness of many Brazilian dishes. Today’s recipe is called couve mineira, a wildly popular version of Brazilian collards with bacon. 

Are Brazilian Collards Good For You?

Brazilian collards often incorporate light frying and bacon, but this does not detract from the inherent nutritional value of the collards themselves. A part of the cruciferous family (along with broccoli, cabbage, Brussels sprouts, etc.), collard greens are low in calories and high in dietary fiber. 3.5 oz of boiled collards also contains nearly four times your daily value of Vitamin K, a vitamin essential for blood coagulation and binding calcium to your bones and tissues.

Like other leafy greens, collards also provide a decent punch of Vitamin C and Vitamin A, along with important minerals like iron and manganese. 

If you want a lighter version of this recipe, simply omit the bacon and use just the extra virgin olive oil for frying. It’s equally delicious!

Brazilian Collards vs Southern Collards

In the US, collards are a staple of Southern cooking. More specifically, they hold cultural importance in Black Southern cuisine. Collard greens were often grown in home gardens by slaves to supplement meager rations. They were prized for their hardiness both during the winter and in the sweltering summer heat.  

Today, collards continue to be an important side dish throughout the South and hold a special place in the category of Soul Food. Southern collard greens are usually rough-chopped or torn into bite-sized pieces, then slow-simmered in broth with a smoky piece of protein, such as a turkey leg. 

While Brazil has an abundance of African influence in its cuisine, it is likely that collards made their way to the country via Portuguese colonists. Collard greens are a favorite ingredient in many Portuguese dishes, such as caldo verde, a hearty green soup. 

Unlike Southern collards, Brazilian collards are not usually slow-cooked. Rather, they are typically sliced into thin strips. The smaller size means they cook more quickly, lending themselves to sauteeing versus boiling or simmering. 

Substitutes for Brazilian Collard Greens

While most Brazilians will argue staunchly against using anything but collard greens for this recipe, you can substitute kale or even shaved brussels sprouts if you prefer. Swiss chard would also be acceptable, since it maintains its “bite” after a light sautee. You won’t want to use broccoli or cauliflower, since they won’t cook through with this method. 


Recipe for Brazilian Collard Greens (Couve Mineira)

Ingredients:

1 bunch of fresh collard greens
6 slices of bacon
1 medium onion, finely chopped
2 cloves garlic, minced
Salt and black pepper to taste
Red pepper flakes (optional, for a spicy kick)
Extra virgin olive oil

Instructions:

  1. Wash the collard greens thoroughly under cold running water to remove any dirt or sand. Drain and pat them dry with a kitchen towel or paper towels.
  2. Remove the tough stems from the collard greens by folding each leaf in half lengthwise and cutting along the stem. Discard the stems or save them for making vegetable stock.
  3. Stack the collard green leaves on top of each other, roll them into a tight cylinder, and slice them into thin strips (about 1/4-inch wide). This technique is known as chiffonade.
  4.  In a large skillet or frying pan, cook the bacon over medium heat until it becomes crispy. Remove the bacon slices from the pan and place them on paper towels to drain excess fat. Once cool, crumble the bacon into small pieces and set it aside.
  5. Drain all but a tablespoon of the bacon fat from the pan. If needed, add a drizzle of extra virgin olive oil. Add the chopped onion and minced garlic. Sauté them until they become translucent and fragrant.
  6. Add the sliced collard greens to the skillet, tossing them with the onions and garlic. Cook for 5-7 minutes, stirring occasionally, until the collard greens are tender and slightly wilted. If needed, you can cover the skillet for a few minutes to help them cook faster.
  7. Season the collard greens with salt, black pepper, and red pepper flakes (if desired). Be cautious with the salt, as the bacon already adds saltiness.
  8. Return the crumbled bacon pieces to the skillet and mix them with the collard greens.
  9. Taste and adjust the seasoning as necessary. If you prefer a slightly crispy texture, you can cook the collard greens for a few additional minutes.
  10. Once the collard greens are tender and well-seasoned, remove the skillet from heat.

Serve your Brazilian collards as a side dish to complement your favorite meals. Enjoy!

What To Eat With Collards

Brazilian collards go well with a wide variety of dishes. They are a must with feijoada, but are just as tasty with a medium rare skirt steak or picanha roast. If you can’t make up your mind, why not try a hand-curated box of premium cuts of beef, lamb, and pork delivered right to your door? Texas de Brazil’s online butcher shop features complete boxes and a la carte options to suit every taste. Get one for you and a friend for a truly elevated barbecue experience! 

You´re headed off-site..

Would you like to checkout now?

You're switching shops with items in your cart. Our Gift Card products are sold from a seperate shop than our Butcher Shop & Merchandise products and require seperate checkouts.

If you wish to return to your Gift Card cart, simply navigate back to a Gift Card product page and click the cart icon - if you don't see your products please toggle between our different shopping carts.