PICKUP/DELIVERY Reserve
Reserve Order To-Go

Croque Monsieur (Bauru de Forno)

Brazilian croque monsieur sandwich

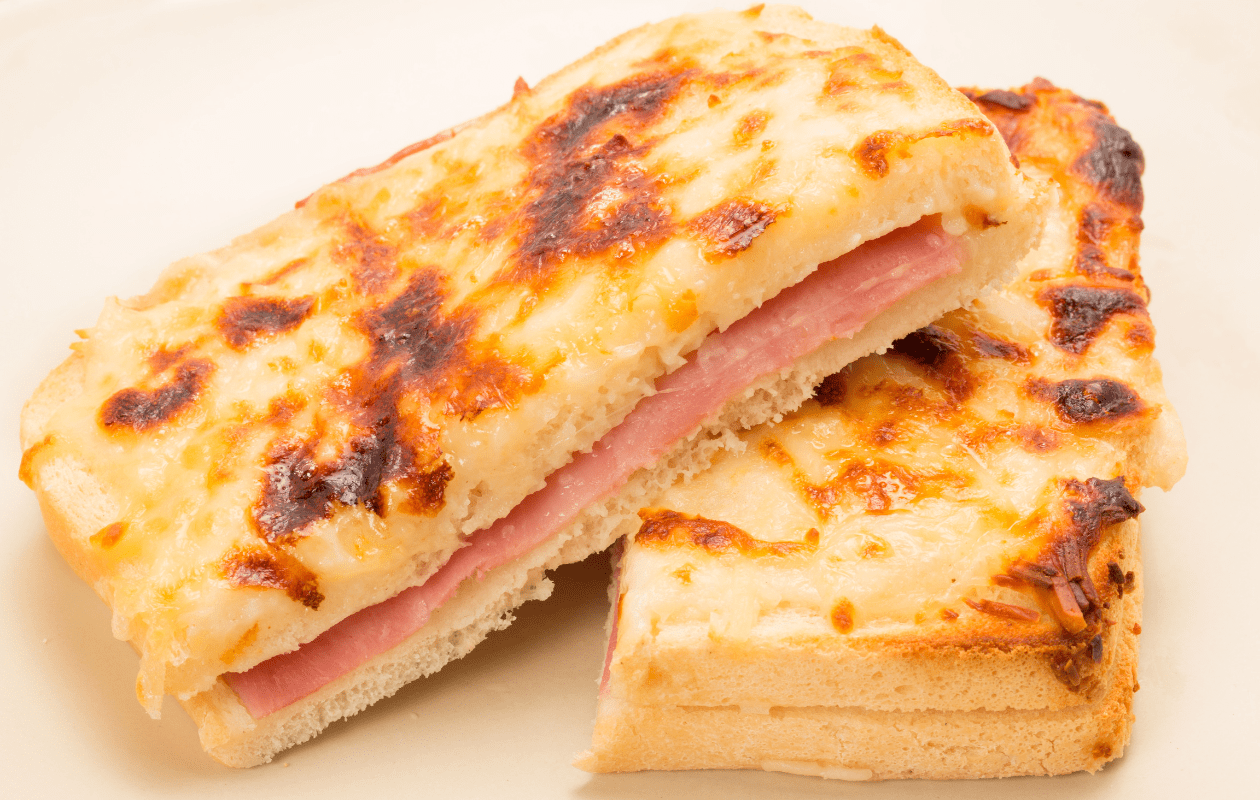
Baked Ham and Cheese Sandwiches

Every country seems to have its own spin on the grilled cheese sandwich, and Brazil is no exception. Like many of the country’s dishes, the Brazilian croque monsieur (aka bauru de forno) is “extra”: extra gooey, extra cheesy, and extra delicious. What really sets Brazilian grilled cheese sandwiches apart is that they are baked in the oven under a layer of melty cheese sauce. The effect is similar to a savory French toast, or a croque monsieur casserole. However you describe it, it is comfort food at its finest. Add in the fact that it is so simple to make, and we are sure it will become a regular in your weeknight meals rotation. 

What is a Croque Monsieur?

The croque monsieur is French in origin. It dates back to the early 20th century, when it was served as a popular brasserie snack (and it still is!). “Croque” means “crunchy,” a nod to the dish’s toasty texture. The ingredients vary according to region, but it must always have at least bread, ham, and melted cheese (traditionally gruyere). If it is topped with an egg (fried or poached), it is called a “croque madame.” 

Our Brazilian croques are similar to a variation known as “croque provencal,” which also features fresh tomatoes. We add a little oregano for an herbaceous layer that pairs very well with the mozzarella cheese. 

Croque Monsieur Sauce

Traditional croque monsieur sandwiches may be served with or without a simple bechamel sauce made from butter, flour, salt, pepper, cream or milk, and a dash of nutmeg. The Brazilian croque monsieur also incorporates a similar sauce, but we substitute the nutmeg with a little dijon mustard for some earthy umami flavor. 

In some recipes, you do not need to make a bechamel at all. The “sauce” is made without heat by whisking together heavy cream, mayonnaise, and mustard. This is also delicious and helps a golden crust to form over the top of the sandwiches, thanks to the eggs in the mayo. In the interest of cutting a few calories, however, we are substituting this version with a bechamel made with skim milk. 

Cheese in Brazilian Croque Monsieurs

Again, the traditional cheese used in French croque monsieurs is gruyere, or sometimes emmental. Brazilians favor mozzarella and parmesan, which are also used in another favorite snack: the ubiquitous Brazilian cheese bread.

You can use whatever kind of cheese you like, as long as it’s a good melter. If you’re looking for a more authentic bauru de forno, however, stick with the mozzarella. 

Brazilian Croque Monsieur Recipe

Ingredients:

For 4 sandwiches:

8 slices of white bread, crusts removed
½ pound of thin sliced deli ham
8 slices slices of sliced mozzarella cheese (provolone is good, too)
1 large steak tomato, sliced
½ cup shredded mozzarella or parmesan
Dried oregano

For the Sauce:

2 tablespoons butter
2 tablespoons flour
10 oz skim milk
1 tablespoon dijon mustard
½ tsp salt
Pepper

Directions:

  1. Preheat the oven to 375 degrees fahrenheit. 
  2. Assemble your sandwiches. On one slice of bread, put one slice of cheese, then one fourth of the ham. Top with a second slice of cheese, one or two slices of tomato, a pinch of dried oregano, and another piece of bread. Repeat for the remaining three sandwiches. 
  3. Put the four assembled sandwiches in a casserole or other oven safe dish. 
  4. In a small saucepan, melt the butter over medium heat. Stir in the flour and cook for two minutes. Add in the salt and a few grinds of fresh black pepper. Slowly whisk in the milk, turning the heat up to a boil. When the sauce has thickened, stir in the dijon mustard.
  5. Pour the sauce over your sandwiches in the casserole dish.
  6. Sprinkle the shredded mozzarella over the sandwiches and sauce.
  7. Bake, uncovered, in the oven until the cheese is bubbly and golden brown. 

Enjoy! 

More Great Brazilian Recipes to Try:

Cornstarch Cookies

Chocolate Coconut Cornstarch Cookies (Sequilhos)

Sequilhos are a popular cookie in Brazil made with cornstarch in lieu of wheat flour. Like many Brazilian desserts, they also incorporate condensed milk. The traditional recipe uses just four simple ingredients. We are going to have a little fun and add some shredded coconut and melted chocolate for flavors similar to a Belgian macaroon. These cornstarch cookies are the perfect accompaniment to an afternoon cup of tea or coffee; and, thanks to their omission of flour, they happen to be naturally gluten free!

What Does Cornstarch Do in a Cookie Recipe?

Wheat flour has gluten, which can become tough and chewy if over mixed. By contrast, the use of cornstarch results in a tender, melt-in-your-mouth texture. It is crumbly, not chewy or snappy. The addition of condensed milk and butter adds to the silky mouthfeel. 

Can I Use Tapioca in Place of Cornstarch in a Recipe?

These days, many individuals are concerned about the use of genetically modified versions of popular foods like corn. If this is a concern of yours, you can look for cornstarch that is certified non-GMO, or substitute another vegan flour, such as tapioca. As a thickener, tapioca flour is more efficient than cornstarch. In other words, if you were using it in a sauce or soup, you would need to add about half as much as you would cornstarch. 

In the case of our sequilhos, however, you can substitute an equal amount of tapioca flour. We are merely using it as an absorbing agent to create a dough, so it is not necessary to calculate different amounts. 

Do Cornstarch Cookies Need to Be Flattened?

Yes. Traditional Sequilhos cornstarch cookies are pressed down once with the back of a fork. Since the dough is dense, this helps the cookies cook evenly and in a uniform, disc shape. If you want, you can press the dough down twice with the fork to mimic the look of American peanut butter cookies. 

Can I Use Sugar in Place of Condensed Milk?

Yes, but you may need to experiment with the amount of cornstarch you add. This will also affect the number of cookies you can make. Because you will be reducing the amount of liquid overall, you will likely need to either use less cornstarch or add a little more liquid in the form of water, milk, or cream. The ultimate consistency should be thick enough to roll with your bare hands. Experiment with various amounts to achieve the right texture. 

Recipe Cornstarch Cookies With Coconut and Chocolate (Sequilhos)

Ingredients:

2.5 cups cornstarch
6 oz unsalted butter, softened to room temperature
½ cup sweetened condensed milk
1 cup of sweetened, shredded coconut
1 cup semisweet chocolate chips

Directions:

  1. Preheat the oven to 350 degrees Fahrenheit. 
  2. Mix together the softened butter and condensed milk.
  3. Add in the cornstarch a half a cup at a time, thoroughly combining each time. Keep in mind that you might not need to add all of the cornstarch. If the dough is thick but not crumbly, you have the right texture. If it is too sticky, add more corn starch. 
  4. Add in 2 tablespoons of the shredded coconut and mix.
  5. Chill the dough for 30 minutes.
  6. Remove the dough from the fridge, and roll it into 1 inch balls. Roll each ball in the shredded coconut, then place on a lined baking sheet a couple inches apart.
  7. Flatten each of the balls by pressing down with the back of a fork. They should be about ½ inch in height. 
  8. Bake for 15-20 minutes until the edges just start to brown. 
  9. Cool cookies on a wire rack for at least ten minutes before you make your chocolate drizzle.
  10. In a microwave safe bowl, add the semisweet chocolate chips. Microwave on high for thirty second bursts, stirring after each round. Repeat until the chocolate is completely melted.
  11. Dip each of your cookies on one side into the melted chocolate. Return them to the wire rack to cool. Alternately, use a spoon to drizzle chocolate over the top of the cornstarch cookies.  

More Delicious Brazilian Recipes to Try:

When Can I Start Grilling?

The Start of Grilling Season and How You Should Prep

churrasco style grilling

Many of us associate grilling with the hot summer months. Labor Day, for example, seems to be the unofficial marker of grilling season. But if you ask us, the time to grill is whenever you want! Firing up the grill in the cooler Spring temperatures or even in the snow can be a much more pleasant experience than laboring over coals in the summer heat. Read our tips for when to start grilling, how to prep, and what you should be cooking. 

Can I Start Grilling in Winter?

Of course you can grill in winter! If you live in a temperate climate, simply grill as you normally would in the summer months. In colder temperatures, you will need to take a few things into consideration:

  • Your grill will take longer to heat up, so start the preheating process earlier than you normally would.
  • Your grill will also require more fuel, since it will take longer to reach the desired temperature
  • The temperature of your grill may fluctuate more in the cold, which means food can take longer to finish cooking
  • Propane stays in a liquid state at -44 degrees fahrenheit. But we doubt you’ll be doing any grilling anywhere close to that temperature!

You will also need to take a few steps to ensure you are safe and comfortable outside in the cold. Dress warmly, but avoid baggy clothing or other items that may pose a fire risk, like long scarves. Make sure you have a clear path to and from the grill, and that it is free of ice or other fall risks. 

Start Grilling in Springtime

Spring is a perfect time to begin grilling. The pleasantly cooler temperatures are ideal for low and slow cooking, which might otherwise be too oppressive in the summer heat. The best meats for this kind of grill are generally tougher and from the muscular portions of the animal, such as shoulders and briskets. 

Grilling is also a great option for easy weeknight meals during the school year. You can grill meat and vegetables in a matter of minutes, and there are no pots and pans to clean up after. 

Prep Before You Start Grilling

Cleaning Your Grill 

The first step to prepping your grill is cleaning it. This should be done regularly (i.e. after each use) but also at the beginning of each grilling season. If you haven’t used your grill in a while, chances are it could use a good scrubbing. To clean your grill, remove all parts and brush off any stuck-on particles with a stiff wire brush. Then wash each part with mild soap and water and dry thoroughly before putting everything back together again. 

Once you’ve completed your start-of-the-season deep clean, you will want to maintain your grill after each use. Scrape it down thoroughly with a clean wire brush. For charcoal grills, remove accumulated ash and smoke residue; for gas grills, clean the drip pan after each use. 

After each cleaning, run a paper towel soaked with canola oil over the grates. This helps season them and prevent rust build up. Also be sure to regularly clean your wire brush with boiling water or soak it in warm soapy water, then rinse. 

Inspecting Your Grill Parts 

Once your grill is clean, inspect all parts for damage or wear and tear such as loose screws, cracked plastic pieces, broken handles, etc.. If anything looks suspect, replace it right away so it doesn’t cause any problems later on down the road. Also check the propane tank (if applicable). Make sure the hose isn’t worn or frayed and that all connections are tight and secure before using it again this summer season. You will also want to inspect for insects or other animals that may have decided to overwinter inside the hoses. 

Grill Packages Delivered to Your Door

Grilling is all about the meat, and you don’t want to compromise on quality. If you are looking for a convenient way to get the best cuts of meat delivered right to your door, try one of Texas de Brazil’s grill packages. Grade A lamb, pork chops, sausages, steaks, and our famous picanha will ensure your next barbecue is unforgettable. 

Unique Grilling Recipes to Try

Brazilian Grilled Cheese

skewered brazilian grilled cheese with grill marks

Espetinhos de Queijo: Skewered Cheese on the Grill with Honey Drizzle

When we think of “grilled cheese” in the States, we think of a toasted sandwich, often accompanied by a steaming bowl of tomato soup. Grilled cheese has a completely different meaning in Brazil, where it is not a sandwich at all. Instead, Brazilian grilled cheese, or espetinhos de queijo, is a favorite on-the-go snack that is literally nothing more than cheese that has been skewered and grilled. 

Despite its simplicity, Brazilian grilled cheese is a decadent and delicious treat. The salty, smoky cheese is often accompanied with a sweet honey drizzle, perfectly rounding out the flavors of this handheld delight. We like to sprinkle it with a healthy amount of farofa (toasted cassava) for a little crunch and nuttiness-it is seriously like having portable baked brie on a cracker. 

Best Cheeses for Grilling

In Brazil, the favorite cheese for many dishes is called Minas cheese. More specifically, “minas fresca” (fresh minas cheese) is the preferred medium of choice for making Brazilian cheese sticks. 

Unfortunately, minas cheese is not readily available outside of Brazil. However, it bears a good resemblance in both taste and texture to a few cheeses you may readily substitute. In general, you want a nice, salty cheese with a high melting point (you want it to maintain its structure after grilling). If you cannot find fresh minas cheese, try the following:

Halloumi: halloumi is often the go-to for grilling cheeses. Originally from Cyprus, it is made from a combination of sheep’s and goat’s milk. It can be found in most high end grocery stores, including Whole Foods and Sprouts. You will also likely find it at your local Mediterranean grocers, especially if the neighborhood has a sizable Greek population. 

Kefalotyri: kefalotyri is also a Greek cheese made from sheep and goat milk. It is somewhat harder and saltier than halloumi, and the end result has a somewhat softer and smoother texture. Again, you should be able to find this cheese at your local Whole Foods or Mediterranean market. 

Paneer: this is our favorite cheese to use for this recipe. It is a hard cow’s milk cheese common in India, Nepal, Pakistan and other parts of South Asia. It is just as lovely on the grill as halloumi, but tends to be quite a bit less expensive. You can also find it at Whole Foods or at many Indian grocers. 

Queso Panela: queso panela is a Mexican cow’s milk cheese similar in taste and texture to minas cheese. It has a mild, slightly salty flavor that pairs well with sweet or salty condiments. Queso panela has a higher water content, however. It does not, typically, do well as a skewer or hand held, unless you put the end result in a tortilla or on a piece of bread. Queso panela can be found in most grocery stores in the international refrigerator section. 

Preparing Your Brazilian Grilled Cheese Skewers

If you are using wooden skewers, you will need to soak them in water for 30 minutes or so to avoid burning on the grill. Remove the soaked skewers and let dry for a few minutes on a paper towel. 

If you are using halloumi, you can use the skewer-soaking time to extract a little of the excess salt from the cheese. Place the cheese in a container of cold water for half an hour, then remove and pat dry with paper towels. 

Brazilian Grilled Cheese Skewers Recipe

Ingredients:

14 oz paneer cheese, cut into 1”x3” sticks.
Extra virgin olive oil
Kosher salt

  1. Heat your grill or grilling pan to medium-high heat. Brush liberally with the extra virgin olive oil.
  2. Place skewers in each of your cheese sticks and prepare a large baking sheet lined with foil to place them after they are grilled. 
  3. Put skewered cheese sticks onto the preheated grill and grill for 2-3 minutes per side. Try your best to allow clear grill marks to form before turning. 
  4. Sprinkle a little kosher salt onto the grilled cheese and put finished sticks on the lined baking sheet. 
  5. When all the sticks are grilled, drizzle with a generous amount of honey or guava syrup and sprinkle with farofa or toasted sesame seeds for a little crunch. 

Enjoy!

More Great Brazilian Recipes to Try:

Burgundy Mushrooms

Grilled Pineapple Slices

Brazilian Cheese Bread (Pao de Queijo)

Short Rib Stew

vaca atolada, a Brazilian short rib stew with yuca root

Brazilian Beef Stew With Yuca (Vaca Atolada)

This Brazilian version of short rib stew slow-simmers the meat with earthy yuca in a savory sauce of red wine, garlic, fresh herbs, and stock. It is a perfect meal for a cold winter day and requires nothing more than throwing ingredients into a pot and letting the flavors meld. 

Origin of Brazilian Short Rib Stew

Vaca atolada translates to “cow stuck in the mud.” The name is thought to have originated with the dish itself, which was probably eaten in a much grittier form by Portuguese explorers searching for gold in Minas Gerais (late 17th century). 

At that time, the explorers survived off beef preserved in a thick layer of fat. During thunderstorm season, any cattle being herded along with the group would, quite literally, become stuck in mud. The story goes that the explorers would use the time to hunker down and enjoy a stew of the preserved beef. 

A less whimsical but no less plausible explanation for the name is the appearance of the dish itself. Beef smothered in a thick brown sauce might be very rudimentarily described as “cow stuck in mud.” 

What are Short Ribs?

Unlike beef back ribs, which come from the same area of the cow as prime rib and ribeye, short ribs are derived from the lower part of the cow’s ribcage (near the brisket). They have a higher fat content and are generally tougher, which makes them especially well-suited to low and slow cooking methods. 

What is Yuca in Short Rib Stew from Brazil?

Our short rib stew uses yuca in place of carrots or potatoes. Also known as cassava or manioc, yuca is a starchy root that features heavily in Brazilian cuisine, where it has been cultivated for centuries. 

When fresh, yuca can be prepared in much the same way as potatoes, sweet potatoes, or other starchy vegetables: boiled, mashed, fried, or roasted. Dried, it is often processed into a fine powder that acts as a thickening agent similar to arrowroot or cornstarch. This version is also known as tapioca flour.  

Unlike potatoes, fresh yuca must always be peeled before using. The root also has a tough and fibrous core that is best removed before cooking.

Where to Find Yuca for Brazilian Short Rib Stew

You can find fresh yuca in most produce sections at grocery stores, even in the US. If you can’t find it at your local chain store, you will certainly be able to find it at the local mercado or other international store. 

If you are still having difficulty finding fresh yuca, many grocery stores will also have frozen prepared yuca in the freezer aisle. 

Of course, in a real pinch, you can just use regular potatoes. The flavor will be slightly different, lacking that nutty and earthy yuca profile. But good, old fashioned potatoes never go amiss in a hearty stew. 

Bone-In vs Boneless Short Ribs for Stew

You can use either boneless or bone-in short ribs for this recipe. We prefer bone-in, since the bones keep the meat extra-tender and add another layer or richness to the sauce. Bone-in beef short ribs are often pre-butchered “English style.” This means 2-2.5” blocks, which are perfect for the stew and result in even cooking. You can also request that your butcher prepare them this way. It will be much easier than attempting to trim them down at home. 

Short Rib Stew Recipe

Ingredients:

3 lbs bone-in short ribs (2.5” square cut)
Extra virgin olive oil
2 oz all purpose flour
Kosher salt
Freshly ground black pepper
8 oz good red wine (not sweet)
3 cloves garlic, minced
1 yellow onion, diced
1 can stewed, diced tomatoes
2 tbsp tomato paste
2 cups beef stock
1 tablespoon fresh thyme
2 lbs yuca root, peeled and quartered

Directions:

  1. Allow the short ribs to come to room temperature for thirty minutes or so. Season them all over with salt and freshly ground black pepper.
  2. Heat a dutch oven or other large stock pot over medium high heat. Add a drizzle of olive oil.
  3. Dredge your short ribs in the all purpose flour and sear on all sides in the dutch oven. You will not be cooking the meat through, just forming a nice, gold, crust to seal in flavor and tenderness.
  4. Remove the meat and lower the heat of your dutch oven to medium.
  5. Add the onion and cook until softened and translucent. Then add the garlic, and cook for another minute or two until fragrant.
  6. Add in the canned tomatoes and cook for one more minute. 
  7. Make a small spot in the pan and add in the tomato paste. Let it cook for thirty seconds or so, then mix it into the tomatoes, garlic, and onions.
  8. Pour in the red wine and stir, making sure to scrape up any seared bits stuck to the pan. 
  9. Return the short ribs back to the pan and add in stock and thyme. Bring the stew to a boil then reduce heat to low and cover.
  10. Cook on low for two hours. When the beef is tender, add in your diced yuca and cook for an additional thirty minutes, until the yuca root is fork tender.

Serve piping hot as-is with crusty baguette, rye bread, or over a bed of buttery egg noodles.

What if My Short Rib Stew is Too Runny?

If your sauce is not thick enough, you can thicken it with a cornstarch slurry or beurre manié. Beurre manié is preferable, since it maintains the velvety consistency of the sauce. Start with a tablespoon of softened butter and a tablespoon of all purpose flour. Mash them together and add them to the stew. Bring to a boil to allow the sauce to thicken. Repeat the process until you have your desired consistency.  

More Great Brazilian Recipes to Try:

You´re headed off-site..

Would you like to checkout now?

You're switching shops with items in your cart. Our Gift Card products are sold from a seperate shop than our Butcher Shop & Merchandise products and require seperate checkouts.

If you wish to return to your Gift Card cart, simply navigate back to a Gift Card product page and click the cart icon - if you don't see your products please toggle between our different shopping carts.