PICKUP/DELIVERY Reserve
Reserve Order To-Go

Shrimp Dip Recipe from Brazil (Caruru)

caruru shrimp dip from Brazil

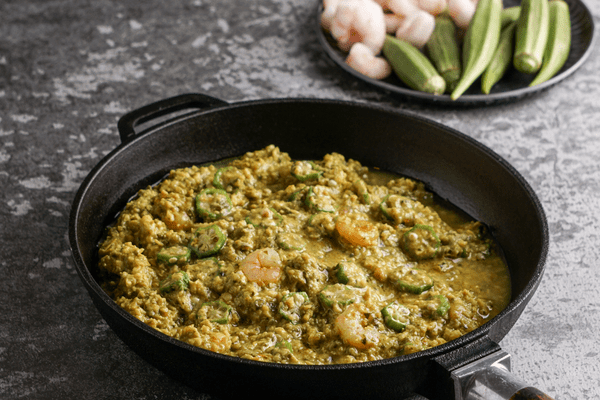
Caruru is a zesty, flavorful shrimp dip from Brazil that often accompanies the popular fritters known as acaraje. It is a unique combination of flavors, with roots heavily steeped in Brazil’s African culture. Many of the ingredients form the base of traditional Bahian cooking, such as dende oil, peanuts, and okra. Despite the seemingly long list of ingredients, this shrimp dip recipe is quite simple to make and will elevate any party snack, from corn chips to crackers to fresh, crunchy veggies. 

Where Does Caruru Come From?

Descriptions of caruru from the 17th century do not include okra or peanuts, but rather a leafy vegetable akin to spinach. During his exploration of the Amazon in 1820, Von Martius described a similar concoction made of “chestnuts pounded with an herb similar to spinach.” There is no mention of shrimp, either. 

There is a popular Caribbean stew known as callaloo that broadly fits this description. Callaloo is most often made with greens like amaranth and taro leaves, then stewed with various spices and salt fish. The taste and texture is often compared to cooked spinach.  

Caruru, it would seem, is a Bahian version of callaloo. The names are even similar, with some suggesting a joint origin. Caruru replaces the greens with okra, a plant native to Africa and likely brought by sugar plantation slaves to Brazil. Much of Brazil’s cuisine, especially in Bahia, has African roots, and the vibrant caruru sauce is a prime example. 

What to Eat with Caruru Shrimp Dip?

Caruru does not have to be a dip. In fact, it tastes delicious served piping hot over white rice or as a delicious base for a lobster roll. Of course, if you have the occasion, you must try it the way Bahians prefer to eat it: paired with a crisp acaraje fritter. These fritters are made from a ground black eyed pea mixture filled with a variety of meats and vegetables. You will often find them served by the famous Baianas de Acaraje, recognizable by their traditional dress. 

What is Dried Shrimp?

Today’s recipe calls for dried shrimp, an ingredient that is widely available in most Asian supermarkets and in the international aisles of many chain stores. The shrimps have been dried in the sun until they are about the size of a thumbnail. They are used as a seasoning in dishes and prized for their unique, umami flavor profile. 

Vegan and Kosher Substitutes for Shrimp Dip

If your diet prohibits shellfish or meat, there are plenty of options that will work for this recipe. Vegan shrimp can be incorporated in place of the jumbo shrimp, and a comparable amount of miso paste will help mimic the sweet, umami flavor of the dried shrimp. 

Shrimp Dip Recipe from Brazil (Caruru)

Ingredients:

1 lb jumbo shrimp, peeled and deveined (about 15-18 shrimps)
2 lbs fresh okra, tops and ends removed, diced
3.5 tbsp ground dried shrimp
¼ cup roasted peanuts
3 cloves garlic, minced
2 tsp red chile flakes
1 small yellow onion, chopped
2 tablespoons dende (red palm oil)
6 oz water
½ cup fresh cilantro, chopped
Extra virgin olive oil
Freshly ground black pepper
½ tsp kosher salt
Hot sauce

Directions:

  1. Heat a skillet over medium high heat. Add a drizzle of extra virgin olive oil. Saute the okra in the oil until the edges take on a golden brown color (about 3 minutes). Remove from heat and set aside. 
  2. In a blender or a food processor, add your jumbo shrimp, ground dried shrimp, and peanuts. Blend or pulse until a smooth, thick paste forms.
  3. Heat another skillet over medium heat. Add in the dende oil and cook the onions, garlic, and chile flakes until fragrant and softened (2-3 minutes).
  4. Stir in the shrimp paste, salt, pepper, and water.  Bring the mixture to a simmer, then reduce to low and cover.
  5. Simmer on low for thirty minutes. 
  6. Add in the cooked okra, chopped cilantro, and a few dashes of hot sauce. 

More Great Brazilian Recipes to Try:

Grilled Pineapple Slices

grilled pineapple rings on cutting board

Pineapple on the Grill with Brown Sugar Glaze

The sweet, succulent fruit we call “pineapple” has its roots in South America, where it was first cultivated along river drainage routes between Paraguay and southern Brazil. Today, it is grown all over the continent as well as other tropical parts of the world. The fruit has a unique and delicious flavor that lends itself to a variety of recipes and cooking methods. Grilled pineapple slices are particularly refreshing on their own or over a scoop of vanilla ice cream. 

Pineapple History

Archaeologists have found evidence of pineapples dating as far back as 1200 BC in parts of Peru. The Mayans and Aztecs began to cultivate it in Mexico between 200 BC and 700 AD. By the 1400s, it existed as an important food resource among most indigenous tribes of Mexico, South, and Central America. 

The pineapple was introduced to Europeans by way of Christopher Columbus, who brought it back to Spain and dubbed it the piña de Indes, or “pine of the Indians.” The Portuguese colonists also brought pineapples home and introduced them to India and other parts of South Asia. 

Europeans, for their part, were fairly obsessed with the strange fruit of the colonies. It proved excessively difficult to grow in non-tropical regions, like Britain and France, where only the wealthiest of citizens could afford them. In fact, pineapples were considered such a status symbol in Europe that they were rarely eaten. Lucky owners would use them as centerpieces for as long as possible until rot necessitated they be thrown away. 

Pineapple became more mainstream by the 1900s, when plantations in the West Indies began producing enough quantities to reduce cost. 

Pineapples and Hawaii

Pineapples were brought to Hawaii by the Spanish in the 18th century, although it was not commercially grown until the late 19th century. James Dole and the Del Monte Company both established operations for growing and canning the fruit on the island of Oahu, which dominated pineapple production until the 1960s. 

Hawaii continues to grow and export pineapple, but not in nearly the same quantities. Today, the Philippines is actually one of the leaders in pineapple export, especially since the acquisition of Del Monte Foods in 2014. 

Nevertheless, the symbol of the pineapple in Hawaii remains ubiquitous. Many times, foods are given the label “Hawaiian” simply due to the presence of a few chunks of pineapple (a controversial pizza comes to mind). 

Fresh vs Canned Grilled Pineapple Slices

You can use canned pineapple for this recipe, but we recommend fresh. Canned pineapple is often submerged in a sugary syrup, which will affect the final texture and taste of the dish. The extra sugar may also cause the slices to burn or cook unevenly. If you do decide to use a canned version, look for ones that say “in 100 percent pineapple juice” and not “in heavy syrup.”

Sugar Glaze for Grilled Pineapple

Today, we will be coating our grilled pineapple slices in a brown-sugar, butter, and cinnamon glaze. The glaze forms a delightfully caramelized crust around the soft, sweet fruit. That being said, pineapples are naturally high in sugar. If you want to limit your sugar intake, you can omit the glaze altogether. Just make sure you use a non-stick spray to keep your pineapple slices from sticking. 

Grilled Pineapple Slices Recipe

Ingredients:

One fresh pineapple, peeled, sliced, and cored (or one 20z can of sliced pineapple)
⅓ cup melted butter
⅓ cup brown sugar
2 tsp ground cinnamon
½ tsp vanilla extract

Directions:

  1. Heat a gas grill, charcoal grill, or grill pan over medium high heat. Brush liberally with oil or non-stick spray. 
  2. In a mixing bowl, stir together the butter, brown sugar, cinnamon, and vanilla extract. Brush the mixture on the top and bottom of each of the pineapple slices.
  3. Grill the pineapple slices for 2-3 minutes per side, until they have beautiful grill marks and are golden brown. 
  4. Serve warm as-is or with vanilla ice cream. 

More Great Recipes to Try

Pamonha

Brazilian pamonha on plate with fresh corn in the background

Brazilian Sweet Corn Tamale Recipe

Pamonhas are a unique Brazilian dish made from sweet corn. Like many other corn dishes, they are widely consumed during the Festas Juninas, since the festival coincides with the nation’s second harvest of corn. But the pamonha is also eaten year round as a simple, delicious treat that can be customized to suit any taste. 

Where Did Pamonha Come From?

Pamonha are first recorded as having been made and eaten in the Minas Gerais region of Brazil. Although it was probably consumed well beforehand, the first recipes for pamonha arose during the 19th century.   

The name “pamonha” likely comes from the Tupi language, an indigenous language of South America. In the Tupi-Guarani dialect, the word pa-muna translates in English to “sticky,” which might describe the consistency of the dish. 

Pamonha vs Tamales

Pamonha shares certain characteristics with the tamale, a traditional dish of Mesoamerican origin. Both the pamonha and tamal utilize a corn-based paste that is steamed or boiled within a corn husk. Both can be filled with various ingredients, like meat or vegetables. 

The main difference between a pamonha and a tamal is the type of corn that is used and how it is processed. Tamales use masa, a mixture made from field corn that has been dried then soaked in an alkaline solution (usually limewater). The soaked kernels are rinsed with water, and the resulting product is called hominy. Hominy can be ground into a fresh dough or dried into a meal known as masa harina. For tamales, masa is blended with spices, water or stock, and lard. 

Pomonha, on the other hand, uses fresh, sweet corn as the main ingredient. Sweet corn has a naturally higher sugar content, which means it lends itself to dessert dishes. Traditional pamonha, for example, are made with grated coconut, coconut milk, butter, and sugar and served as-is for a sticky, sugary treat. 

Are Pamonha Always Sweet?

While traditional pamonha are often sweet, you can easily adapt this recipe to accommodate savory fillings. Pamonha salgada, for example, is a cheese-filled variation. It uses less sugar in the dough and adds parmesan cheese and a good amount of melty white cheddar. (It is not dissimilar in taste to Brazilian cheese bread.) 

The simplicity of the basic recipe for pamonha means you can customize it however you like. Experiment with different flavors and fillings and have fun with it!

Pamonha Recipe

Ingredients:

4 cups fresh, sweet corn kernels (about 6-7 ears of corn)
¼ cup masa harina
5 oz unsweetened coconut milk
1 ¼ cup white sugar
½ tsp salt
4 oz grated sweetened coconut
2 tbsp melted butter
Corn husks for wrapping
Corn straw or kitchen twine for tying

Directions:

  1. Peel the husks from your corn. Rinse the larger leaves and put them in a saucepan. Cover the husks with water and bring the pan to a boil. Cook for three minutes, then remove the pan from the heat and set it aside.
  2. Slice off corn kernels with a sharp knife. 
  3. When you have enough corn kernels, place them in a blender with the coconut milk and blend until a smooth liquid forms. Add the sugar, salt, butter, grated coconut, and masa and blend until smooth. 
  4. At this point, the mixture should be sticky, but malleable. If your mixture is too liquid, add a little more masa. If it is too tough, add a little more coconut milk. 
  5. Put a blanched corn husk with the glossy side up onto the counter. The wide end should be facing away from you.
  6. Spread about ¼ cup along the top half of the corn husk. A good method is to scoop the amount you want using a spoon, then put a layer of plastic wrap over the dough and press it down using your fingers.
  7. Fold one long side of the husk over the dough, then the other long side. Finally, bring the bottom half up to form a pouch. Secure with corn straw or twine.
  8. Continue this process until you have used all of your dough.
  9. Put your pamonhas in a large saucepan and cover with water. Bring to a boil then reduce the heat to medium-high. Simmer for about 45 minutes, or until the husks begin to take on a yellowish appearance.
  10. Remove the pamonha from the water and let them cool slightly before serving. 

More Great Recipes to Try:

Lamb Loin Chops Recipe

Pan Seared Lamb Loin with Garlic and Rosemary

lamb loin chops in skillet with garlic and rosemary

The Brazilian Steakhouse tends to be synonymous with one word: beef. From the signature picanha to more mainstream cuts like filet mignon, the churrascaria is a steak-lovers paradise. But Brazilians also enjoy plenty of other types of meat, including lamb. Like Americans, Brazilians often consider lamb to be a meat reserved for special occasions. Today’s recipe for lamb loin chops is ideal for the upcoming Holidays: pain seared with plenty of garlic and rosemary, it is deceptively simple and packed with flavor. 

Lamb Chops vs Lamb Loin Chops

Lamb chops are harvested from the ribs of the lamb. They can be sold separately or in a rack to be carved after cooking. This cut of lamb may also be served “frenched,” with a length of rib bone polished and protruding from the meat to form a handle. Chops presented in this way are sometimes referred to as “lamb lollipops.” They tend to be the most expensive of all the cuts of lamb and are prized for their tenderness and depth of flavor. 

Lamb loin chops, by contrast, are derived from the area just behind the rib cage, between the tenderloin and the flank. Loin chops can be bone-in or boneless and contain a large medallion of the adjacent tenderloin, giving them the appearance of a smaller t-bone steak. They can be slightly tougher than lamb chops since they are leaner. This means their flavor and texture are best at rare or medium rare temperatures. 

What Does Lamb Taste Like?

Lamb has a similar texture to beef, but it has a slightly stronger, gamey flavor. The overall taste of the meat will vary slightly depending on where the lamb was reared and what its diet consisted of. Grass-fed lambs, for example, have a more distinct flavor that is somewhat earthy and smokey. 

Is Lamb Better for You Than Beef?

Like beef, lamb is considered a red meat. As such, it is an excellent source of protein and certain vitamins and minerals, including zinc, selenium, and iron. Lamb may offer additional health benefits compared to beef, especially if it has been grass fed. This diet infuses the meat with beneficial Omega 3 fatty acids, which have been shown to prevent heart disease and aid in bone and joint health. 

Lamb does have higher levels of saturated fat than beef, which means it can be somewhat higher in calories (3 oz of lamb loin has about 282 calories, compared to 3 oz of beef top loin, which has 224). However, the meat generally has less marbling, which means most of the fat is in one area that can be discarded. 

How to Cook Lamb Loin Chops

Lamb loin chops are at their tastiest when cooked rare or medium rare. They do well with almost any cooking method, but especially pan searing and grilling. To get the most out of your loin chops, keep the following tips in mind before you cook them:

  1. Let the chops come to room temperature before cooking. This ensures a more even sear and reduces the chance of overcooking.
  2. Use bone-in chops. While they may not be as convenient to cut or eat as the boneless version, bones in meat act as a temperature insulator. This, again, makes for more even cooking and slows down the cooking process slightly, giving you a little wiggle room for temperature. 
  3. Use a cast iron skillet or dutch oven. These heavy bottomed pans are ideally suited to searing meat, since they maintain a perfectly even temperature and form a beautiful crust. 
  4. Cook in batches. You may be tempted to get all your chops into the pan at once, but you will have a much more difficult time getting that beautiful brown crust to form if the pan is too crowded. Cook your chops in batches to give them enough space to cook evenly and seal in those juices. They need to rest anyway, so don’t rush it!

Lamb Loin Chops Recipe 

Ingredients:

3 pounds lamb loin chops (bone in)
Extra virgin olive oil
Salt
Freshly ground black pepper
4 tbsp butter, unsalted
6 cloves garlic, smashed*
1/2 tbsp fresh rosemary (or 1/2 tsp dried)
1 tbsp fresh thyme (or 1 tsp dried)

Directions:

  1. Allow your lamb loin chops to come to room temperature (about 20 minutes should do). 
  2. Preheat a cast iron skillet over medium high heat.
  3. Season the lamb loin chops liberally on both sides with salt and black pepper.
  4. Add a drizzle of extra virgin olive oil to the preheated skillet (about a tablespoon). 
  5. Add chops and brown on each side until a golden crust forms. This should take about 3 minutes per side.
  6. Remove the chops to a separate dish and lower the heat of your pan to medium. When the pan has cooled to medium, add the butter, rosemary, thyme, and smashed garlic to the pan. 
  7. Let the butter melt and the garlic become fragrant (don’t let it burn!).
  8. When the butter is melted, add the chops back to the pan and cook them for another 10-15 minutes until the internal temperature is 125** degrees (medium rare). 
  9. Serve with any remaining pan juices and fresh herbs. 

*We recommend smashing or slicing the garlic to infuse its flavor into the butter without burning. If you want to mince your garlic, you will want to add it later in the cooking process (1-3 minutes before chops are done). 

**The USDA recommends cooking lamb to a temperature of at least 145 degrees for food safety. However, most chefs agree that the high heat when searing will eliminate surface bacteria and other worrisome pathogens. This does not apply to ground lamb, of course, which will need to be cooked to an internal temperature of at least 160 degrees to eliminate food borne pathogens on and within the meat. 

Try Your Lamb Loin Chops With These Great Side Dishes:

Premium Lamb Chops Delivered to Your Door

The best tasting meat starts with quality. At Texas de Brazil, we source only the highest rated, USDA choice meats for both our restaurant and our delivery service. Visit Texas de Brazil’s online butcher shop to have premium cuts of lamb, beef, chicken, pork, and sausage delivered right to your door. Go online to select your hand curated grill package, or choose from a la carte options (including our signature spicy rub for picanha). 

Texas de Brazil Announcement – Opening Its First Nebraska Restaurant Location in Downtown Omaha

Premier Brazilian Steakhouse Introduces the Brand’s First Nebraska Location

Omaha, NE – October 7, 2022 — Texas de Brazil, the world’s premier Brazilian steakhouse, opens tonight in the city of Omaha. The restaurant is located at 1110 Capitol Ave, Omaha, NE 68102 in the up-and-coming, Capitol District.

Texas de Brazil’s family-owned churrascarias are renowned for their time-honored tradition of churrasco-style cooking combined with generous southern hospitality and superior service.

“We’re excited to bring our unique dining concept to guests in Omaha, a city famous for its pioneering past and high standards in the steakhouse industry. We look forward to sharing our delicious Brazilian fare with the community and hope to exceed their expectations,” says Salim Asrawi, president of Texas de Brazil.

The new restaurant features soaring ceilings with unique light fixtures and an extravagant salad area made of white marble and adorned with a lavish flower arrangement. Guests can enjoy a drink in the intimate lounge area or browse for their favorite wines in the elegant wine cellar.

The restaurant features one exclusively private dining room, where up to 30 guests can dine together. For smaller parties, the dining room features a stunning wood table that accommodates up to 10 guests next to the grill where guests can view the meats being prepared in the Brazilian gaucho way, over an open flame using natural wood charcoal.

The highlights of this rodizio-style dining experience are the continuous servings of fire-roasted meats and unlimited plates from the chef-crafted salad area.

The experience begins with a visit to the expansive salad area where hot and cold side specialty dishes offer delicious variety.

  • Salad Area Selections include artisan breads, imported cheeses, grilled vegetables, Brazilian hearts of palm, spicy shrimp salad, couscous pasta, sautéed mushrooms, feijoada (black beans), jasmine rice, lobster bisque and much more.

The main course or star of the show – a savory variety of flame-grilled meats that are expertly prepared and carved at the table by the restaurant gauchos.

  • Churrasco Selections include cuts of beef, lamb, pork, chicken and Brazilian sausage, such as filet mignon, barbecued pork ribs, leg of lamb, Parmesan drumettes and the guest’s favorite, picanha.

A good wine nicely complements the flavors of churrasco and Texas de Brazil’s curated wine list includes acclaimed varietals from California and South America vineyards as well as Texas de Brazil’s exclusive private label collection of six varietals bottled in Chile.

A full bar offers craft cocktails including the traditional Caipirinha in a variety of flavors plus a full selection of distilled spirits and beer (domestic and Brazilian).

For those with a sweet tooth, no meal is complete without dessert and guests can indulge in selections including house-made flan, triple layer chocolate mousse cake, cheesecake and more, all served a la carte.

Service hours include – Dinner: Wed. -Thurs. 5 – 9 p.m., Fri. 5 – 9:30 p.m., Sat. 4 – 9:30 p.m. and Sun. 4 – 8:30 p.m.

Regular dinner, which includes the meat and salad service is $49.99 per person. The salad area only option is $29.99. When purchased with a full-price meal children 2 years and under dine complimentary, 3-5 years are $5.00 and 6-12 years are 50% off regular dinner price.

For reservations or more information, visit www.texasdebrazil.com/locations/omaha/ or call 402.783.8777.

About Texas de Brazil

Texas de Brazil is an authentic churrascaria featuring a continuous dining experience that blends the unique culture of Brazil, with the generous hospitality of Texas. The menu features a vast selection of grilled meats, a 50-item salad area, an award-winning wine list and a la carte dessert selections. Founded as a family-owned business in 1998, Texas de Brazil is now the largest Brazilian-American steakhouse brand in the world, with restaurants in 21 states and 12 international locations. Stay connected. Follow @texasdebrazil on Instagram and Twitter, and Texas de Brazil on Facebook. For information, visit http://www.texasdebrazil.com.

# # #

Brigadeiro Cake

brazilian brigadeiro cake with sprinkles

Traditional brigadeiros in Brazil are chocolate fudge balls served in little cupcake flutes and topped with chocolate sprinkles. Like many Brazilian desserts, condensed milk is used as a base. Brigadeiros are considered a “must” at parties, since the bite-sized treats are so delicious and easy to make. They are also highly customizable, since they require only a few simple ingredients. They can be found in various flavors and iterations, including today’s brigadeiro cake. 

Where Do Brigadeiros Come From?

The first Brigadeiros are attributed to Heloísa Nabuco de Oliveira, a confectioner from Rio de Janeiro. During the presidential elections of 1946, Heloisa was an ardent supporter of Eduardo Gomes. Gomes held the military rank of “Brigadier,” and it is thought that Heloisa developed and named the new dessert in his honor. The original name was “doce de brigadeiro,” but it was eventually shortened to just “brigadeiro.”

The classic Brigadeiro has a signature look: small, round balls topped with chocolate sprinkles and served in paper bonbon cups. However, you will find many variations on the theme throughout the country. Like French truffles, Brigadeiros lend themselves to all sorts of flavors and toppings. Coconut is quite popular, as is strawberry, lemon, and various nut mixtures. 

The Brigadeiro recipe can also be applied to larger confections, like pies and cakes. The creamy texture is a perfect frosting for a dense crumb cake or a filling for a silky chocolate pie. Today’s recipe is for a Brigadeiro cake: a moist, two-layer chocolate cake is filled and iced with brigadeiro frosting, then coated in plenty of chocolate sprinkles. 

Brigadeiros vs Truffles vs Fudge

Brigadeiros are quite similar to both truffles and American fudge. However, each of these confections has a slightly different texture due to their ingredients. 

Truffles are made with “ganache,” a mixture of chocolate and heavy cream. Their texture is soft and creamy, and they are often not as sweet as fudge or Brigadeiros. 

Like Brigadeiros, fudge is made with condensed milk and chocolate. However the ratio of chocolate to condensed milk is much higher, and the chocolate takes the form of chips or a chopped bar. The resulting texture is much harder than a truffle or a Brigadeiro.

Brigadeiros typically incorporate butter and powdered chocolate in addition to the condensed milk, which makes them softer than fudge and slightly chewier than truffles. 

Can I Use Cake Mix for Brigadeiro Cake?

Of course! Store-bought cake mixes will be perfectly fine for this recipe, especially if you are in a hurry or don’t want to deal with the extra ingredients. The star of the show is really the Brigadeiro frosting, so make sure you don’t cut corners for that!

Can I Make Brigadeiros Without Condensed Milk?

We have never tried to do this ourselves, but Pies and Tacos has a lovely recipe for a vegan and paleo option for Brigadeiros that incorporates coconut butter, cashew butter, and vegan chocolate chips. Certainly worth a try!

What is Table Cream?

Table cream is a dense, shelf-stable cream that is sold in can or jar form. You can often find it in the international section of the grocery store as Mexican crema or Media Crema. In the can, especially, you will notice a clear liquid above the cream, which tends to settle to the bottom. Before you use the cream, strain off this liquid.

If you do not have table cream, you can substitute heavy cream. You may need to adjust the amount of butter and cornstarch, however, to achieve the desired consistency.  

Brigadeiro Cake 

Ingredients:

For the Brigadeiro Cake

2 cups all purpose flour
¾ cup unsweetened cocoa powder
1.5 cups granulated sugar
1 cup whole milk
½ cup vegetable oil
2 tsp baking soda
1 tsp baking powder
½ tsp salt
3 eggs
1 tsp vanilla extract

For the Frosting

2 14 oz cans of sweetened condensed milk
1 cup table cream with serum strained off (see above)
1 cup whole milk
2 tbsp cornstarch
1 tbsp butter
1.5 cups cocoa powder
Lots of chocolate sprinkles (2-3 cups)

Directions:

  1. Start the frosting. In a saucepan, whisk together your milk, cocoa powder, and cornstarch. Then add in the table cream, condensed milk, and butter.
  2. Heat the mixture over medium heat, stirring constantly. After about 10-15 minutes, you should have a thick consistency similar to mousse or pudding.
  3. Once you have achieved your pudding consistency, remove the brigadeiro cake frosting from the heat. Pour the mixture into a heat safe bowl and cover with cling film. 
  4. Let the mixture cool down to room temperature, then transfer it to the refrigerator and allow it to cool for 1-2 hours. 
  5. While the brigadeiro frosting cools, bake your chocolate cake. Start by preheating the oven to 350 degrees Fahrenheit. 
  6. Grease two 8×2” round cake pans. For easier removal, line the bottom of each pan with parchment paper. 
  7. In a stand mixer, blend flour, sugar, cocoa powder, salt, baking powder, and baking soda.
  8. In a separate bowl, whisk together eggs, vegetable oil, vanilla extract, and milk. 
  9. Add the wet ingredients to the dry ingredients and mix until you have a smooth batter (don’t over mix!). 
  10. Divide the brigadeiro cake batter evenly between your two prepared pans.
  11. Bake in the oven for about 30 minutes or until a knife or toothpick comes out clean when inserted in the middle. 
  12. Let the cakes cool for at least 30 minutes before removing from the pan. 
  13. To frost the cake, place one of the rounds with the flat side up. Scoop a cup or so of your brigadeiro frosting and spread it evenly over the top of the cake.
  14. Place the second brigadeiro cake round on top of the frosted cake again with the flat side up. Spread the remainder of your chocolate frosting on the top and sides of the cake. It does not have to be perfect! You’ll be coating it all with sprinkles, anyway.
  15. Finally, cover your cake liberally with chocolate sprinkles. This can be a little tricky, and you can expect to get some frosting on your hands. If you don’t want to put sprinkles on the sides, just put a good layer over the top. 

Enjoy!

Other recipes to enjoy:

You´re headed off-site..

Would you like to checkout now?

You're switching shops with items in your cart. Our Gift Card products are sold from a seperate shop than our Butcher Shop & Merchandise products and require seperate checkouts.

If you wish to return to your Gift Card cart, simply navigate back to a Gift Card product page and click the cart icon - if you don't see your products please toggle between our different shopping carts.