PICKUP/DELIVERY Reserve
Reserve Order To-Go

Chicken Milanesa (Crispy Breaded Chicken Cutlets)

Chicken milanesa with a lemon wedge and fried potatoes

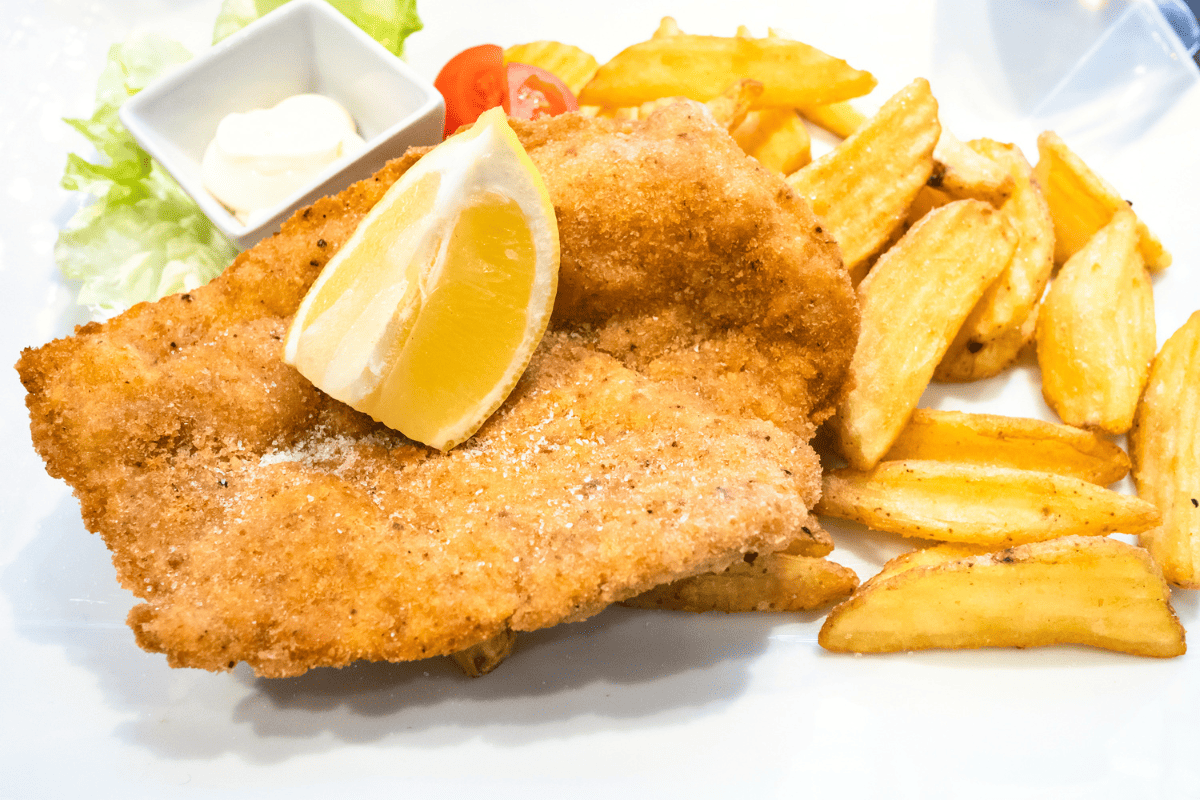
When something is prepared “a milanesa” in Brazil, it generally means some kind of meat has been pounded thin, breaded, and fried crisp. Americans have similar recipes that use this technique, such as chicken fried steak and the borrowed German dish, schnitzel. Brazilians tend to favor poultry and beef over pork, so today we will be making chicken milanesa. Served simply with a squeeze of lemon or on top of a toasted brioche bun, chicken milanesa is an easy comfort food dish that is perfect for a busy weeknight meal. 

Why is it Called Chicken Milanesa?

In English, Chicken a Milanesa is known as “Milanese Chicken” or “Milan Chicken.” This is because the particular dredging and frying style has origins in Milan, Italy. Traditionally, veal was the meat of choice, but beef, pork, and chicken are also popular options. 

The Milanese method of preparing fried meat is a series of steps: 

  1. The meat is pounded thin to tenderize and allow it to cook quickly and evenly.
  2. The pounded cutlet is dredged in flour.
  3. The meat is dipped in a beaten egg mixture.
  4. The meat is dipped into seasoned breadcrumbs.
  5. The meat is pan-fried in oil until crisp and golden.

Vegetarian Milanese Chicken

Again, Milanese-style refers more to the dredging method and less to the actual protein used. This means you can easily substitute vegetarian options and fry them the same way you would chicken, beef, etc. 

Eggplant works well as a substitute, since it has a firm texture. You could also use firm tofu or tempeh; however, when using vegetables, soybean products, or other vegetarian options, skip the step where you pound it flat. You’ll just wind up with a crumbly or slimy mess that does not lend itself to dredging and frying. 

Sauce for Chicken Milanesa

Chicken Milanese is traditionally served with a lemon wedge. It is a refreshing way to cut through what might otherwise be a somewhat greasy dish. You can elevate that twist of citrus by incorporating lemon juice and a little zest in a creamy, tangy butter sauce:

Chicken Milanesa Lemon Garlic Cream Sauce

3 oz unsalted butter, cut into 1-inch pats
2 cloves garlic, minced
6 oz dry white wine
8 oz chicken stock
8 oz heavy cream
Juice of two lemons
1 tsp lemon zest
½ tsp salt (more to taste)
Freshly ground black pepper

Simply melt one pat of butter in a saucepan over medium heat. Saute the garlic until fragrant, then add in the wine, stock, heavy cream, salt, and a few twists of freshly ground black pepper. Bring to a boil and then lower to a high simmer. When the mixture has thickened, add in the remaining butter, lemon juice, and lemon zest. Stir until the butter is melted. 

Milanese Chicken Sandwich

If you want to use your breaded chicken a milanesa for a sandwich, do so by all means! Lightly toast a brioche or potato bun and spread a little mayo or aioli on it. Top the chicken with some fresh lettuce and a thick slice of tomato, and you’ve got a chicken sandwich to rival your favorite fast food place. 

Panko vs Italian Breadcrumbs for Milanese Chicken

As an Italian recipe, traditional chicken milanesa calls for Italian-style breadcrumbs. However, we like to incorporate a little panko as well for added crunch. Panko breadcrumbs are much larger than their finer, Italian counterparts; adding them thickens the crust a bit and makes it all the crispier.

Recipe for Chicken Milanesa

Ingredients:

Serves 4

4 chicken breast cutlets (around 6 oz each)
½  cup seasoned Italian breadcrumbs
½ cup panko
½ cup all purpose flour
1 oz freshly grated parmesan or pecorino cheese
2 large eggs
1 tsp lemon zest
Salt
Freshly ground black pepper
Vegetable oil

Directions:

  1. Pound the chicken cutlets to a thickness of about ¼”. An easy way to do this is to place one on a cutting board, cover it with cling film, and pound with a meat tenderizer. Season each cutlet with salt and pepper.
  2. Set up your chicken milanesa dredging station: put the breadcrumbs, lemon zest, and parmesan cheese in one shallow bowl and mix to combine; put the eggs in another bowl and whisk thoroughly; finally, put the flour into another shallow dish and season lightly with salt and pepper. Mix to combine.
  3. Put around one cup of vegetable oil in a heavy skillet and heat over medium high heat. To see if it is ready, toss a few breadcrumbs in. If they sizzle right away, the oil is hot enough. The oil should be shimmering, not smoking. If this is the case, remove it from the heat and let it cool down a little.
  4. Take one of your chicken cutlets and coat it with the flour mixture. Shake it to remove any excess, then dip it into the egg mixture. Let any extra egg drip off before finally coating the chicken in the breadcrumb and cheese mixture. Repeat this process with each of your cutlets.
  5. Fry the cutlets in the oil until they are crisp and golden brown (about 3 minutes per side). Transfer them to a baking sheet lined with paper towels to drain any excess oil. 
  6. Serve your beautiful chicken milanesa with a fresh lemon wedge or with your lemon garlic cream sauce (see above). Enjoy!

More Great Brazilian Recipes to Try:


Pastel de Queijo (Brazilian Cheese Pastry)

pastel de queijo on a serving platter with dipping sauce

Pastels are a favorite street food in Brazil. They are essentially a hand pie, and can be stuffed with all sorts of delicious fillings, both savory and sweet. Today, we are opting for simplicity and making pastel de queijo. Mild and gooey cheese is encased in a crisp, fried crust for a truly decadent and satisfying treat. 

Where Does Pastel de Queijo Come From?

The exact origin of pastels in Brazil is not known. However, many attribute the first recipes to Chinese immigrants. This is due to the similarity between the pastel’s crust and a fried spring roll wrapper. It is thought that Chinese Brazilians adapted their spring roll recipes to suit different tastes, substituting traditional fillings with local ingredients. 

Another theory suggests that Japanese immigrants were the first to popularize pastels. During WWII, prejudice against Japanese immigrants grew immensely due to the country’s alliance with Germany. In order to escape persecution, many Japanese Brazilians posed as Chinese, adopting clothing and traditions to disguise their true heritage. Making food with typically Chinese ingredients may have been another way to maintain this facade. 

Whatever the history, pastels have become an integral part of Brazilian fast food cuisine. The fillings reflect regional tastes: shrimp and cod are popular in Bahia, while São Paulans favor ground meats. Other common fillings include heart of palm, shredded chicken, requeijao, and, of course, cheese. 

What Kind of Cheese is Best for Pastels?

Traditional pastel de queijo uses a mild cheese, like mozzarella or Minas cheese; but you can use any kind of cheese you like, so long as it is suitably melty. Whatever you might use for a fondue, you can use for a pastel de queijo: 

  • Gruyere 
  • Emmental
  • Cheddar
  • Gouda
  • Havarti
  • Provolone

Feel free to use a blend of your favorites as well. We are sticking with mozzarella and a little aged white cheddar today, but the sky’s the limit for your cheesy filling. 

Tips for the Perfect Pastel de Queijo Crust

The crust is very important for pastels: you want a crisp, crunchy texture that is thick enough to hold in all that cheesy goodness, but not so thick it’s hard to eat. Your crust should also have bubbles (remember the spring roll wrapper relationship?). 

The bubbles in your pastel de queijo crust are achieved via two key ingredients: alcohol and vinegar. Traditional Brazilian pastels use cachaca for the alcohol, but you can substitute any grain alcohol (rum, vodka, etc.). The alcohol does not impart much taste, as it cooks off during frying. It is simply a means of attaining that light, bubbly crust. 

Another important step in ensuring the best crust for your pastel de queijo is letting the dough rest. As with other pastry dough, this allows the gluten in the flour to relax. If you attempt to roll out and cut the dough without resting it, your crust will be tough.

Pastel Dipping Sauce

Pastel de queijo is sometimes served with hot sauce. You can certainly do this with yours, especially if you like heat. We like to pair ours with a little hot honey. In a microwave-safe container, mix half a cup of liquid honey with a tablespoon of red chili flakes (more, if you want spicier). Add in a tablespoon of apple cider vinegar and stir to combine. Heat the mixture in the microwave for two fifteen-second bursts. Let the mixture sit for a few minutes to allow the chili flakes to infuse, then strain them out. Voila!

Freezing Pastel de Queijo

You can easily prepare pastels ahead of time and freeze them until ready to use. Assemble them as you would right before frying, then place them on a baking tray and put them in the freezer. When they have hardened, transfer the pasteis to an airtight container (you may want to wrap them individually in parchment to prevent sticking). The frozen pastel de queijo will keep for up to 4 months. When you are ready to use them, fry them as you would below, keeping in mind you may need a little extra frying time. 

Recipe for Pastel de Queijo (Brazilian Cheese Pastries)

Ingredients:

For the Crust

3.5 cups flour (all purpose)
1 egg
¾ tbsp salt
1 cup cold water
1 oz canola or vegetable oil
1 tsp apple cider vinegar
1 oz grain alcohol (cachaca, rum, vodka, etc.)
Oil for frying

For the Filling

4 oz mozzarella cheese, cubed
4 oz aged white cheddar cheese, cubed

Directions:

  1. In a large bowl, combine the all purpose flour and salt. Add in the egg, water, vinegar, alcohol, and vegetable oil and mix until the dough starts to come together.
  2. Once you have a soft and pliable dough, knead it on a clean surface for about five minutes until it becomes smooth and elastic. Return the dough to the bowl and cover it with a damp cloth. Let the dough rest for 15-30 minutes.
  3. After the resting period, divide the dough into smaller portions (about the size of a large marble) and roll each portion into a thin, circular disk. You want around 3-4 inches in diameter. Repeat this process for the remaining dough. 
  4. Place 1 cube of each type of cheese in the center of each disc. Fold the dough over the cheese to form a half moon shape. Press the edges firmly to seal the pastel, using a fork to crimp the edges.
  5. In a large frying pan, add enough oil to cover the pasteis de queijo. Heat the oil to 350 degrees Fahrenheit (175 degrees Celsius). To check if the oil is ready, drop a small piece of dough into the oil. If it sizzles and quickly rises to the top, the oil is ready.
  6. Carefully slide the pastel de queijo into the oil and fry until golden brown on both sides, flipping once during the process. Fry in batches and avoid overcrowding the pan. It usually takes about 3-4 minutes per side, but keep an eye on them to prevent burning.
  7. Once done, remove the pastels from the oil using a slotted spoon and transfer them to a paper towel-lined plate to drain excess oil.
  8. Let the pasteis cool for a few minutes then serve with your hot honey dipping sauce or with a squeeze of lime juice. Enjoy!

More Great Brazilian Recipes to Try:


Lebanese Brazilian Food: Fried Kibbeh

plate of fried kibbeh from brazil

Immigration from the Levantine Region to Brazil began in the late 19th century. The Ottoman Empire had collapsed, resulting in uncertain political and economic futures for the citizens of Lebanon and Syria. Between 1885 and 1933, over 130,000 Lebanese immigrants arrived in Brazil through the Port of Santos. 

Today, over 7 million Brazilians claim Lebanese descent. This number is greater than the population of Lebanon itself, so it is no surprise that Lebanese culture is quite prevalent in many parts of Brazil. This is particularly true of Lebanese cuisine, which can be found readily in almost every city. Favorite Brazilian Lebanese dishes include hummus, tabbouleh, sfiha, and sweet halwas drizzled with honey. 

Another favorite Lebanese dish in Brazil is kibbeh. Traditional kibbeh are a kind of croquette made by pounding a mixture of lamb, spices, fresh mint, and onions. The mixture is rolled together into a football shape and stuffed into a shell made from a blend of bulgur wheat and more minced lamb and spices. 

Kibbeh in Brazil

Brazilian kibbeh are similar to the traditional Lebanese croquettes, but the meat of choice is typically beef instead of lamb. There is also a raw version known as kibbeh cru. This is often compared to a French steak tartare, but the presence of those Levantine spices make it quite unique. 

Brazilian kibbeh may also be stuffed with various fillings, including requeijao (Brazilian cream cheese). 

What is Bulgur?

The bulgur used to form the shell of the kibbeh is made from cracked whole kernels of wheat (usually durum wheat) that are then par boiled. This precooking method means that bulgur can be prepared much faster than other versions. 

Bulgur is a very popular whole grain in the Middle East, where it has been used in various recipes for thousands of years. Tabbouleh salad, for example, incorporates bulgur wheat, tomatoes, onions, fresh mint, and a tangy lemon dressing.

What Is a Good Bulgur Substitute?

If you do not have or do not want to use bulgur, many recipes use wheat couscous instead. Plain white rice, farro, or barley can also be used. 

Gluten free bulgur substitutes include quinoa, buckwheat, amaranth, and millet.   

For kibbeh, the grain most similar in flavor is barley. However, barley will take much longer to cook, since it has not been parboiled. For a gluten-free substitute for kibbeh, we recommend millet. Again, you may need to adjust the cooking time to ensure it is tender. 

Do I Have to Use Mince Meat in Brazilian Kibbeh?

No, you can use a vegan alternative, like chickpeas, to form your shell and filling. You may need to experiment with the quantities to form a good binding, or you can just try this delicious recipe with chickpeas, dates, walnuts, and red onions.

What is Kibbeh Spice Made Out Of?

Kibbehs are spiced with a special blend known as kamouneh. This is a mixture unique to the Levantine region of the Middle East and lends an earthy flavor to any recipe. It centers around cumin (kamouneh), which is enhanced with various dried herbs and berries. 

If you cannot find pre-made kamouneh or kibbeh spice, try the following recipe:

Homemade Kamouneh for Brazilian Kibbeh

2 tbsp ground cumin
1 tsp ground black pepper
½ tsp ground marjoram
1 tsp dried mint
1 tsp dried basil
1 tsp salt
½ tsp paprika
½ tsp ground coriander
1 tbsp allspice
2 tsp turmeric
1/2 tsp cinnamon
½ tsp cayenne (or more for additional heat)

Brazilian Kibbeh Recipe

Ingredients:

For the shell

2.5 cups bulgur wheat (fine ground)
1 pound lean ground beef
1 large yellow onion, roughly chopped
1 tablespoon kamouneh spice
Pinch of salt

For the Filling

1 pound lean ground beef
½ yellow onion, diced
1 clove garlic, minced
1 tablespoon kamouneh spice
¼ cup toasted pine nuts
Extra virgin olive oil
Vegetable oil for frying

Directions:

  1. Soak your bulgur in cold water for fifteen minutes, then strain.
  2. Add the bulgur, 1 pound of lean ground beef, the roughly chopped onion, and one tablespoon kamouneh to a food processor*. Pulse until a thick, smooth paste forms.
  3. Place the paste in the refrigerator.
  4. Cook the filling. Heat a skillet on medium heat and add in a drizzle of olive oil. Add in your diced onions and cook until softened and translucent (2-3 minutes). 
  5. Now add in your beef and one tablespoon of kibbeh spice.  Cook until evenly browned.
  6. Just before the meat is done, add in the garlic and cook until it is fragrant and the meat has finished browning. Be careful not to burn the garlic!
  7. Allow your filling to cool for ten minutes or so.
  8. Retrieve your kibbeh dough from the fridge.
  9. Next to the kibbeh bowl, have your filling and a small bowl of water nearby. You will need to continually wet your hands to avoid the dough becoming too sticky.
  10. Wet your hands in the water and scoop about two tablespoons of the shell dough out. Roll the dough into an oval shape. 
  11. Press a hollow in the middle of your dough ball with your hands or the back of a spoon.
  12. Put a small amount of filling in the hollow you have made. Seal the dough back around the meat filling and roll again to make it smooth.
  13. Continue this process until you have used up all your dough and filling.
  14. Freeze the raw kibbeh for thirty minutes.
  15. Meanwhile, heat a skillet over medium high with enough oil to submerge the kibbeh (a deep fry). If you have a heat thermometer, heat the oil to 350 degrees fahrenheit.
  16. Retrieve your frozen kibbeh and fry them in batches until they are golden brown. Let them strain on paper towels and serve immediately with tzatziki, a drizzle of tahini, or greek yogurt thinned with a little lemon juice and olive oil. 

*If you do not have a food processor, you can achieve a similar effect with a blender. Or, if you want to go the traditional route, you can use a large mortar and pestle to beat the bulgur and meat together until they make a fine paste. In Lebanon, this mortar and pestle is known as a jeren. Jeren are made from solid rock and can weigh over 100 pounds!

More Recipes Like This:


You´re headed off-site..

Would you like to checkout now?

You're switching shops with items in your cart. Our Gift Card products are sold from a seperate shop than our Butcher Shop & Merchandise products and require seperate checkouts.

If you wish to return to your Gift Card cart, simply navigate back to a Gift Card product page and click the cart icon - if you don't see your products please toggle between our different shopping carts.