PICKUP/DELIVERY Reserve
Reserve Order To-Go

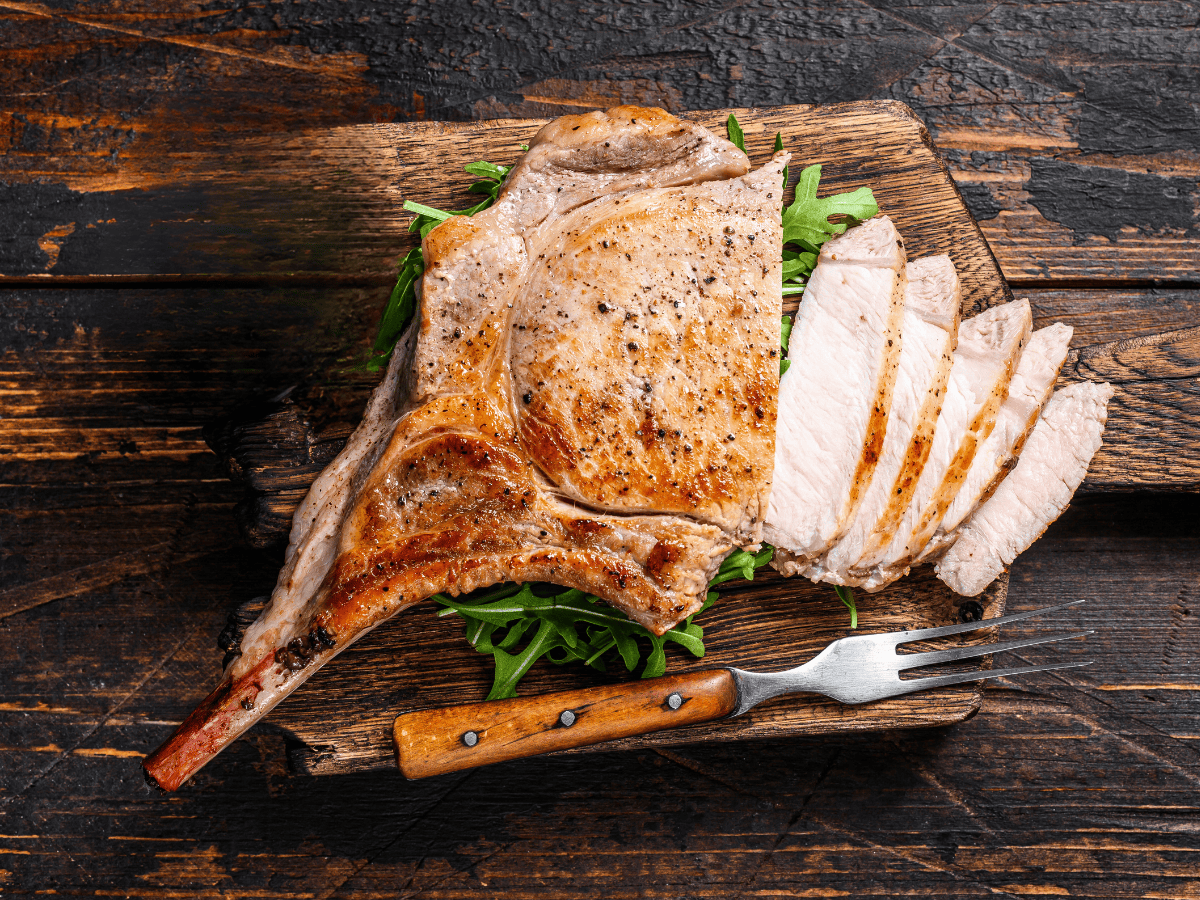
Grilled Tomahawk Pork Chop With Apple Glaze

grilled tomahawk pork chop on a bed of arugula

jump to recipe button

The tomahawk pork chop is a remarkable delicacy, boasting both impressive presentation and succulent flavor. But what exactly sets this cut apart from the rest? Is it any different from a boneless porkchop? Let us teach you more about this rare cut of pork and how to cook it perfectly every time. 

What Cut Of Meat Is A Tomahawk Pork Chop?

The tomahawk pork chop is derived from the loin section of the pig, specifically from the rib area. It is easily recognizable by several inches of frenched bone poking out. “Frenched” simply means the bone has been cleaned of excess cartilage, fat, and meat. The exposed bone serves an aesthetic and practical purpose: it is impressive to look at and also acts as a convenient handle for flipping in the pan or on the grill. 

diagram of cuts of pork emphasizing location of the tomahawk pork chop

Why Is It Called “Tomahawk” Pork Chop?

The name “tomahawk” is a nod to its resemblance to the traditional Algonquian weapon, which is a long-handled ax used as both a tool and a weapon. The term has been adopted in the culinary world to describe cuts of meat that include an elongated bone, including the tomahawk pork chop and tomahawk ribeyes. 

Are Tomahawk Pork Chops A Good Cut Of Meat?

Absolutely. The tomahawk pork chop doesn’t get as much press as its beef cousin, but it should! The internal bone lends an earthy succulence to an already flavorful cut of meat while also allowing for more even cooking and enhanced tenderness. 

Should You Marinate A Tomahawk Pork Chop?

Honestly, you really don’t need to. This cut of meat is plenty tender without a marinade, and you risk overshadowing the milder pork flavor with too many seasonings. A little salt and pepper and a hit of smoke from the grill is all you need for a perfect tomahawk pork chop. 

That being said, a little boost of flavor from a glaze or dipping sauce never hurt anyone. Pork is famous for pairing well with apples, so we like to baste our finished chops with a fresh, sweet glaze made from apple juice (see below). 

Tips For Cooking the Perfect Tomahawk Pork Chop

Preparation

Allow the pork chop to come to room temperature before cooking. This ensures even cooking throughout.

Seasoning

Use a fairly generous amount of salt and black pepper–more than you think you should (unless you are on a low sodium diet, of course). This is a larger cut of meat, remember. 

Grilling

Unlike many cuts of beef, which do best with a quick, high sear, you want to cook your pork chops over medium heat. Pork needs to be ten degrees hotter than beef to achieve medium rare doneness, so you’ll need to cook it slightly longer. Medium heat will ensure you do not burn/overcook the meat.

Resting

Once the tomahawk pork chop has reached an internal temperature of 145°F (63°C), let the meat rest for ten minutes. 

Serving

A single tomahawk pork chop can weigh up to 16 oz, which is more than enough to share (though you may not want to). If you want to slice into the chop to serve it, slice against the grain as you would with beef. 

Grilled Tomahawk Pork Chop With Apple Juice Glaze

Ingredients

2 tomahawk pork chops, 14 oz each
One tbsp unsalted butter
One tbsp extra virgin olive oil
1 clove garlic, minced
1/2 shallot, minced
1/2 tsp fresh rosemary, chopped
1 tsp fresh thyme leaves
2 tsp dijon mustard
2/3 cup apple juice
1 teaspoon kosher salt
Freshly ground black pepper

Instructions

Preheat the Grill

Preheat your grill to medium heat, around 350°F. Make sure the grill grates are clean and lightly oiled to prevent sticking.

Season And Cook

Season the pork chops liberally with salt and freshly ground black pepper. Place them on the grill over direct heat. Sear for around 5-7 minutes per side, checking frequently with a thermometer to test for doneness.  

Rest The Pork Chops

Once the tomahawk pork chops are at 140 to 145 degrees fahrenheit (medium rare), transfer them to a plate or cutting board to rest. 

Make the Glaze

While the pork rests, make the glaze. 

  • Heat a small saucepan over medium heat. Melt a tablespoon of unsalted butter and add in the tablespoon of extra virgin olive oil. 
  • Add in the minced shallot and cook for 1-2 minutes, until softened. 
  • Add in the garlic and cook for a further 30 seconds.
  • Stir in the minced herbs and dijon mustard, then pour in the apple juice. 
  • Bring the mixture to a boil then reduce heat to medium. Simmer until it is thickened and syrupy (about 5-10 minutes). 

Serve

Slice each grilled tomahawk pork chop against the grain into thick, juicy slices and ladle a generous spoonful of your glaze over the top. 

What To Serve With Grilled Tomahawk Pork Chops

Your tomahawk pork chop will pair beautifully with classic steakhouse sides, like mashed potatoes, crispy Brussels sprouts, or roasted asparagus. For a little change of pace, you could try the following sides for a Brazilian spin: 

Where Do You Buy A Tomahawk Pork Chop?

This is a rare cut that is often difficult to find outside of specialty butcher shops. You can order them conveniently online from the Texas de Brazil butcher shop, which will send them wrapped and prepped right to your door. Don’t forget to add in a few other choice cuts of meat, like our Australian rack of lamb, spicy picanha, and bone-in filet mignon

Arroz Carreteiro (Brazilian Rice Made with Leftovers)

Pot of arroz carreitero, long grain Brazilian rice with leftover barbecue meats

Barbecue season is in full swing, which means many of us have a fridge full of odds and ends of charred, smoky meats. Nobody wants to waste them, but it can be difficult to put together another meal from a few ribs and two remaining sausages. Enter arroz carreteiro, a flavorful Brazilian rice designed to incorporate those miscellaneous leftovers into one delicious, filling dish. 

Where Does Arroz Carreteiro Come From?

Arroz carreteiro translates to “waggoner’s rice.” Like many of Brazil’s hearty stews and one-pot meals, this recipe originated with the gauchos of Southern Brazil. The country’s famous cattlemen were in need of quick and easy nourishment while traveling long distances. Like feiijao tropeiro and other dishes, arroz carreteiro frequently included non-perishable ingredients, like dried beef and cassava flour. 

Today, arroz carreteiro is often eaten after a weekend of churrasco. Leftover cuts of meat and veggies are tossed in with perfect long-grain rice and topped with eggs, grated parmesan cheese, and parsley. 

Do You Have to Use Leftover Meat for Arroz Carreteiro?

Of course not! The point of waggoner’s rice is largely to use up leftovers, but that doesn’t have to include meat. You can omit the barbecue leftovers in favor of other things you have in the fridge, like boiled eggs or roasted vegetables. Or, cook fresh portions of meat and add them in the same way you would the leftover meat (see instructions below). 

What Kind of Rice Do I Need for Arroz Carreteiro?

In general, Brazilians prefer long grain white rice (jasmine, basmati, etc.). The reason for this is that the rice grains do not stick together. This allows the individual grains to be coated with flavors and has a less glutinous mouth feel. 

You can use short grain rice if that is what you have, but be sure to rinse it several times to avoid it becoming too mushy as it cooks down. You will also need to slightly reduce the amount of liquid to account for the added moisture from rinsing. Dry rice should have a ratio of 1 cup of rice to 1.5 cups of liquid. Rinsed rice will need 1.25 cups of liquid for every one cup of rice. 

Our arroz carreitero will need more water because we will be using more than just rice. We will simmer it a little longer to allow all the liquid to be absorbed. 

Tips for Perfect Brazilian Rice

In addition to the right amount of liquid and the correct grain of rice, use the following tips to ensure the perfect rice for your arroz carreteiro:

  1. Use a large enough pot. Use a 2 quart stock pot for one cup of rice. Size up when cooking more. 
  2. Keep the heat at a simmer. Once you’ve reached the initial boil, reduce the heat to a gentle simmer; you don’t want to boil the mixture for a prolonged amount of time, since it will reduce the liquid too quickly and undercook the rice. 
  3. Don’t Remove the Lid. When your rice has around ten minutes left to cook, avoid removing the lid, if possible. Steam is important in cooking perfect arroz branco, and you don’t want to let any escape until it is done. A glass lid can be handy for this process so you can keep an eye on the rice without removing the lid. 

Arroz Carreteiro Recipe (Brazilian Rice with Leftover Barbecue)

Ingredients:

1 cup long grain white rice
2 cups of leftover barbecue meat, shredded and/or cubed
2.5 cups water
½ yellow onion, chopped
½ red bell pepper, chopped
1 hot pepper, such as jalapeno or serrano, minced
2 cloves garlic, minced
2 hard boiled eggs
2 tbsp chopped fresh parsley
Extra virgin olive oil
Freshly ground black pepper
1 tsp paprika (not smoked)
Grated parmesan cheese
Salt to taste

Directions:

  1. Heat a large pot or deep skillet over medium heat.
  2. Add a drizzle of olive oil, and add in your chopped onion and peppers. Cook for 2-3 minutes, until tender.
  3. Add in the garlic and cook for a further thirty seconds, just until fragrant.
  4. Add in the barbecue meat, paprika, black pepper, and salt (we used 2 tsp). 
  5. Pour in the rice and add the water. Stir to mix.
  6. Bring the mixture to a boil then reduce to medium-low heat.
  7. Cover the pot partly with the lid, don’t seal it yet. 
  8. Cook the arroz carreteiro for about 25 minutes, until most of the liquid has been absorbed.
  9. When you don’t see any more liquid, turn the heat off and cover the rice completely with the lid. Let the steam work its magic for ten more minutes. 
  10. Top the arroz with the chopped parsley and boiled egg. Add a generous amount of parmesan cheese on top, and serve piping hot. 

Enjoy!

More Delicious Brazilian Recipes to Try:


Cookout Food Brazilian Style

Family around grill for cookout

With warmer temperatures approaching, many of us are itching to get cookout season going. In the US, this typically means brats, burgers, hot dogs, and cold salads. But in Brazil, it’s a whole different ball game. If you’re looking for something new to try at your next barbecue, take a look at this list of unique and delicious cookout ideas. We’ve rounded up some of our very favorite recipes to elevate your cookout food to a new level. 

Unique Cookout Food Ideas from Brazil

Grilled Cheese Skewers

If you’re looking for a truly delicious and unique cookout food, consider grilled cheese.There is nothing simpler yet more decadent than a smokey, charred piece of gooey cheese on a stick. That’s exactly what these espetinhos de queijo are: thick pieces of paneer cheese, brushed with olive oil, seasoned with salt, and grilled on medium high heat for a few minutes on each side. Each slice is skewered with a pre-soaked bamboo stick for the perfect grab and go treat: crisp and smokey on the outside, and melty goodness on the inside. Get the full recipe for Brazilian grilled cheese skewers

Brazilian Potato Salad

Potato salad is a cookout food staple. Brazilian potato salad is similar to the American version, but somewhat lighter. It omits the boiled eggs, pickles, onions, and other ingredients in favor of a simple mixture of potatoes, mayonnaise, and sweet shredded carrots. Garnished with fresh parsley, it is a perfect accompaniment to any grilled meat. Get the full Brazilian potato salad recipe. 

Grilled Pineapple Slices

Another fun cookout food idea that couldn’t be simpler: grilled pineapple slices. Brushed with melted butter, brown sugar, and cinnamon, these slices are lightly charged over the grill until they form a delectable, caramelized crust. They taste amazing on their own, but we are sure no one would complain if they were served alongside a scoop of vanilla ice cream or as a garnish on a refreshing espanhola

Grilled Tomahawk Steak

If you’re looking to truly impress your guests, the ribeye is the king of cookout food. As one of the more expensive cuts of meat, it is essential that it is cooked correctly to get your money’s worth. Luckily, all it takes is a little simple seasoning and monitoring to achieve superb results. The most important steps include: bringing your tomahawks to room temperature, searing on high then moving to indirect heat, allowing the meat to rest for at least fifteen minutes, and slicing against the grain. Voila! Perfect, grilled tomahawk steak at home

Gourmet Brazilian Pasta Salad

Nothing says “cookout” like pasta salad. Brazilians call cold noodle salad “macarronese,” since it is traditionally made with macaroni. Our preferred recipe subs in fusilli for the macaroni to allow the flavorful bacon and dijon dressing to coat every nook and cranny. Add in fresh and surprising ingredients, like shredded carrots, fresh tomatoes, and sweet peas, and you have a gourmet Brazilian pasta salad

Feijoada with Farofa

Instead of the standard baked beans, try this Brazilian take: black beans slowly simmered in a flavorful broth with short ribs, bacon, and sausage. Topped with crispy farofa, feijoada is easily enjoyed as a main course or alongside your favorite cooked meat. 

Brazilian Lemonade

Actually a limeade, limonada suiça is sweet, tart, and refreshing. It is delicious chilled or blended with ice, and is also a fantastic mixer for something a little stronger (rum or cachaca, anyone?). 

Your Next Cookout: Delivered

The best cookout food starts with the best quality ingredients. Skip the supermarket and visit Texas de Brazil’s online Butcher Shop to get premium cuts of beef, lamb, pork, chicken, and more delivered right to your door. Purchase a la carte or a specially curated box and get ready to enjoy the ultimate at-home barbecue experience. 

Peri Peri Chicken

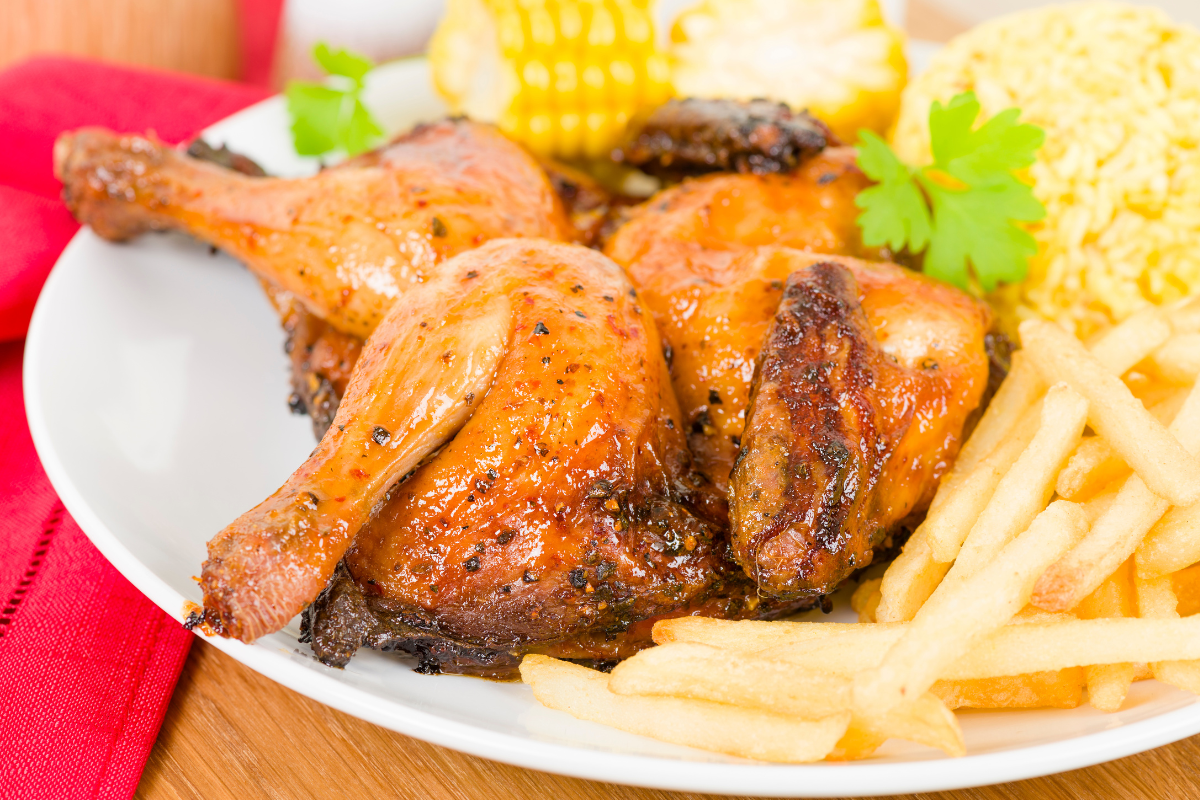
peri peri chicken with french fries, rice, and corn

Peri Peri is a Portuguese condiment that is used to season a variety of dishes. It features as a key ingredient in today’s recipe, which is marinated in a flavorful combination of peri peri, paprika, garlic, and lemon, then seared to perfection on the grill. Peri Peri chicken can also be made by pan searing or even baked, if you prefer. The results are always spiced, tangy and delicious. 

Where Does Peri Peri Chicken Come From?

Peri peri sauce was introduced to South Africans by Portuguese traders, possibly as early as the 16th century. The primary ingredient, the malagueta chili pepper, was sourced from the then-Portuguese colony of Brazil. 

The name “peri peri” is, nonetheless, African in origin. “Pilipili” is Swahili for chili pepper; the name peri peri is specific to the malagueta pepper, which is alternatively known as piri piri in other parts of Southern Africa. 

Today, peri peri chicken is an extremely popular dish in both South America, Portugal, and Southern Africa. Peri peri on its own also acts as a dipping sauce used in much the same way as ketchup or bbq sauce. 

What Does Peri Peri Sauce for Chicken Taste Like?

Peri peri hot sauce has a unique flavor, thanks to the combination of heat, citrus, and garlic. Malagueta peppers themselves have a similar look and taste as thai chilis, or bird’s eye peppers. Malaguetas have a higher heat index, similar to other tabasco peppers. Peri peri hot sauce blends the peppers with ginger, lime juice, garlic, and sugar. The resulting taste is tangy with a hint of sweetness, plenty of fire, and a touch of earthiness from the ginger root. 

What Type of Chicken to Use for Peri Peri Chicken?

The traditional peri peri chicken calls for a whole chicken, bones, skin and all. The chicken is spatchcocked, smothered in zesty peri peri marinade, and grilled over high heat to sear in the juices and crispy up the skin.

You can also use chicken quarters or bone-in, skin-on chicken thighs. You will just need to adjust the grilling time for smaller cuts of meat. Of course, you can use chicken breasts as well, but you will have to be more careful not to overcook the meat. 

Related: When Can I Start Grilling?

How Do You Spatchcock a Chicken for Piri Piri?

Spatchcocking offers several benefits when cooking a whole chicken. The meat cooks more evenly, for one, and in less time. It is also easier to season the meat, ensuring the flavorful marinade permeates every spot. 

With a good pair of kitchen shears, spatchcocking couldn’t be simpler. Place a whole chicken breast-side down on a cutting board. Use the shears to cut along one side of the chicken spine, as close to it as you can. Repeat the same process on the other side, and discard the spine (or save if for stock). 

Flip the chicken over so the breast side is up. Press firmly down to flatten the chicken. You will probably hear a little “crack” of the rib bones. A brutal process, sure, but one that guarantees flavor. 

Store Bought vs Homemade Peri Peri Sauce

You can buy bottled peri peri sauce online or in certain specialty stores. But it is so simple to make, you may as well do it yourself! In the States, you probably won’t be able to locate malagueta peppers. That’s okay! Fresnos or red serranos will work well, and they are readily available in most American super markets. 

Peri Peri Chicken Recipe

Ingredients:

For the peri peri sauce:
5 Fresno chilis or red Serrano chilis
1 clove of garlic, minced
1 tbsp fresh ginger
2 oz fresh lime juice
2 tsp granulated sugar
Pinch of salt
1 oz olive oil, or more to achieve desired texture

For the Marinade:
2 tbsp peri peri sauce
1 tbsp paprika
¼ cup fresh cilantro, chopped
2 oz extra virgin olive oil
2 tbsp brown sugar
2 cloves garlic, smashed
Zest and juice of two large lemons

For the Chicken:
1 whole chicken (approximately 5 pounds), spatchcocked

Directions:

  1. Blend all the ingredients for your peri peri in a blender or food processor until smooth. It should have the consistency of tabasco sauce. Add more oil, if needed. 
  2. Whisk together the marinade ingredients in a small bowl. Place the spatchcocked chicken in a glass or porcelain dish and coat all over with the marinade. Cover and refrigerate for at least two hours (preferably overnight). 
  3. Heat a grill over medium high heat. Brush the grates with plenty of vegetable oil or olive oil.
  4. Place the spatchcocked chicken skin side down and sear for five minutes, until the skin is crisp and golden.
  5. Turn the heat down to low. Flip the chicken over and cover the grill. Cook the chicken on low until it has reached an internal temperature of 165 degrees fahrenheit. This will take about 40-45 minutes, but be sure you are checking the temperature throughout the process to avoid overcooking.
  6. Remove the chicken from the grill and slice into pieces for serving. Serve with additional peri peri sauce for dipping, potato salad, and an ear of corn for a perfect barbecue meal. 

More Great Brazilian Recipes to Try:

When Can I Start Grilling?

The Start of Grilling Season and How You Should Prep

churrasco style grilling

Many of us associate grilling with the hot summer months. Labor Day, for example, seems to be the unofficial marker of grilling season. But if you ask us, the time to grill is whenever you want! Firing up the grill in the cooler Spring temperatures or even in the snow can be a much more pleasant experience than laboring over coals in the summer heat. Read our tips for when to start grilling, how to prep, and what you should be cooking. 

Can I Start Grilling in Winter?

Of course you can grill in winter! If you live in a temperate climate, simply grill as you normally would in the summer months. In colder temperatures, you will need to take a few things into consideration:

  • Your grill will take longer to heat up, so start the preheating process earlier than you normally would.
  • Your grill will also require more fuel, since it will take longer to reach the desired temperature
  • The temperature of your grill may fluctuate more in the cold, which means food can take longer to finish cooking
  • Propane stays in a liquid state at -44 degrees fahrenheit. But we doubt you’ll be doing any grilling anywhere close to that temperature!

You will also need to take a few steps to ensure you are safe and comfortable outside in the cold. Dress warmly, but avoid baggy clothing or other items that may pose a fire risk, like long scarves. Make sure you have a clear path to and from the grill, and that it is free of ice or other fall risks. 

Start Grilling in Springtime

Spring is a perfect time to begin grilling. The pleasantly cooler temperatures are ideal for low and slow cooking, which might otherwise be too oppressive in the summer heat. The best meats for this kind of grill are generally tougher and from the muscular portions of the animal, such as shoulders and briskets. 

Grilling is also a great option for easy weeknight meals during the school year. You can grill meat and vegetables in a matter of minutes, and there are no pots and pans to clean up after. 

Prep Before You Start Grilling

Cleaning Your Grill 

The first step to prepping your grill is cleaning it. This should be done regularly (i.e. after each use) but also at the beginning of each grilling season. If you haven’t used your grill in a while, chances are it could use a good scrubbing. To clean your grill, remove all parts and brush off any stuck-on particles with a stiff wire brush. Then wash each part with mild soap and water and dry thoroughly before putting everything back together again. 

Once you’ve completed your start-of-the-season deep clean, you will want to maintain your grill after each use. Scrape it down thoroughly with a clean wire brush. For charcoal grills, remove accumulated ash and smoke residue; for gas grills, clean the drip pan after each use. 

After each cleaning, run a paper towel soaked with canola oil over the grates. This helps season them and prevent rust build up. Also be sure to regularly clean your wire brush with boiling water or soak it in warm soapy water, then rinse. 

Inspecting Your Grill Parts 

Once your grill is clean, inspect all parts for damage or wear and tear such as loose screws, cracked plastic pieces, broken handles, etc.. If anything looks suspect, replace it right away so it doesn’t cause any problems later on down the road. Also check the propane tank (if applicable). Make sure the hose isn’t worn or frayed and that all connections are tight and secure before using it again this summer season. You will also want to inspect for insects or other animals that may have decided to overwinter inside the hoses. 

Grill Packages Delivered to Your Door

Grilling is all about the meat, and you don’t want to compromise on quality. If you are looking for a convenient way to get the best cuts of meat delivered right to your door, try one of Texas de Brazil’s grill packages. Grade A lamb, pork chops, sausages, steaks, and our famous picanha will ensure your next barbecue is unforgettable. 

Unique Grilling Recipes to Try

You´re headed off-site..

Would you like to checkout now?

You're switching shops with items in your cart. Our Gift Card products are sold from a seperate shop than our Butcher Shop & Merchandise products and require seperate checkouts.

If you wish to return to your Gift Card cart, simply navigate back to a Gift Card product page and click the cart icon - if you don't see your products please toggle between our different shopping carts.