PICKUP/DELIVERY Reserve
Reserve Order To-Go

Stuffed Pumpkin Recipe (Camarao na Moranga)

Brazilian stuffed pumpkin with shrimp stew

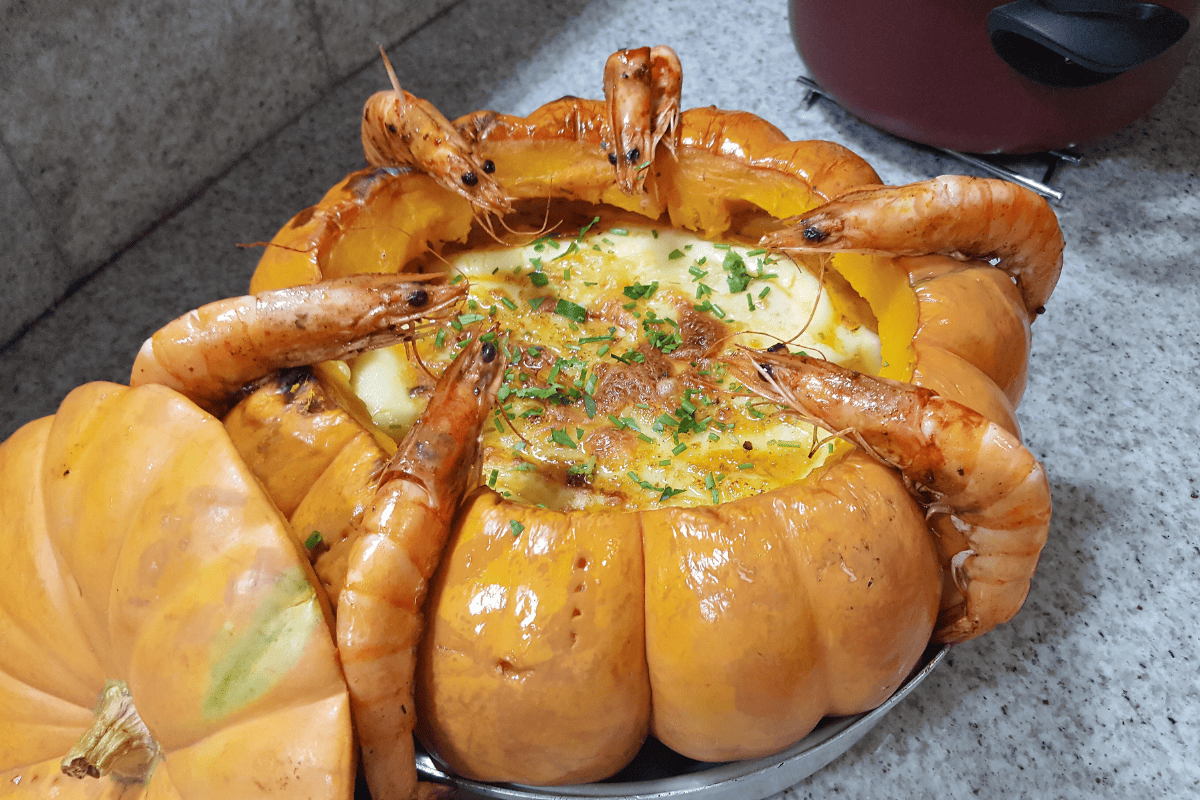
Camarao na moranga is another favorite recipe at Christmas time in Brazil, where pumpkins are available year round. In the US, however, pumpkins mean one thing: Fall. This is a perfect meal to eat on a chilly Autumn evening. Not only that, its presentation is beyond compare: creamy shrimp soup in a real, roast pumpkin shell. Trust us, you won’t want to miss trying this stuffed pumpkin recipe this Fall. 

What Pumpkins are Used for Stuffed Pumpkin Soup?

Brazilians use a species of pumpkin called a moranga for this stuffed pumpkin recipe. The American equivalent would be a Cinderella pumpkin-the whimsical, somewhat squat pumpkins with a deep orange color. They are great for roasting and have a sweet, caramelized flavor when roasted. 

Interestingly, the origins of this stuffed pumpkin recipe in Brazil are as fairytale-esque as Cinderella herself. It is said that the first morangas were planted by Japanese political prisoners at the Presídio da Ilha Anchieta penitentiary.

Apparently, the conditions were quite unsanitary, leading many of the prisoners to contract worms. They refused Western medicine in favor of traditional remedies, which included pumpkin seeds. Local Brazilians became intrigued by the supposed remedy, and began buying the extra pumpkins planted at the prison. 

A trader carrying the pumpkins into a nearby town hit a rough patch of roadway, causing one of the pumpkins to roll off and into the sea. Miraculously, the pumpkin washed up on shore. Very coincidentally, the pumpkin was picked up by a seaside chef. When she opened it, it was supposedly full of shrimp. She was inspired to cook the shrimp inside and serve it in the hollowed out gourd. Thus, the first stuffed pumpkin recipe was born. 

This wild story is fun to tell and imagine. The only thing verifiable about it, however, is the general timeline and location when the stuffed pumpkin recipe known as camaro na moranga first appeared: in the 1940s in Sao Paulo. 

Squash Alternatives for Stuffed Pumpkin

While Cinderella pumpkins are typically used in the traditional Brazilian stuffed pumpkin recipe, other varieties of squash will do. Acorn squash, buttercup squash, and sugar pumpkins work well, especially if you want to make individual portions. If you want a slightly larger pumpkin “bowl,” you can also use Kobocha squash

What Type of Shrimp for Camarao na Moranga?

For your shrimp stuffed pumpkin recipe, you’ll want to use medium or large shrimp. This ensures everyone gets a generous helping of shellfish in every portion. White or pink shrimp is fine. Be sure to use either very fresh shrimp or opt for frozen, if you doubt the quality of the fresh shrimp. 

Brazilian Stuffed Pumpkin Recipe (Camarao na Moranga)

Ingredients:

One large Cinderella, kabocha, or other round roasting squash (8 lbs is good)
1 large onion, diced
3 cloves garlic, minced
Extra virgin olive oil
Kosher salt
1 fresh lime
Freshly ground black pepper
1 can stewed tomatoes
2 tbsp all purpose flour
1 cup fish stock
1/2 cup unsweetened coconut milk
2 lbs medium or large shrimp (raw/thawed, deveined, heads and tails discarded)
Fresh parsley
3 oz grated parmesan cheese
8 oz Brazilian cream cheese (you can substitute American)

Directions:

  1. Roast the pumpkin: Preheat the oven to 350 degrees Fahrenheit. Scoop out all the seeds and pulp. Season the inside of the pumpkin with a drizzle of olive oil, salt and black pepper. 
  2. Replace the top of the pumpkin and wrap the whole gourd in foil. You might need a separate piece to cover the stem. Roast for 45 minutes.
  3. While the pumpkin cooks, heat a large saucepan over medium-high. 
  4. Meanwhile, season the shrimp with salt, pepper, and a squeeze of fresh lime juice.
  5. Add a drizzle of oil to the hot saucepan. Sear the seasoned shrimp for a couple of minutes on each side, then remove. Be sure to reserve any juices produced by the cooked shrimp.
  6. Reduce the temperature to medium and add another drizzle of olive oil. Add in the chopped onions and cook for 2-3 minutes. Then add in the minced garlic and cook for a further 30 seconds or so.
  7. Add in your two tablespoons of flour and mix with the oil to form a rue. Cook for 30 seconds to eliminate the flour taste. 
  8. Slowly pour in your fish stock, whisking constantly. Bring the mixture to a boil to allow it to thicken fully, then reduce heat to medium. As it simmers, stir in the tomatoes and coconut milk. 
  9. Now, stir in the cooked shrimp. Let it warm through for a minute. 
  10. If you haven’t removed the pumpkin, do so now. Leave the oven on 350 degrees Fahrenheit.
  11. Carefully mop up any pumpkin juice with a paper towel. When the pumpkin is dry and cool enough to touch, spread the cream cheese all over the inside. 
  12. Now, ladle in your shrimp stew until the pumpkin is filled to the top. Sprinkle it with the parmesan cheese, and put it back in the oven (uncovered).
  13. Bake for 15-20 minutes, until the top has formed a golden crust.
  14. Garnish with fresh parsley. 
  15. Serve this stuffed pumpkin recipe over Brazilian rice. Be sure to scoop out a little pumpkin flesh with each spoonful. The combination of shrimp stew and fresh roasted pumpkin is a match made in Heaven. 

More Great Brazilian Recipes to Try:

Brazilian Collards with Bacon (Couve Mineira)

Brazilian collards alongside feijoada black bean stew and rice

Collard greens, known as “couve” in Portuguese, play a significant role in Brazilian cuisine. They are a staple side dish often served alongside traditional Brazilian dishes like Feijoada (a black bean stew with pork) and grilled meats. Collard greens are not only delicious but also nutritious, providing essential vitamins and minerals that complement the richness of many Brazilian dishes. Today’s recipe is called couve mineira, a wildly popular version of Brazilian collards with bacon. 

Are Brazilian Collards Good For You?

Brazilian collards often incorporate light frying and bacon, but this does not detract from the inherent nutritional value of the collards themselves. A part of the cruciferous family (along with broccoli, cabbage, Brussels sprouts, etc.), collard greens are low in calories and high in dietary fiber. 3.5 oz of boiled collards also contains nearly four times your daily value of Vitamin K, a vitamin essential for blood coagulation and binding calcium to your bones and tissues.

Like other leafy greens, collards also provide a decent punch of Vitamin C and Vitamin A, along with important minerals like iron and manganese. 

If you want a lighter version of this recipe, simply omit the bacon and use just the extra virgin olive oil for frying. It’s equally delicious!

Brazilian Collards vs Southern Collards

In the US, collards are a staple of Southern cooking. More specifically, they hold cultural importance in Black Southern cuisine. Collard greens were often grown in home gardens by slaves to supplement meager rations. They were prized for their hardiness both during the winter and in the sweltering summer heat.  

Today, collards continue to be an important side dish throughout the South and hold a special place in the category of Soul Food. Southern collard greens are usually rough-chopped or torn into bite-sized pieces, then slow-simmered in broth with a smoky piece of protein, such as a turkey leg. 

While Brazil has an abundance of African influence in its cuisine, it is likely that collards made their way to the country via Portuguese colonists. Collard greens are a favorite ingredient in many Portuguese dishes, such as caldo verde, a hearty green soup. 

Unlike Southern collards, Brazilian collards are not usually slow-cooked. Rather, they are typically sliced into thin strips. The smaller size means they cook more quickly, lending themselves to sauteeing versus boiling or simmering. 

Substitutes for Brazilian Collard Greens

While most Brazilians will argue staunchly against using anything but collard greens for this recipe, you can substitute kale or even shaved brussels sprouts if you prefer. Swiss chard would also be acceptable, since it maintains its “bite” after a light sautee. You won’t want to use broccoli or cauliflower, since they won’t cook through with this method. 


Recipe for Brazilian Collard Greens (Couve Mineira)

Ingredients:

1 bunch of fresh collard greens
6 slices of bacon
1 medium onion, finely chopped
2 cloves garlic, minced
Salt and black pepper to taste
Red pepper flakes (optional, for a spicy kick)
Extra virgin olive oil

Instructions:

  1. Wash the collard greens thoroughly under cold running water to remove any dirt or sand. Drain and pat them dry with a kitchen towel or paper towels.
  2. Remove the tough stems from the collard greens by folding each leaf in half lengthwise and cutting along the stem. Discard the stems or save them for making vegetable stock.
  3. Stack the collard green leaves on top of each other, roll them into a tight cylinder, and slice them into thin strips (about 1/4-inch wide). This technique is known as chiffonade.
  4.  In a large skillet or frying pan, cook the bacon over medium heat until it becomes crispy. Remove the bacon slices from the pan and place them on paper towels to drain excess fat. Once cool, crumble the bacon into small pieces and set it aside.
  5. Drain all but a tablespoon of the bacon fat from the pan. If needed, add a drizzle of extra virgin olive oil. Add the chopped onion and minced garlic. Sauté them until they become translucent and fragrant.
  6. Add the sliced collard greens to the skillet, tossing them with the onions and garlic. Cook for 5-7 minutes, stirring occasionally, until the collard greens are tender and slightly wilted. If needed, you can cover the skillet for a few minutes to help them cook faster.
  7. Season the collard greens with salt, black pepper, and red pepper flakes (if desired). Be cautious with the salt, as the bacon already adds saltiness.
  8. Return the crumbled bacon pieces to the skillet and mix them with the collard greens.
  9. Taste and adjust the seasoning as necessary. If you prefer a slightly crispy texture, you can cook the collard greens for a few additional minutes.
  10. Once the collard greens are tender and well-seasoned, remove the skillet from heat.

Serve your Brazilian collards as a side dish to complement your favorite meals. Enjoy!

What To Eat With Collards

Brazilian collards go well with a wide variety of dishes. They are a must with feijoada, but are just as tasty with a medium rare skirt steak or picanha roast. If you can’t make up your mind, why not try a hand-curated box of premium cuts of beef, lamb, and pork delivered right to your door? Texas de Brazil’s online butcher shop features complete boxes and a la carte options to suit every taste. Get one for you and a friend for a truly elevated barbecue experience! 

Black Eyed Peas and Rice (Baiao de Dois)

Black eyed peas and rice in black serving dishjump to recipe button

With the cooler months approaching in the US, we are getting more excited for comfort food. Today’s recipe is a perfect weeknight meal to fight the chill and feed the soul (and belly). Black eyed peas with rice is simple and so filling it is easily a standalone dish, though you can certainly use it as a side as well. Even better: it’s a one pot meal, so cleanup is a breeze. 

Baiao de Dois Meaning

Baiao de Dois does not actually translate to “black eyed peas and rice.” The baiao is actually a style of music thought to have originated among the Amerindian tribes of Northeastern Brazil. It is characterized by a signature duple meter rhythm, accomplished with the steady beat of a zambia (bass drum). Over time, the addition of instruments reflects the influence of other cultures arriving in Brazil: atabaque drums from Africa, and an accordion from Europe, for example. 

The baiao is also a reference to a dance style that accompanies the music. It was popularized in the 1940s by Luiz Gonzaga, whose efforts to bring the style to the masses included a hit called “Baiao de Dois” (dance for two). 

Over time, the special dish of black eyed peas and rice became affectionately known as “Dance for Two,” or baião de dois. A hearty, flavorful blend of slow-simmered black eyed peas with fluffy rice is, indeed, a perfect combination that dances on the tongue. 

Fresh vs Canned Black Eyed Peas

Baiao de dois traditionally uses fresh black eyed peas. They can be found in Brazilian markets alongside other fresh legumes, like green peas and edamame. They are not so easily found in the US, however. If you can’t find fresh black eyed peas, we recommend you use frozen, not canned. Canned black eyed peas can have a metallic taste and mushy texture. We want the al dente bite and earthy flavor of the fresh legume for our black eye peas and rice. 

Other Ingredients in Black Eyed Peas and Rice

The dance for two that is our black eyed peas and rice does involve a few other players, including meat and aromatics. Original recipes often used carne seca, but modern recipes often substitute bacon. Another great thing about this dish is that it is customizable: you can add what you have on hand, or omit something you don’t like. In Brazil, the dish is often served on special occasions, and every family has their own spin. 

One of our preferred substitutions is collards or kale in place of the traditional cilantro. Just be sure to add the greens a little sooner than you would the cilantro to let the leaves tenderize enough. 

What Kind of Rice for Baiao de Dois?

You can use any kind of rice you like for this recipe. Brazilians typically favor long-grain rice, since it has less starch and therefore a less glutinous, or sticky, texture. But again, you can use what you have. If you want less starch on a short grain variety, just rinse it a few times with cold water. 

Brazilian Black Eyed Peas and Rice Recipe (Baiao de Dois)

Ingredients:

1 small yellow onion, diced
3 cloves garlic, minced
Six strips of bacon
½  cup fresh cilantro, chopped
1 lb (16 oz) fresh or frozen black-eyed peas
10 oz rice
2 cups water
1 cup stock (chicken or vegetable)
1 cup mozzarella cheese
2 tsp salt (more to taste)
Freshly ground black pepper

Directions:

  1. Cook the bacon in a large saucepan until crisp, then remove to a plate with paper towels to drain excess grease. Crumble or roughly chop into bite-sized pieces with a sharp knife. 
  2. Drain all but a tablespoon of bacon grease from the pan and return it to the heat of medium. Add in a drizzle of extra virgin olive oil, then toss in your diced onions. 
  3. When the onions have softened (1-2 minutes), add in the minced garlic and cook for a further 30 seconds. 
  4. Add in the black eyed peas, crumbled bacon, salt, black pepper, and 2 cups of water. Bring to a boil, then reduce the heat to medium-low and simmer. Cover the pot and cook for 30 minutes.
  5. After thirty minutes, check to see if the peas are tender. If they are ready, stir in the 1 cup of stock and the rice. Bring the mixture to a boil once more, then reduce to medium low. Cover, and cook for another twenty minutes, or until the rice is tender. If you need, you can add more liquid (stock or water) to the rice during the cooking process. 
  6. Taste for salt and add more if needed. 
  7. Finally, stir in the mozzarella cheese and fresh cilantro. Top your black eyed peas and rice with a little more cheese and herbs, if you like. 

Enjoy!

More Great Brazilian Recipes to Try:


Montaditos

montaditos with cured ham

Spanish Sandwich Morsels in Brazil

It is estimated that there are between 10 and 15 million Brazilians of Spanish descent. During peak immigration, Spain represented the third largest population of immigrants to the country. It is no surprise, then, that Spanish culture and cuisine have become an integral part of the nation’s identity. Tapas, for example, is very popular in Brazil. This Spanish tradition of sharing small plates lends itself naturally to the Brazilian love of food, friends, and nightlife. A favorite small plate is the montadito, an open-faced sandwich meant to be consumed in a bite or two. The dish can be customized with all sorts of toppings depending on local preferences. 

What Are Montaditos?

Montaditos are, essentially, bite-sized, open-faced sandwiches. Various toppings are traditionally served on slices of french baguette, either toasted or fresh (other types of bread may be used, however). 

The term “montadito” itself derives from the Spanish word “montar,” which means “to mount” or “to place on top.” It is a reference to the meats and cheeses piled atop the bread slices. Interestingly, the word “montar” in Portuguese means “to assemble,” also a relevant description. 

Montaditos were likely the first type of sandwich ever eaten in Spain. There is evidence of such sandwiches as early as the 15th century, when it was not uncommon for peasants to use a slice of bread as a plate. Hardened bread was fashioned into a “trencher,” or hollowed out dish to accommodate any available food. 

Such dishes allowed for even the stale bread to have use, since certain toppings might soak into it and make it edible. This practice may date even farther back than the middle ages to Ancient Rome, when fresh pressed olive oil could be sampled with a slice of bread.

Montadito Topping Ideas

The beauty of montaditos lies in their versatility. From savory to sweet, there’s a wide array of toppings to suit every palate. Brazilian favorites include:

  1. Jamón Ibérico: Thin slices of the renowned Spanish cured ham, jamón ibérico, adorn many montaditos. The silky texture and rich flavor of the ham provide a delightful contrast to the crunch of the bread.
  2. Manchego Cheese: Aged and nutty, manchego cheese adds a delightful richness to montaditos. It can be paired with quince paste or drizzled with honey for a perfect sweet-savory balance.
  3. Chorizo: Slices of spicy chorizo sausage bring a burst of flavor to montaditos. The smoky and tangy notes of chorizo are often offset with fresh tomatoes or a sweet tomato spread.
  4. Roast Beef: a Brazilian meal is rarely complete without a little red meat, and that includes montaditos. 
  5. Roasted Peppers: Sweet and smoky roasted red peppers add a burst of color and a touch of sweetness to the montadito.
  6. Anchovies: These small fish are a favorite topping, offering a briny and umami-packed punch that tantalizes the taste buds.
  7. Paté: Various types of paté, such as duck liver or seafood paté, add a creamy and luxurious element to montaditos.
  8. Brie: a French twist often combines the creamy Brie cheese with vegetarian montadito options, like juicy tomatoes or fried eggplant. 

Montaditos vs Crostini

Crostini are an Italian dish that is very similar to montaditos. However, where montaditos always constitute some kind of topping, crostini may be served simply toasted and with a brush of olive oil. They are also considered an “antipasti,” or appetizer, as opposed to a small course. 

Bruschetta are another Italian bread dish that incorporates toppings over grilled toast. These are most often associated with fresh vegetable and herb toppings, such as the ubiquitous tomato and basil combo. But, like montaditos, they can be endlessly customized. 

Simple Montadito Recipe

Ingredients:

1 loaf of French baguette
4 ounces parmesan or pecorino cheese
4 ounces capicola
1 jar fig preserves
Small handful of Arugula
Extra virgin olive oil
Kosher salt

Directions:

  1. Preheat the oven to 350 degrees fahrenheit. 
  2. Slice your baguette into thin slices, 1-2 inches wide.
  3. Put the slices on a lined baking sheet and drizzle each with a little olive oil and a dash of salt. 
  4. Toast the bread until it is golden brown, around 10 minutes. 
  5. When the toast is cool enough to handle, spread each slice with a generous amount of fig preserves. 
  6. Layer each montadito with a slice or two of capicola, a thin slice of parmesan, followed by a garnish of arugula. 

Enjoy with a glass of Spanish rioja or a refreshing caipirinha. 

More delicious Brazilian Recipes to try:

Macarronada (Brazilian Spaghetti Bolognese)

macarronada pasta with meat sauce

Around 30 million Brazilians have Italian ancestry, so it is not surprising that pasta dishes are very popular. It is even available as a fast food option: the beloved restaurant chain, Sprato, has over 200 locations in Brazil! You line up and select your type of pasta, sauce, and toppings much like you’d build a sandwich at Subway. But pasta is easy enough to make at home, and today’s recipe for macarronada is no exception. Traditional macarronada is a Brazilian version of spaghetti bolognese: ground beef, garlic, tomatoes, wine, and herbs are simmered for hours until they develop a supremely savory and complex flavor. Get ready for your new Sunday dinner favorite. 

Do Brazilians Eat Spaghetti?

Of course! As we mentioned above, Italian cuisine is very popular in Brazil. It was originally brought by immigrants in the late 19th century. Today, Italian dishes like pasta, pizza and lasagna are a staple of Brazilian cuisine. Macarronada was, until recently, the traditional meal to eat on Sundays after mass. It is sometimes still referred to as “macarronada de domingo,” or “Sunday pasta.”

Like other dishes, however, many Brazilians like to put a spin on these traditional recipes. It is not uncommon to find pasta sauces made with sliced green olives, sweet corn, or peas. We’re sticking with a more traditional bolognese (we’re keeping the olives, though).  

Macarronada translates to “pasta,” but it is often used to refer to spaghetti in particular. That being said, you can use any type of pasta you want for this bolognese recipe. We like spaghetti noodles because all the nooks and crannies between them means you’ll get a taste of delicious, meaty sauce in every bite. But pappardelle would also be delicious, or fettuccine. 

Macarronada Recipe

Ingredients:

1 pound lean ground beef
3 cloves garlic, minced
1 small onion, diced
6 strips of bacon
¾ cup white wine
One 14 oz can crushed tomatoes
2 oz tomato paste
¼ cup diced green olives
1 cup beef stock
8 oz spaghetti noodles
Parmesan cheese
Extra virgin olive oil
Salt and pepper,  to taste

Directions:

  1. Bring a large skillet to medium high heat. Add in the bacon and cook until crisp. Remove and strain over paper towels. When cool to the touch, chop into small pieces.
  2. Reserve a tablespoon of the bacon fat and add in your ground beef. Season with salt and pepper. Cook until evenly browned. Remove and strain excess grease.
  3. Return the skillet to the stove and bring back up to medium. Add a drizzle of extra virgin olive oil. Add in the tomato paste and let it cook for a minute or two on its own. Then, stir in the chopped onion and cook until softened and translucent (2-3 minutes). 
  4. Add in the garlic and cook for a further 30-60 seconds, just until fragrant.
  5. Deglaze the pan with the wine. 
  6. Add in the beef, bacon crumbles, tomatoes, olives, and beef stock. 
  7. Bring the mixture to a rolling simmer. Reduce heat to low and cover the pot with a well-fitting lid.
  8. Simmer on low for two hours, or until you have a thick, uniform ragu for your macarronada.
  9. During the last fifteen minutes of cooking, bring another large pot of salted water to a boil. Add in your spaghetti and cook until it is al-dente. Strain and toss with a little olive oil. 
  10. Taste your macarronada sauce for salt. Add in more if necessary.
  11. Serve a generous ladle of the sauce over a portion of noodles. Garnish with basil or fresh parsley and parmesan cheese. 

More Great Brazilian Recipes to Try:


Back to Basics: Perfect Brazilian Rice

Brazilian rice with feijoada, collards, and orange slices

Garlicky Brazilian White Rice Side Dish

Along with black beans (feijao), white rice is the most common side dish in Brazil. It is prepared in a signature way that ensures the grains remain loose, not sticky. It is a simple but satisfying dish that compliments virtually every meal. Don’t let its simplicity fool you, though. There are a few key steps you must take in order to prepare the perfect Brazilian white rice. Not to worry: we’ll share our go-to recipe for flavorful, fluffy arroz Brasileiro so you get it right every time. 

History of Rice in Brazil

There is evidence that rice was cultivated by the indigenous peoples of the Amazon nearly 4000 years ago. Archaeologists believe these prehistoric groups developed a method for manipulating and reproducing wild rice. Unfortunately, this method was lost, likely due to the fact that the indigenous people were decimated by early colonists. 

In an ironic turn of events, Portuguese colonists in the 17th century began to experiment with rice cultivation in Brazil. The climate of the southern region proved especially arable for the crop, which became a protected national staple by the early 19th century. 

What Rice is Used in Brazilian Rice?

Brazilians prefer long-grain rice. This type of rice has less starch, which allows the grains to remain separate as opposed to sticking together. Prior to boiling, Brazilian rice is lightly fried in oil and refogado. Refogado is its own Brazilian staple: a sofrito-style blend of onions, garlic, and olive oil that has been blended into a paste. Many keep a jar handy in the fridge, since it acts as the base flavor for so many dishes. 

You can add other aromatics to your refogado to suit your own tastes. Popular additions in Brazil include tomatoes and bay leaves. Some recipes call for you to simmer the ingredients prior to storing in a jar in the fridge. But this is not necessary for our Brazilian rice, since we will be sauteeing the refogado in oil with the rice. This will cook out the strong flavors of the onion and garlic. 

Do You Have to Use Sofrito for Brazilian Rice?

No, you can just finely mince fresh onion and garlic and sautee these in the pan with the long grain rice. You will have more of a “bite” than with the prepared refogado, since there will be larger, heterogenous pieces. If you prefer your rice more uniform, we suggest preparing the aromatics ahead of time in the refogado style. 

Easy Refogado Recipe for Arroz Brasileiro

Ingredients:

1 small yellow onion
2 large heads of garlic (heads, not cloves! We know, it’s a lot of garlic, but it’s important)
¼ to ⅓ cup of extra virgin olive oil

Directions:

  1. Peel and roughly chop the onion. Smash and peel the cloves of garlic from the two heads. You can make it a little easier on yourself by buying pre-peeled cloves of garlic. You’ll need about a cup total of individual cloves.
  2. Add the garlic and onion and ¼ cup of olive oil to a food processor. Pulse until you have a paste. If it is still chunky, add a little more olive oil.

Now let’s get to the main event: perfect Brazilian rice!

Brazilian Rice Recipe with Refogado

Makes about four servings

Ingredients:

2 cups long grain white rice
2 tbsp extra virgin olive oil
1 tbsp prepared refogado OR ¼ diced yellow onion and 2 minced garlic cloves
1.5 tsp salt
4 cups water

Directions:

  1. Heat a large saucepan over medium heat. Add in the olive oil and the rice. Stir constantly until you see some grains begin to toast (they will take on a light golden color). This should take around 3 minutes. 
  2. When the rice starts to turn golden, add in the refogado or minced aromatics. Stir and cook along with the rice for another 2 minutes.
  3. Add in the water and salt and bring the mixture to a boil.
  4. Reduce the heat to low, then cover. Simmer on low for 25 minutes, or until all the water has been absorbed. 

Serve hot with feijoada and your favorite protein. We love this as a satisfying lunch with some carne seca, or a special meal with Brazilian flank steak

More Great Brazilian Recipes to Try:


Chicken Milanesa (Crispy Breaded Chicken Cutlets)

Chicken milanesa with a lemon wedge and fried potatoes

When something is prepared “a milanesa” in Brazil, it generally means some kind of meat has been pounded thin, breaded, and fried crisp. Americans have similar recipes that use this technique, such as chicken fried steak and the borrowed German dish, schnitzel. Brazilians tend to favor poultry and beef over pork, so today we will be making chicken milanesa. Served simply with a squeeze of lemon or on top of a toasted brioche bun, chicken milanesa is an easy comfort food dish that is perfect for a busy weeknight meal. 

Why is it Called Chicken Milanesa?

In English, Chicken a Milanesa is known as “Milanese Chicken” or “Milan Chicken.” This is because the particular dredging and frying style has origins in Milan, Italy. Traditionally, veal was the meat of choice, but beef, pork, and chicken are also popular options. 

The Milanese method of preparing fried meat is a series of steps: 

  1. The meat is pounded thin to tenderize and allow it to cook quickly and evenly.
  2. The pounded cutlet is dredged in flour.
  3. The meat is dipped in a beaten egg mixture.
  4. The meat is dipped into seasoned breadcrumbs.
  5. The meat is pan-fried in oil until crisp and golden.

Vegetarian Milanese Chicken

Again, Milanese-style refers more to the dredging method and less to the actual protein used. This means you can easily substitute vegetarian options and fry them the same way you would chicken, beef, etc. 

Eggplant works well as a substitute, since it has a firm texture. You could also use firm tofu or tempeh; however, when using vegetables, soybean products, or other vegetarian options, skip the step where you pound it flat. You’ll just wind up with a crumbly or slimy mess that does not lend itself to dredging and frying. 

Sauce for Chicken Milanesa

Chicken Milanese is traditionally served with a lemon wedge. It is a refreshing way to cut through what might otherwise be a somewhat greasy dish. You can elevate that twist of citrus by incorporating lemon juice and a little zest in a creamy, tangy butter sauce:

Chicken Milanesa Lemon Garlic Cream Sauce

3 oz unsalted butter, cut into 1-inch pats
2 cloves garlic, minced
6 oz dry white wine
8 oz chicken stock
8 oz heavy cream
Juice of two lemons
1 tsp lemon zest
½ tsp salt (more to taste)
Freshly ground black pepper

Simply melt one pat of butter in a saucepan over medium heat. Saute the garlic until fragrant, then add in the wine, stock, heavy cream, salt, and a few twists of freshly ground black pepper. Bring to a boil and then lower to a high simmer. When the mixture has thickened, add in the remaining butter, lemon juice, and lemon zest. Stir until the butter is melted. 

Milanese Chicken Sandwich

If you want to use your breaded chicken a milanesa for a sandwich, do so by all means! Lightly toast a brioche or potato bun and spread a little mayo or aioli on it. Top the chicken with some fresh lettuce and a thick slice of tomato, and you’ve got a chicken sandwich to rival your favorite fast food place. 

Panko vs Italian Breadcrumbs for Milanese Chicken

As an Italian recipe, traditional chicken milanesa calls for Italian-style breadcrumbs. However, we like to incorporate a little panko as well for added crunch. Panko breadcrumbs are much larger than their finer, Italian counterparts; adding them thickens the crust a bit and makes it all the crispier.

Recipe for Chicken Milanesa

Ingredients:

Serves 4

4 chicken breast cutlets (around 6 oz each)
½  cup seasoned Italian breadcrumbs
½ cup panko
½ cup all purpose flour
1 oz freshly grated parmesan or pecorino cheese
2 large eggs
1 tsp lemon zest
Salt
Freshly ground black pepper
Vegetable oil

Directions:

  1. Pound the chicken cutlets to a thickness of about ¼”. An easy way to do this is to place one on a cutting board, cover it with cling film, and pound with a meat tenderizer. Season each cutlet with salt and pepper.
  2. Set up your chicken milanesa dredging station: put the breadcrumbs, lemon zest, and parmesan cheese in one shallow bowl and mix to combine; put the eggs in another bowl and whisk thoroughly; finally, put the flour into another shallow dish and season lightly with salt and pepper. Mix to combine.
  3. Put around one cup of vegetable oil in a heavy skillet and heat over medium high heat. To see if it is ready, toss a few breadcrumbs in. If they sizzle right away, the oil is hot enough. The oil should be shimmering, not smoking. If this is the case, remove it from the heat and let it cool down a little.
  4. Take one of your chicken cutlets and coat it with the flour mixture. Shake it to remove any excess, then dip it into the egg mixture. Let any extra egg drip off before finally coating the chicken in the breadcrumb and cheese mixture. Repeat this process with each of your cutlets.
  5. Fry the cutlets in the oil until they are crisp and golden brown (about 3 minutes per side). Transfer them to a baking sheet lined with paper towels to drain any excess oil. 
  6. Serve your beautiful chicken milanesa with a fresh lemon wedge or with your lemon garlic cream sauce (see above). Enjoy!

More Great Brazilian Recipes to Try:


Smoked Mac n Cheese (Maccaronada com Requeijao)

smoked Brazilian mac n cheese with penne noodles

Smoked Pasta with Brazilian Cream Cheese

When it comes to comfort food, few dishes rival good, old-fashioned mac n cheese. Creamy, gooey, and flavorful, it is a perfect meal on its own, and a glorious accompaniment to churrasco. If you thought you couldn’t elevate  this staple dish, any further, prepare to be amazed:mac n cheese can be smoked right along with your favorite proteins. The smoke adds a whole new element to an already flavor-packed and decadent pasta dish. What’s more, it’s easy! Read on for a fabulous recipe for smoked mac n cheese. We have a feeling you won’t be going back to baked any time soon. 

Mac n Cheese in Brazil

Brazilians love cheese, so it’s no surprise that mac n cheese is nearly as popular there as it is here in the US. Of course, there are a few distinctly Brazilian ingredients that set the dish apart from its American cousin. The cheeses are a couple of national favorites you’ll find in nearly every dish that calls for dairy: mozzarella and requeijao. These milder cheeses are ideal when making a smoked mac n cheese, since the flavors won’t overpower that smoky element. 

Brazilian mac n cheese is also typically made with penne, not elbow macaroni. The grooves in penne allow the creamy sauce to fully coat each noodle, and the bigger size keeps the noodles a little more separated than in traditional mac n cheese. This is definitely more of a pasta than a casserole, although Brazilians don’t shy away from baked dishes either. 

Finally, our smoked Brazilian mac n cheese incorporates a little tomato goodness. Topped with parmesan cheese, the final product has an italian flare not dissimilar to baked ziti, but far creamier. 

Can You Freeze Smoked Mac n Cheese

Sure. Frozen smoked mac n cheese will keep for up to six weeks in your freezer. For best results, defrost or fully thaw the mixture before re-heating. This allows the sauce to melt evenly. You may need to add a little fresh cream to smooth out lumps that may have formed while freezing. 

Cheese Substitutes for Mac n Cheese

Requeijao is not commonly found in stores in the US. Luckily, you can easily make homemade Brazilian cream cheese. If this is a little more effort than you’d like, you can substitute American cream cheese. 

We are sticking with mozzarella cheese for our smoked mac n cheese. However, there are a few different cheeses that would be very well suited to a little smoke flavor: gouda, provolone, havarti, or, of course, cheddar. 

What Wood Chips for Smoked Mac n Cheese?

Mild wood chips are best for a good, but not overwhelming, smoke flavor. Try cherry, pecan, or applewood chips. 

Recipe for Smoked Mac n Cheese (Maccaroneda com Requeijao)

Ingredients: 

1 lb dried penne (16 oz)
1 onion, finely chopped
2 cloves of garlic, minced
Extra virgin olive oil
1 cup tomato sauce
1 cup heavy cream or whole milk
1 cup requeijão (Brazilian cream cheese)
1 cup shredded mozzarella cheese
1 oz shredded or grated parmesan cheese
Salt and pepper to taste
Fresh parsley, chopped (for garnish)

Directions:

  1. Preheat your smoker to 225 degrees Fahrenheit.
  2. Bring a large pot of salted water to a rolling boil. Add in the penne and cook until al-dente. Strain and toss with a little olive oil. Reserve ¼ cup or so of the pasta water. 
  3. While the pasta cooks, heat a large, heat-safe skillet over medium heat (cast iron works well).
  4. Add in a drizzle of extra virgin olive oil. Saute the onion until translucent. Then add in the garlic and cook for a further 30 seconds, just until fragrant. 
  5. Add in tomato sauce and a splash of the reserved pasta water. Add a few twists of freshly ground black pepper and kosher salt (we used 1.5 tsp). Bring the mixture to a high simmer, then reduce to medium, cover and cook until it has thickened (around 5 minutes).
  6. Now, stir in the heavy cream. Heat the mixture to a boil, then remove from the heat.
  7. Add in your mozzarella cheese and cream cheese, stirring constantly off the heat until all the cheese is melted. 
  8. When the sauce has come together, pour in the penne noodles and stir until evenly coated. 
  9. Top the smoked mac n cheese with the shredded parmesan cheese.
  10. Transfer the pan to the smoker and “bake” for 45 minutes to one hour. Keep an eye on the mixture so it doesn’t dry out. 
  11. Top finished smoked mac n cheese with fresh parsley. Enjoy!

More Great Brazilian Recipes to Try:


Pastel de Queijo (Brazilian Cheese Pastry)

pastel de queijo on a serving platter with dipping sauce

Pastels are a favorite street food in Brazil. They are essentially a hand pie, and can be stuffed with all sorts of delicious fillings, both savory and sweet. Today, we are opting for simplicity and making pastel de queijo. Mild and gooey cheese is encased in a crisp, fried crust for a truly decadent and satisfying treat. 

Where Does Pastel de Queijo Come From?

The exact origin of pastels in Brazil is not known. However, many attribute the first recipes to Chinese immigrants. This is due to the similarity between the pastel’s crust and a fried spring roll wrapper. It is thought that Chinese Brazilians adapted their spring roll recipes to suit different tastes, substituting traditional fillings with local ingredients. 

Another theory suggests that Japanese immigrants were the first to popularize pastels. During WWII, prejudice against Japanese immigrants grew immensely due to the country’s alliance with Germany. In order to escape persecution, many Japanese Brazilians posed as Chinese, adopting clothing and traditions to disguise their true heritage. Making food with typically Chinese ingredients may have been another way to maintain this facade. 

Whatever the history, pastels have become an integral part of Brazilian fast food cuisine. The fillings reflect regional tastes: shrimp and cod are popular in Bahia, while São Paulans favor ground meats. Other common fillings include heart of palm, shredded chicken, requeijao, and, of course, cheese. 

What Kind of Cheese is Best for Pastels?

Traditional pastel de queijo uses a mild cheese, like mozzarella or Minas cheese; but you can use any kind of cheese you like, so long as it is suitably melty. Whatever you might use for a fondue, you can use for a pastel de queijo: 

  • Gruyere 
  • Emmental
  • Cheddar
  • Gouda
  • Havarti
  • Provolone

Feel free to use a blend of your favorites as well. We are sticking with mozzarella and a little aged white cheddar today, but the sky’s the limit for your cheesy filling. 

Tips for the Perfect Pastel de Queijo Crust

The crust is very important for pastels: you want a crisp, crunchy texture that is thick enough to hold in all that cheesy goodness, but not so thick it’s hard to eat. Your crust should also have bubbles (remember the spring roll wrapper relationship?). 

The bubbles in your pastel de queijo crust are achieved via two key ingredients: alcohol and vinegar. Traditional Brazilian pastels use cachaca for the alcohol, but you can substitute any grain alcohol (rum, vodka, etc.). The alcohol does not impart much taste, as it cooks off during frying. It is simply a means of attaining that light, bubbly crust. 

Another important step in ensuring the best crust for your pastel de queijo is letting the dough rest. As with other pastry dough, this allows the gluten in the flour to relax. If you attempt to roll out and cut the dough without resting it, your crust will be tough.

Pastel Dipping Sauce

Pastel de queijo is sometimes served with hot sauce. You can certainly do this with yours, especially if you like heat. We like to pair ours with a little hot honey. In a microwave-safe container, mix half a cup of liquid honey with a tablespoon of red chili flakes (more, if you want spicier). Add in a tablespoon of apple cider vinegar and stir to combine. Heat the mixture in the microwave for two fifteen-second bursts. Let the mixture sit for a few minutes to allow the chili flakes to infuse, then strain them out. Voila!

Freezing Pastel de Queijo

You can easily prepare pastels ahead of time and freeze them until ready to use. Assemble them as you would right before frying, then place them on a baking tray and put them in the freezer. When they have hardened, transfer the pasteis to an airtight container (you may want to wrap them individually in parchment to prevent sticking). The frozen pastel de queijo will keep for up to 4 months. When you are ready to use them, fry them as you would below, keeping in mind you may need a little extra frying time. 

Recipe for Pastel de Queijo (Brazilian Cheese Pastries)

Ingredients:

For the Crust

3.5 cups flour (all purpose)
1 egg
¾ tbsp salt
1 cup cold water
1 oz canola or vegetable oil
1 tsp apple cider vinegar
1 oz grain alcohol (cachaca, rum, vodka, etc.)
Oil for frying

For the Filling

4 oz mozzarella cheese, cubed
4 oz aged white cheddar cheese, cubed

Directions:

  1. In a large bowl, combine the all purpose flour and salt. Add in the egg, water, vinegar, alcohol, and vegetable oil and mix until the dough starts to come together.
  2. Once you have a soft and pliable dough, knead it on a clean surface for about five minutes until it becomes smooth and elastic. Return the dough to the bowl and cover it with a damp cloth. Let the dough rest for 15-30 minutes.
  3. After the resting period, divide the dough into smaller portions (about the size of a large marble) and roll each portion into a thin, circular disk. You want around 3-4 inches in diameter. Repeat this process for the remaining dough. 
  4. Place 1 cube of each type of cheese in the center of each disc. Fold the dough over the cheese to form a half moon shape. Press the edges firmly to seal the pastel, using a fork to crimp the edges.
  5. In a large frying pan, add enough oil to cover the pasteis de queijo. Heat the oil to 350 degrees Fahrenheit (175 degrees Celsius). To check if the oil is ready, drop a small piece of dough into the oil. If it sizzles and quickly rises to the top, the oil is ready.
  6. Carefully slide the pastel de queijo into the oil and fry until golden brown on both sides, flipping once during the process. Fry in batches and avoid overcrowding the pan. It usually takes about 3-4 minutes per side, but keep an eye on them to prevent burning.
  7. Once done, remove the pastels from the oil using a slotted spoon and transfer them to a paper towel-lined plate to drain excess oil.
  8. Let the pasteis cool for a few minutes then serve with your hot honey dipping sauce or with a squeeze of lime juice. Enjoy!

More Great Brazilian Recipes to Try:


Bobo de Camarao (Brazilian Shrimp Chowder)

bobo de camarao (shrimp cowder) served over white rice.

In Brazil, bobo de camarao is a kind of shrimp stew. We are leaning more towards a shrimp chowder with our recipe, since we will be blending most of the ingredients for a smoother consistency. If you’re looking for a light yet satisfying weeknight meal or luncheon staple, this is the perfect recipe to add to your arsenal. Let’s take a look at some of the history behind the unique flavors of bobo de camarao, as well as some tips and tricks for attaining the perfect shrimp chowder. 

Bobo de Camarao Ingredients

Brazilian shrimp chowder has its origins in Bahia, a state in the northeastern part of the country that is famous for its blue costs and bustling nightlife. It is also well known for its cuisine, which reflects the area’s rich West African Heritage. (“Bobo de camarao” translates from the Portuguese to “stew of shrimp.”)

Much of Bahia’s cuisine has shared foundations that are derived from African recipes. Natural thickening agents like manioc, okra, and banana starch are still used to bulk up stews like bobo de camarao, while ingredients like coconut milk and dende (red palm oil) add a creaminess and depth of flavor. Chili peppers are also a star ingredient in much of Bahian cooking, tempered by the sweetness of the coconut milk and the tang of tomatoes. 

Of course, as a coastal region, Bahia is also a hub for seafood. Shrimp is a favorite, and it features heavily in many recipes, from stews to street food (related: see our article about the Baianas de Acaraje). 

Cooking with Yuca

Yuca is also known as “manioc,” and it is a staple of Brazilian cuisine. It has similar thickening properties to cornstarch and can easily be substituted for potatoes in many recipes. Today, we are relying on it mainly for its thickening abilities, but also for its unique, nutty flavor. 

Yuca requires a little preparation in order to remain tender and palatable. You will need a vegetable peeler to remove the skin. You will also need to remove the fibrous core in the center. You can just cut around this in the same way you would a mango. 

In some recipes, bobo de camarao will have you cook and mash the yuca separately from the rest of the ingredients. This is not necessary if you shred the yuca beforehand and add it directly to the pot. You will be doing the same with the ginger root. 

Dende Oil Substitutes for Bobo de Camarao

Dende is a crucial ingredient in this shrimp chowder, since it imparts both a unique flavor and gorgeous color. That being said, it may not be readily available in many US grocery stores. If you can’t find dende, which is red, you can substitute regular palm oil, olive oil, avocado oil, or fractionated coconut oil. 

Bobo de Camarao Recipe

Ingredients:

½ large yellow onion, chopped
1 tablespoon dende oil
3 cloves garlic, minced
2 ⅓ cups fresh yuca, core removed, chopped, and shredded*
1 tbsp fresh ginger, grated
2 lbs large shrimp, peeled and deveined
1 can stewed tomatoes or 2 large fresh tomatoes, diced
½ cup red bell pepper, diced
½ cup orange bell pepper, diced
1 jalapeno, diced fine (leave out ribs and seeds if you don’t want it too spicy)
1 can of coconut milk, unsweetened (14 oz)
2 cups water
Juice of one large lime
¼ cup cilantro, chopped

Directions:

  1. Heat a large stock pot or dutch oven over medium heat. Drizzle in the tablespoon of dende oil. 
  2. Saute your chopped onions for three minutes, until softened and translucent. Then add in your minced garlic and cook for one more minute. 
  3. Add in bell peppers and jalapeno pepper. If using fresh tomatoes, add these in now as well.
  4. Add in the shredded fresh ginger, shredded yuca, and chopped cilantro. Pour the coconut milk over the ingredients, along with two cups of water. Stir to combine everything evenly.
  5. Cover the pot and simmer on low heat until the yuca is tender and cooked through (25-30 minutes).
  6. Check the mixture for consistency. If it is too thick or you notice any yuca sticking to the bottom of the pot, add more water to loosen it.
  7. Once the yuca is cooked through, add almost all of it to the belly of a blender. Leave around 2 cups for texture. Blend the rest until smooth, and then add it back to the pot.
  8. Now add in your shrimps and cook until pink and tender. Large shrimp will need to simmer for around 10 to 15 minutes. Check frequently to avoid chewy or tough shrimp!
  9. Garnish with fresh scallions or more cilantro. Enjoy piping hot with crusty bread, Brazilian cheese bread, or over white rice. 

More great Brazilian Recipes to Try:

You´re headed off-site..

Would you like to checkout now?

You're switching shops with items in your cart. Our Gift Card products are sold from a seperate shop than our Butcher Shop & Merchandise products and require seperate checkouts.

If you wish to return to your Gift Card cart, simply navigate back to a Gift Card product page and click the cart icon - if you don't see your products please toggle between our different shopping carts.